Introduction
SmartTest is the online exam platform of TEX Vietnam Technology JSC, built for schools, training centers and teachers. One platform offers three assessment modes:
- Online exam: candidates take the test on a computer or phone, with proctoring and automatic grading.
- Live arena: a game-show style quiz; questions are projected on the big screen and students answer on their phones.
- Answer-card scan: students hold up paper cards and the teacher scans the whole class with one phone.
The screenshots in this guide show the Vietnamese interface; the English interface has the same layout and buttons.
How to run an online exam
- Import the test from Word/PDF (or build it from a question bank, or with AI).
- Organize the exam: choose the mode, the exam and create the subject.
- Set up the subject: time, scoring, security, schedule, proctors.
- Import candidates from Excel.
- Start the exam and send candidates the link or exam code.
- Monitor the exam while it runs.
- Finish and review results: score distribution, gradebook, item analysis.
Getting started
Sign in and sign up
Open the Online exams page and, in the Manage Exams box, click Sign in. You can sign in with email and password or with a Google account.
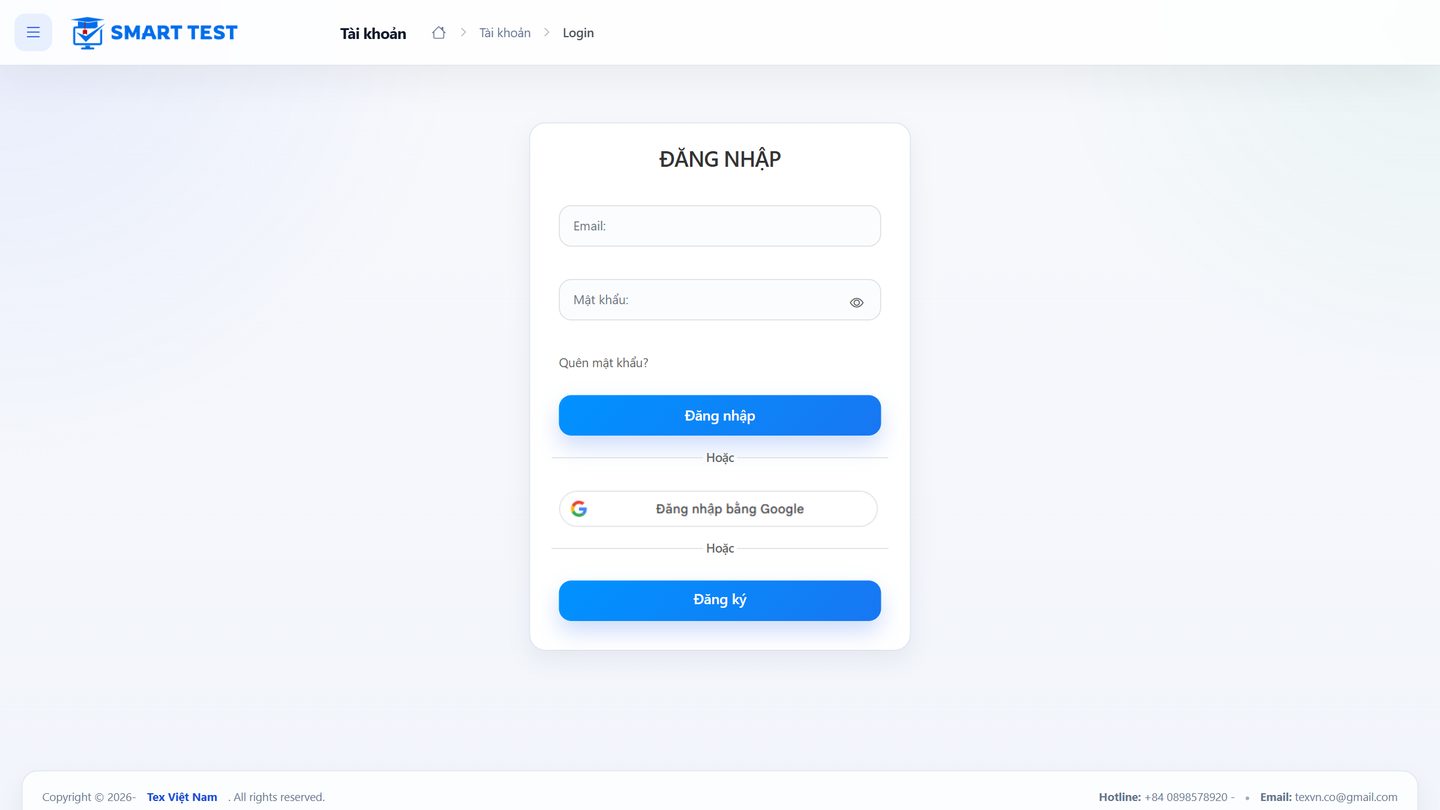
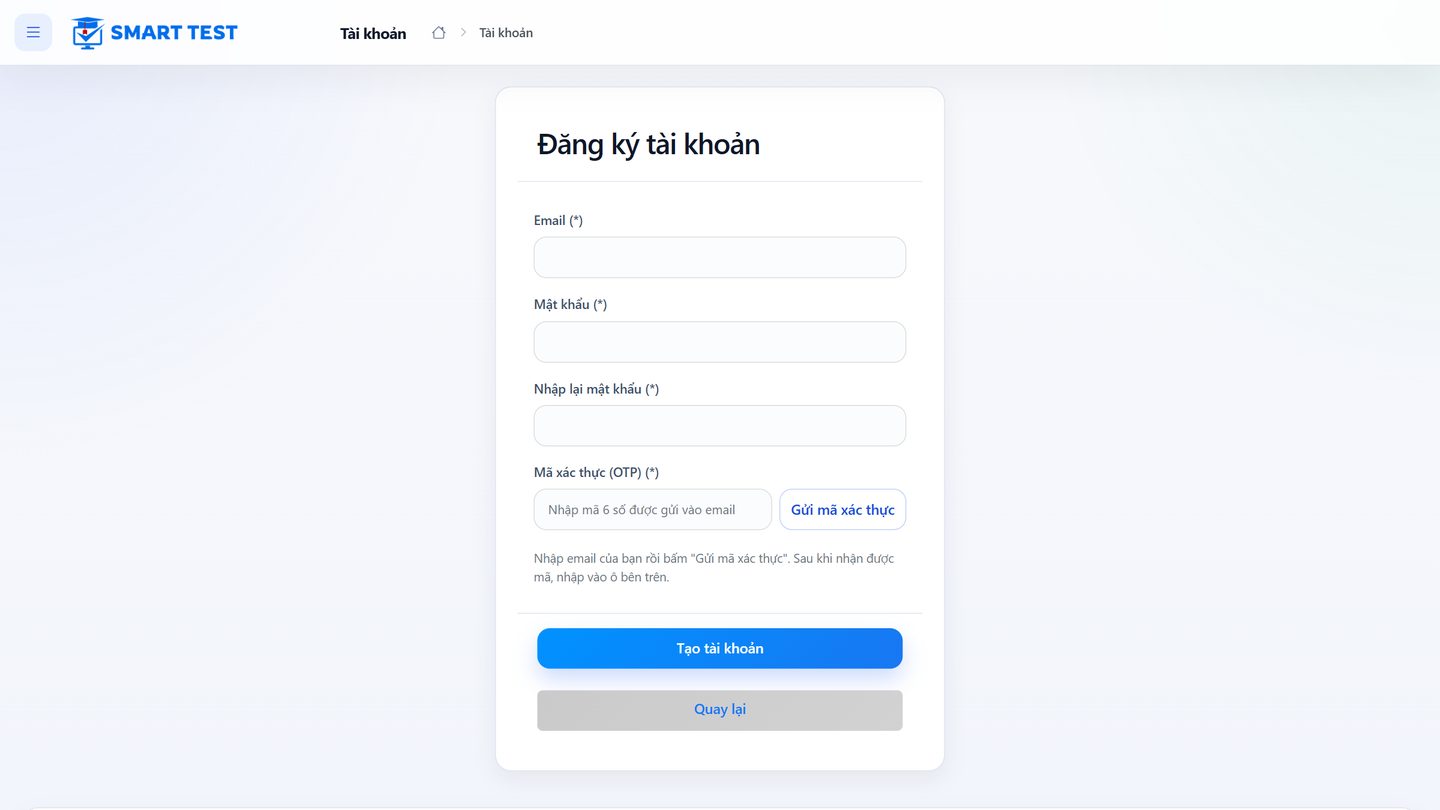
No account yet? Click Sign up and enter your email, a password and the verification code sent to your email.
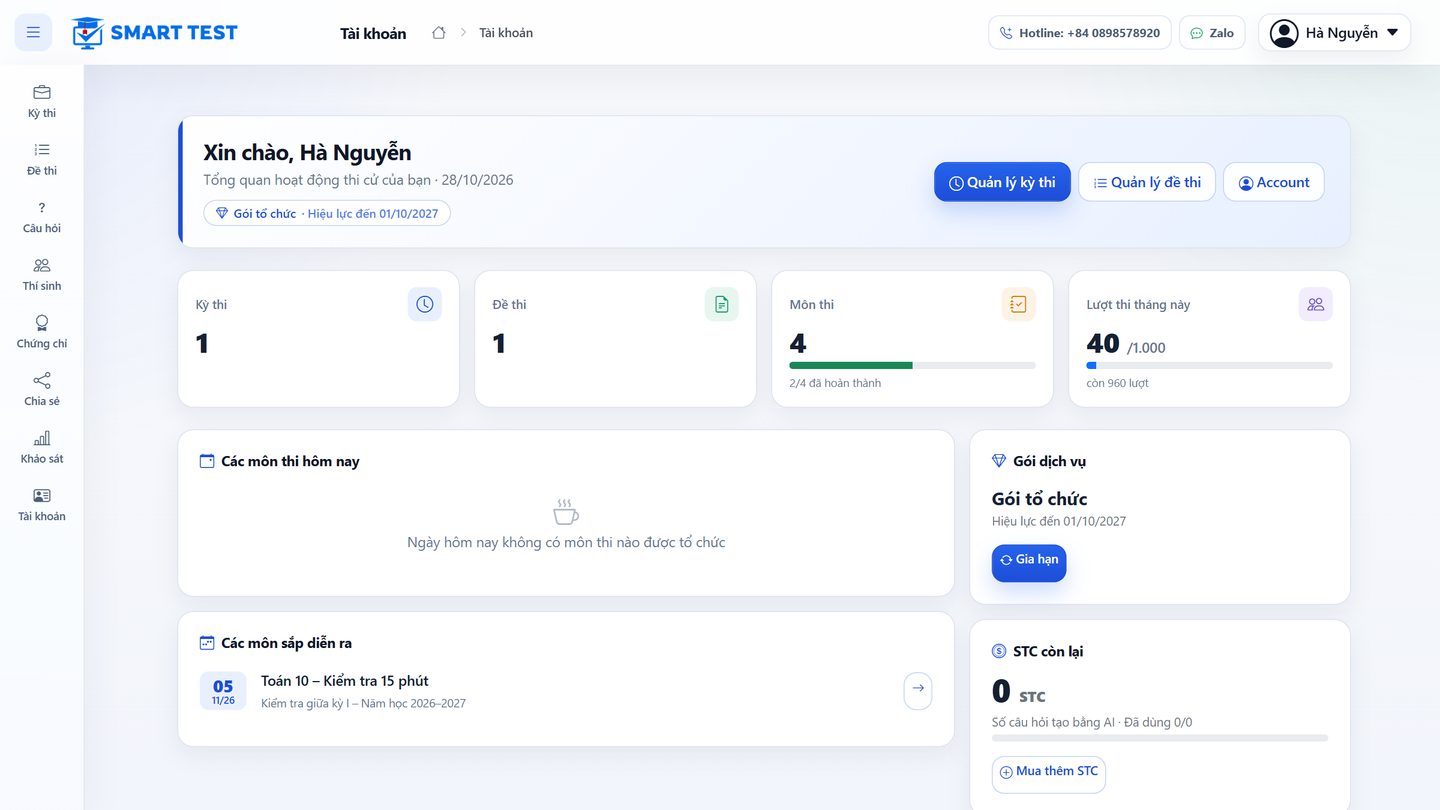
Dashboard
After signing in, the dashboard shows the number of exams, tests, subjects, attempts this month, and today's and upcoming subjects. The left menu has:
- Exams: the exams and subjects you have created.
- Tests: import, create and manage tests.
- Questions: question banks.
- Candidates: the student list shared by all exams.
- Certificates, Sharing, Surveys, Account.
Running an online exam
Step 1. Import the test from Word/PDF
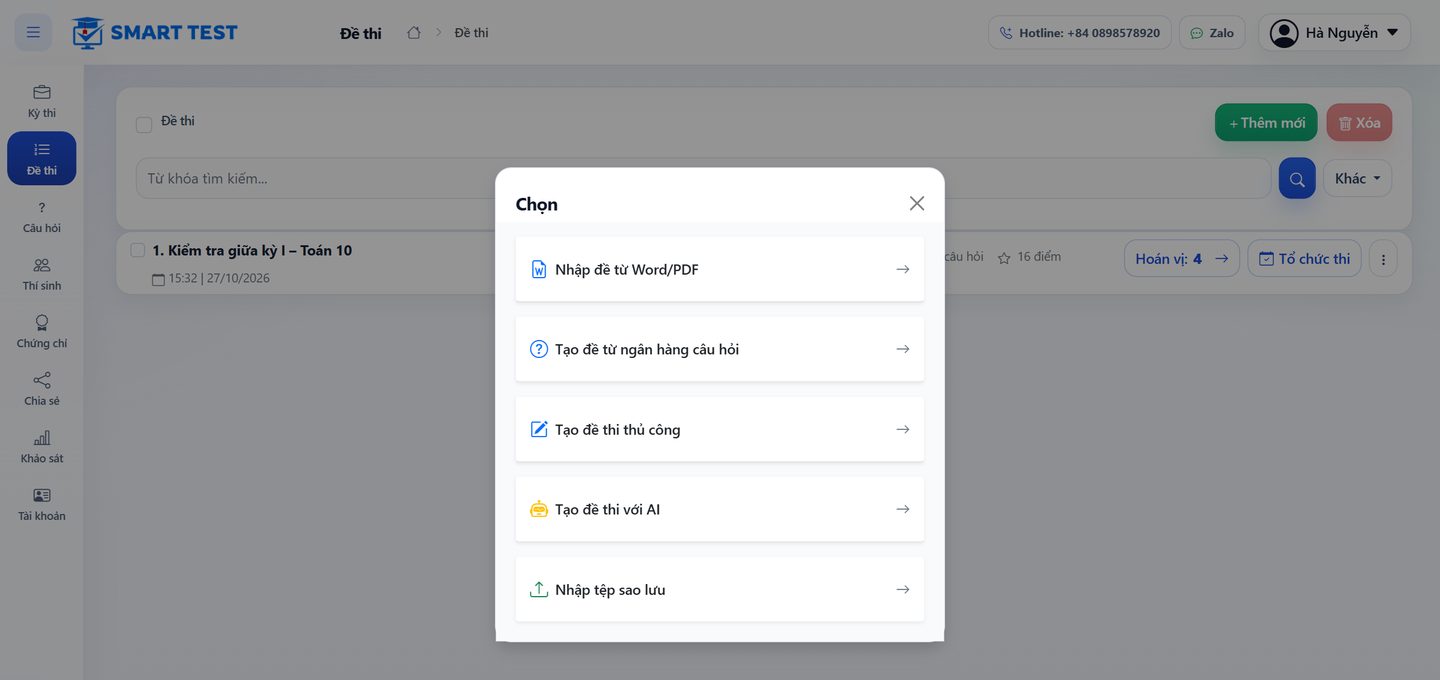
Open Tests and click Create. You can choose:
- Import test from Word/PDF: upload a prepared test file.
- Create test from question bank: see Create a test from a question bank.
- Create test manually: write each question on the web.
- Create test with AI: AI writes the test for the topics and levels you choose.
- Import backup file: restore a test exported from SmartTest.
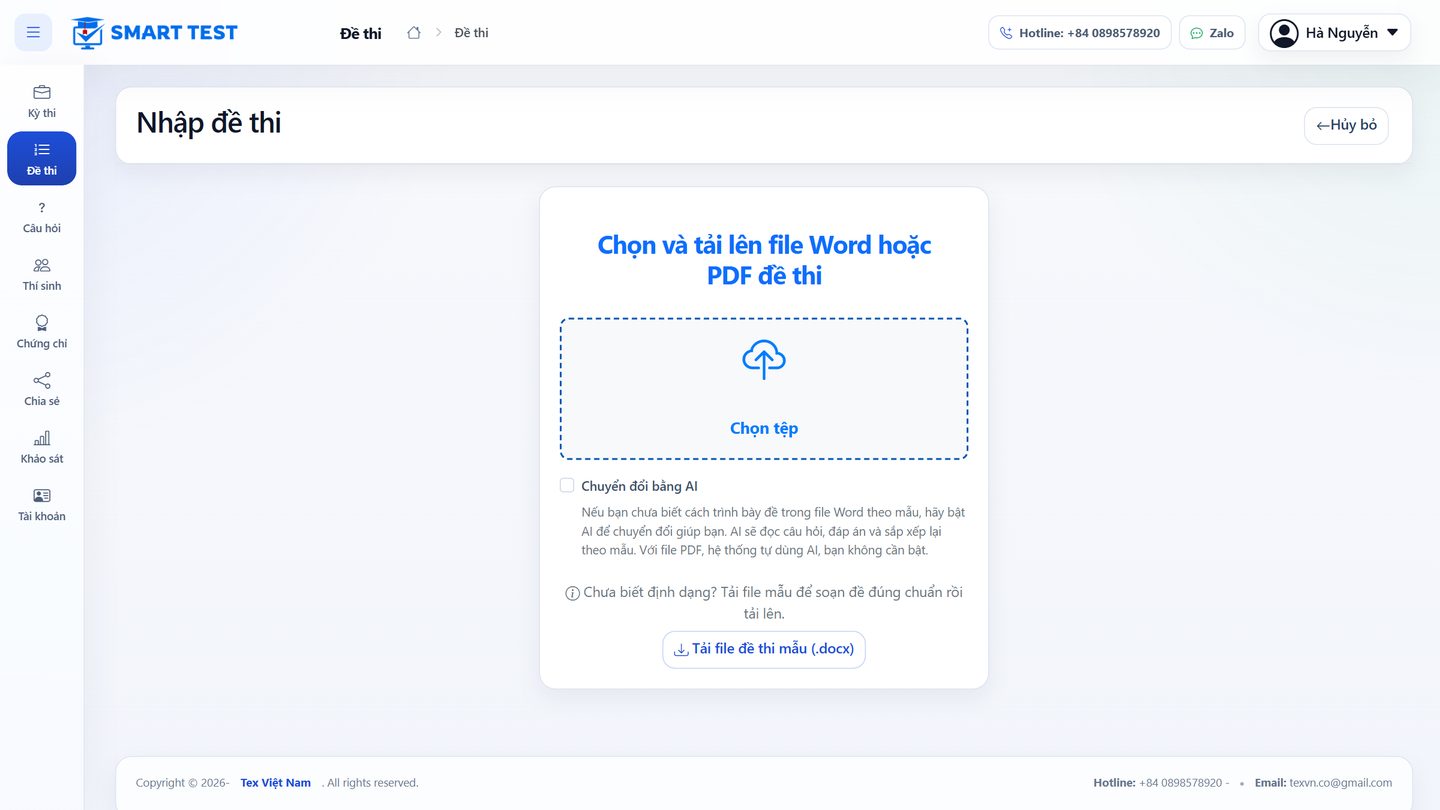
Choose Import test from Word/PDF, click Choose file and pick the test file. If the file does not follow the template, tick Convert with AI so AI reads the questions and answers and arranges them into the template (PDF files are always converted with AI). Not sure about the format? Click Download sample test (.docx) or read Preparing the Word file.
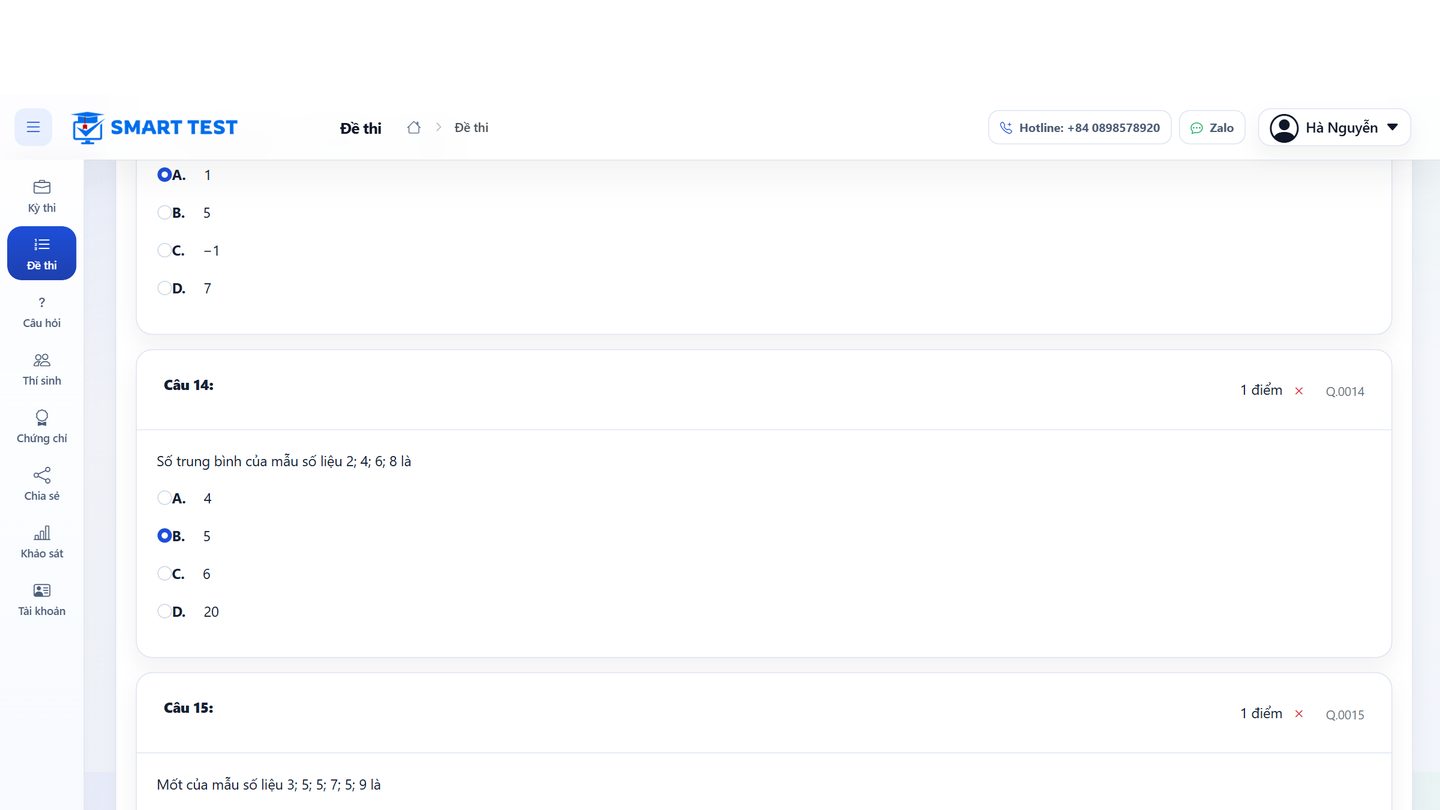
SmartTest shows every question with its correct answer for you to check. Questions without a correct answer are flagged in red; fix them before saving. Set the test name, duration and number of shuffled versions, then save.
Step 2. Organize the exam from the test
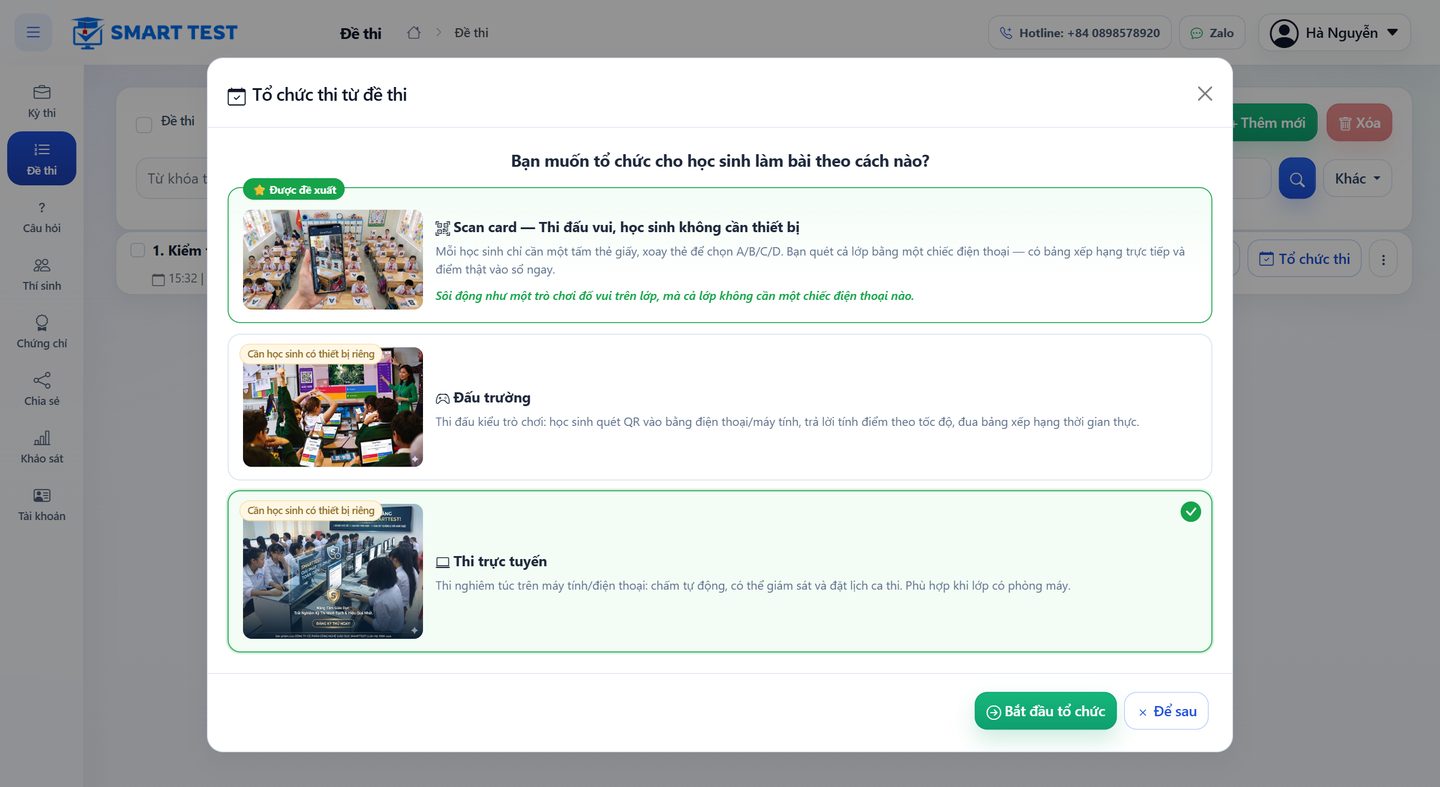
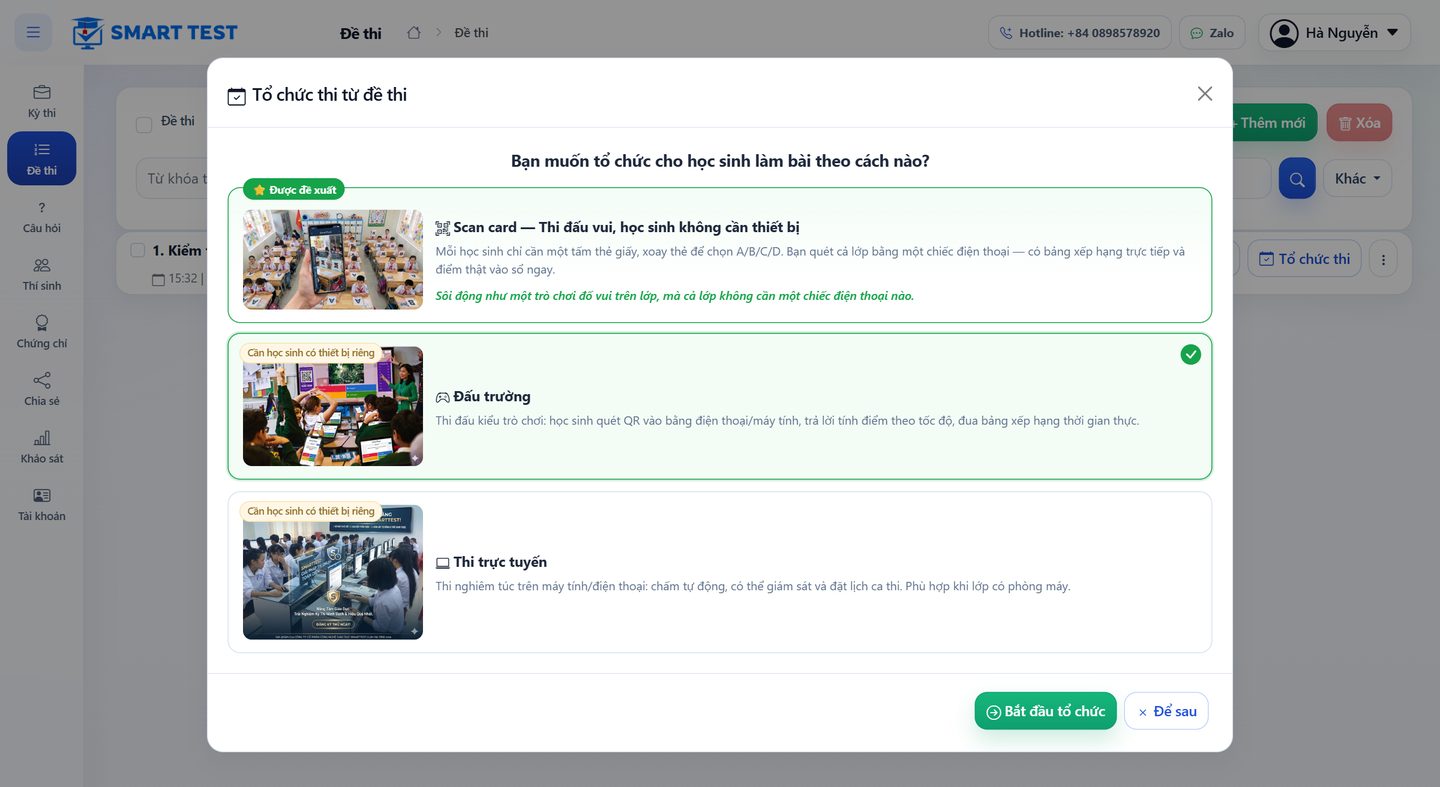
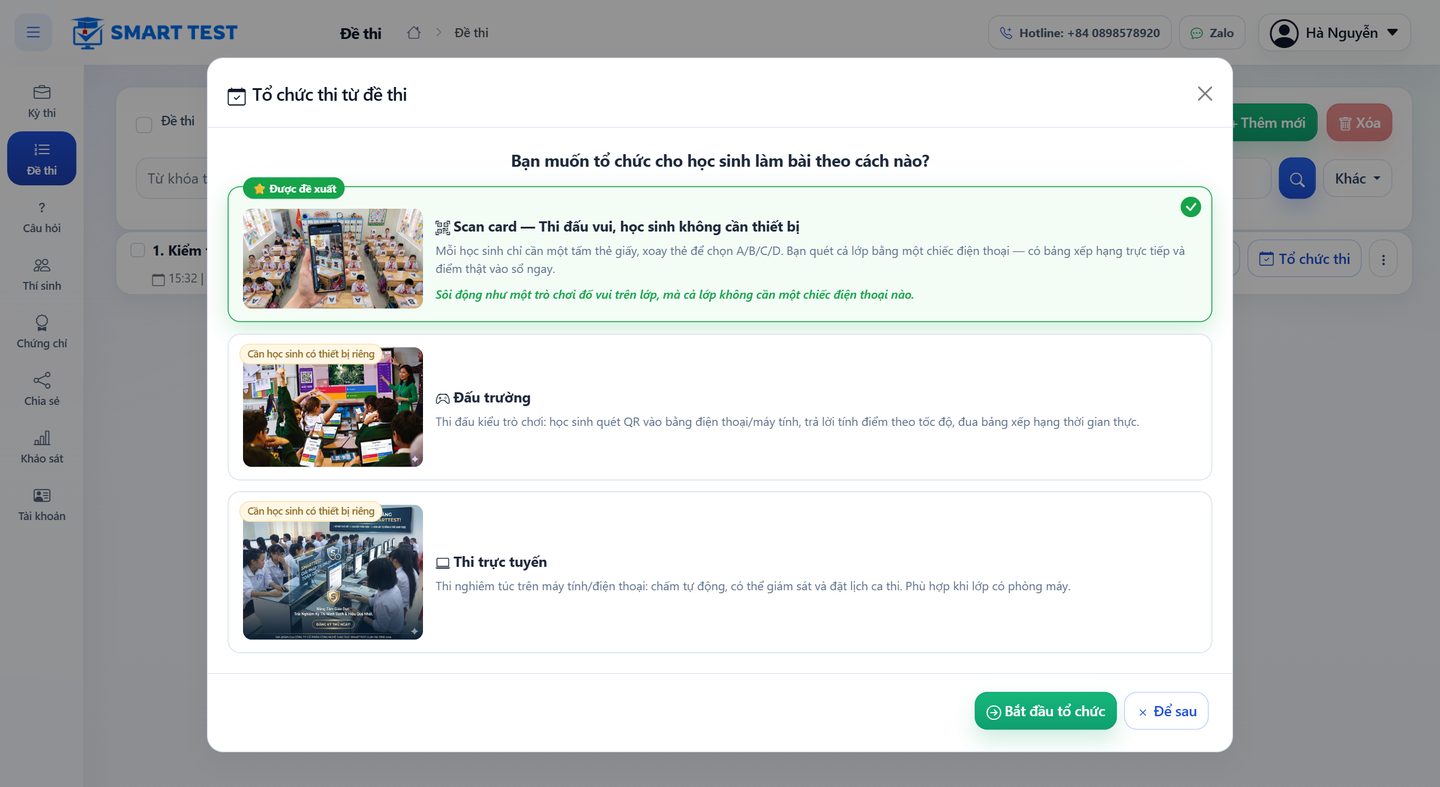
After saving, the Organize exam from test window opens (or click Organize exam next to the test in the Tests list). Choose how students will take it:
- Online exam: a formal exam on computers or phones, with proctoring and exam sessions.
- Live arena: a game-style quiz, see Live arena.
- Scan card: students need no device, see Answer-card scan.
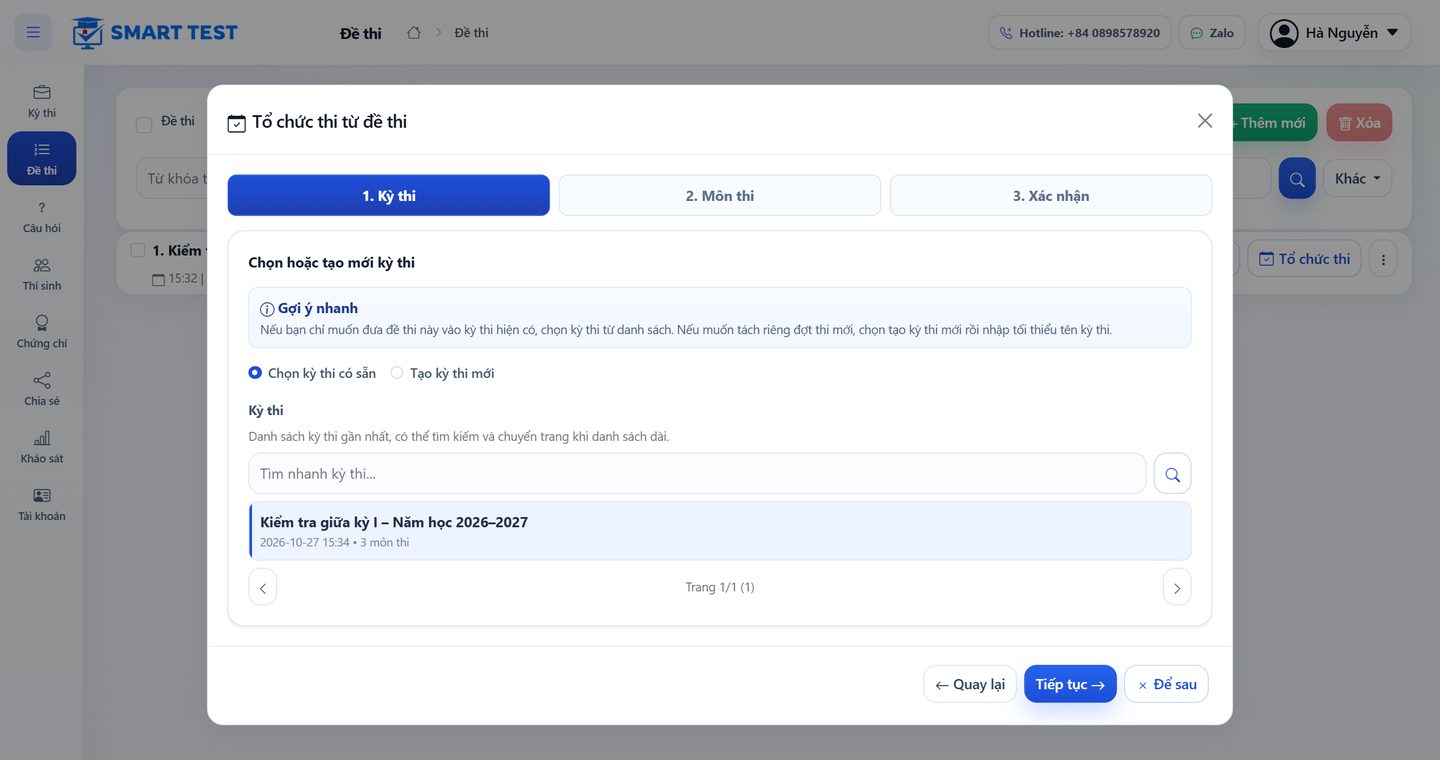
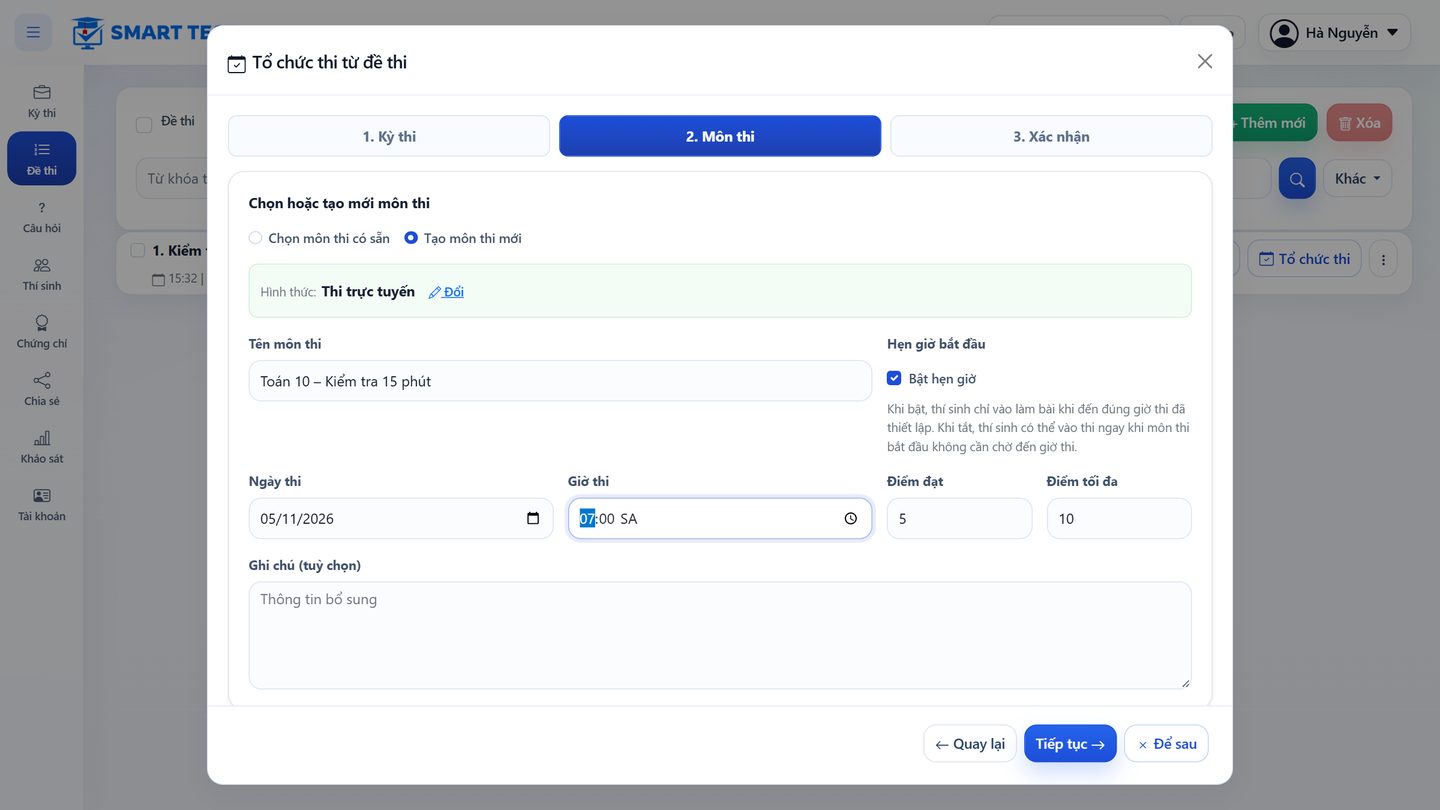
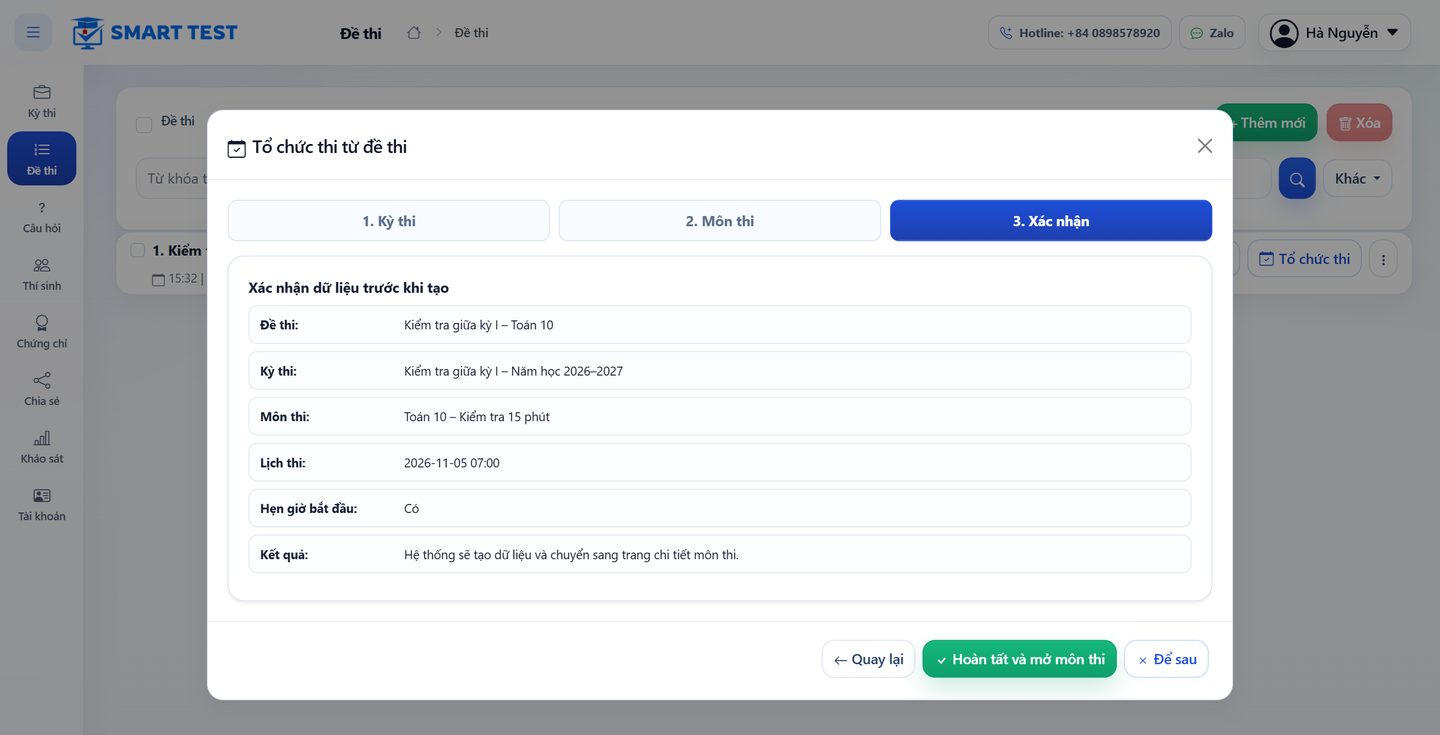
Click Start organizing and pick an existing exam or create a new one. An exam groups several subjects, for example “Mid-term 1 – School year 2026–2027”.
Enter the subject name, the exam date and time, click Continue, review and click Finish and open subject. The subject is created with the test you just imported.
Step 3. Set up the subject
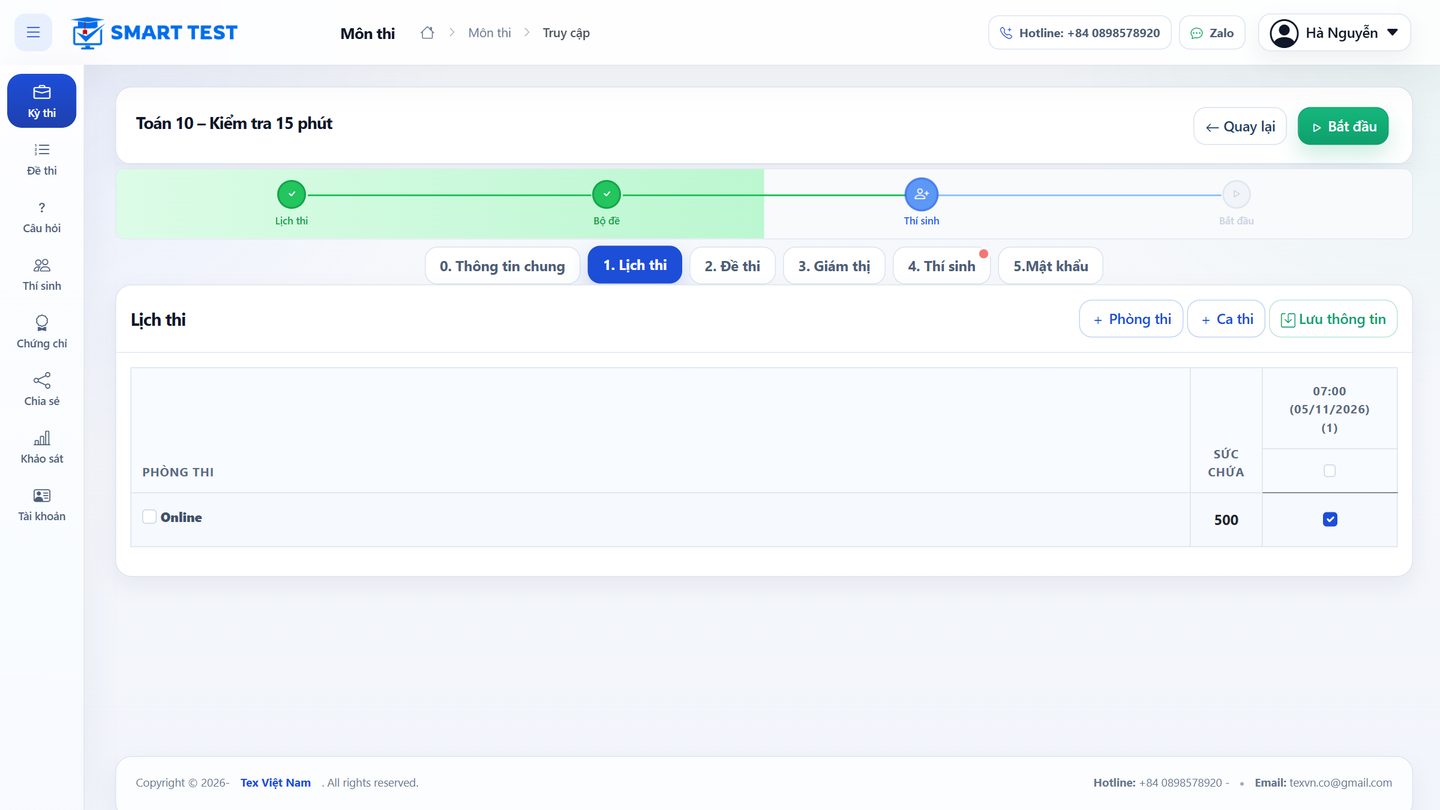
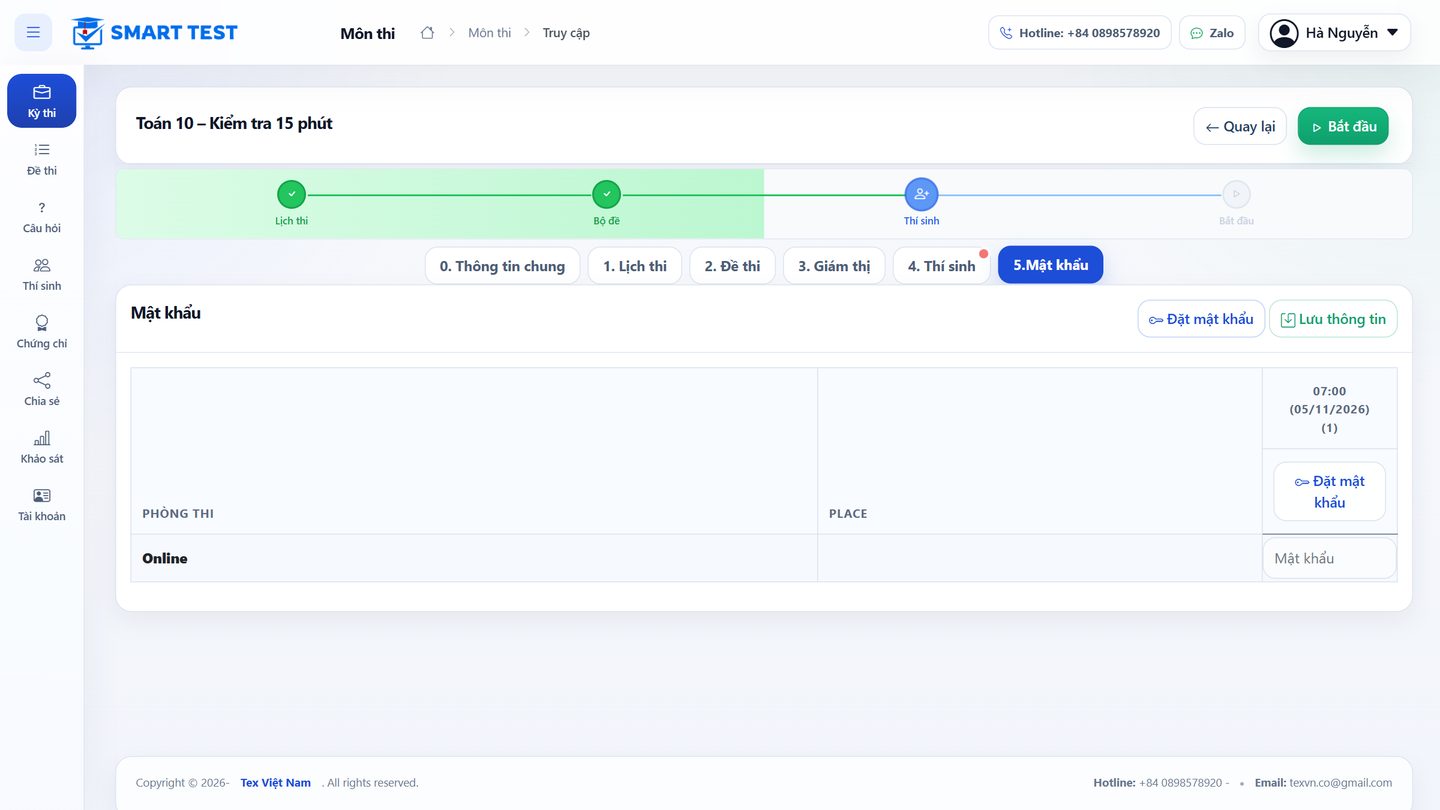
Open the subject from Exams → choose the exam → click Manage on the subject. The progress bar at the top shows what is still missing; the tabs are numbered in the order to complete them: 0. General, 1. Schedule, 2. Tests, 3. Supervisors, 4. Candidates, 5. Password. A red dot marks a tab that still needs attention.
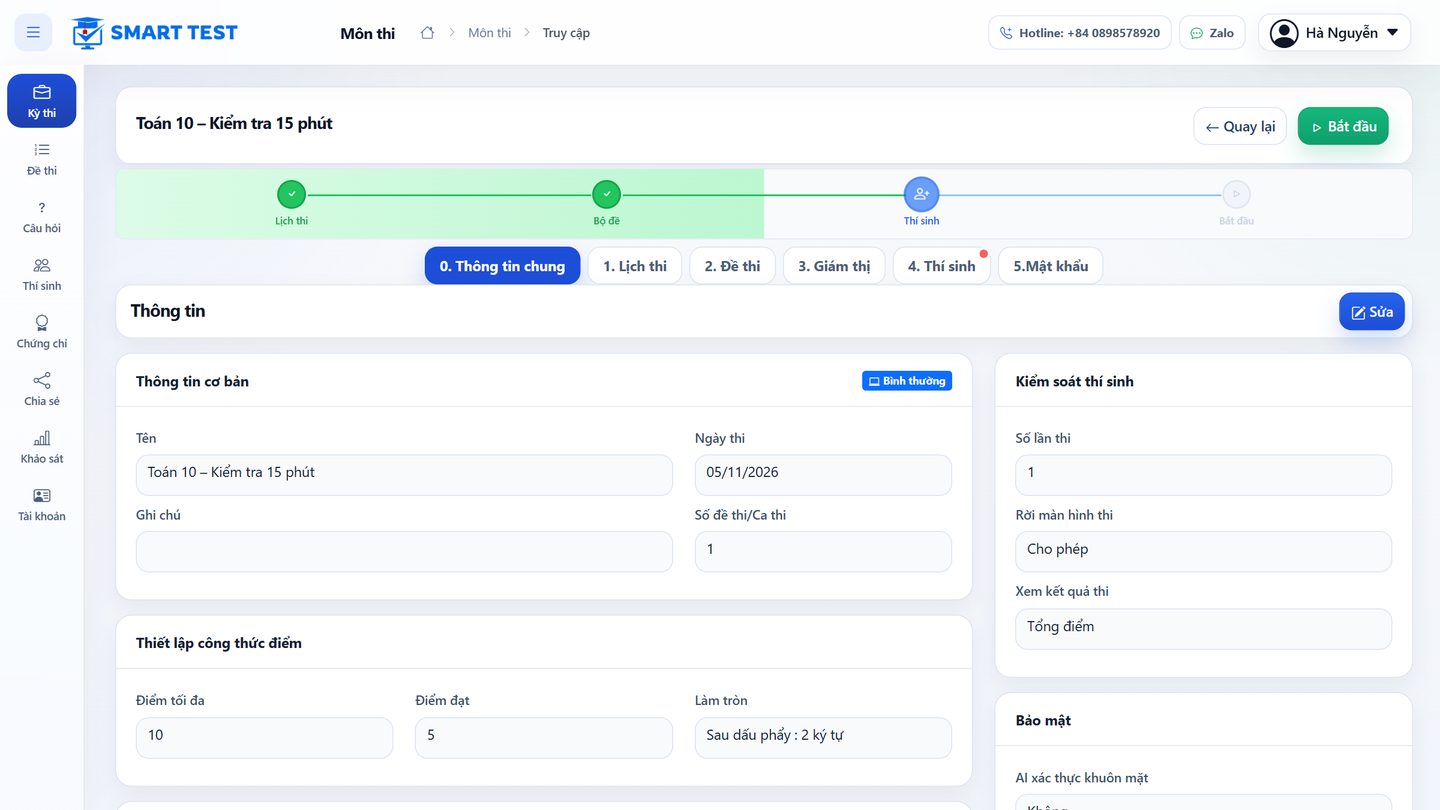
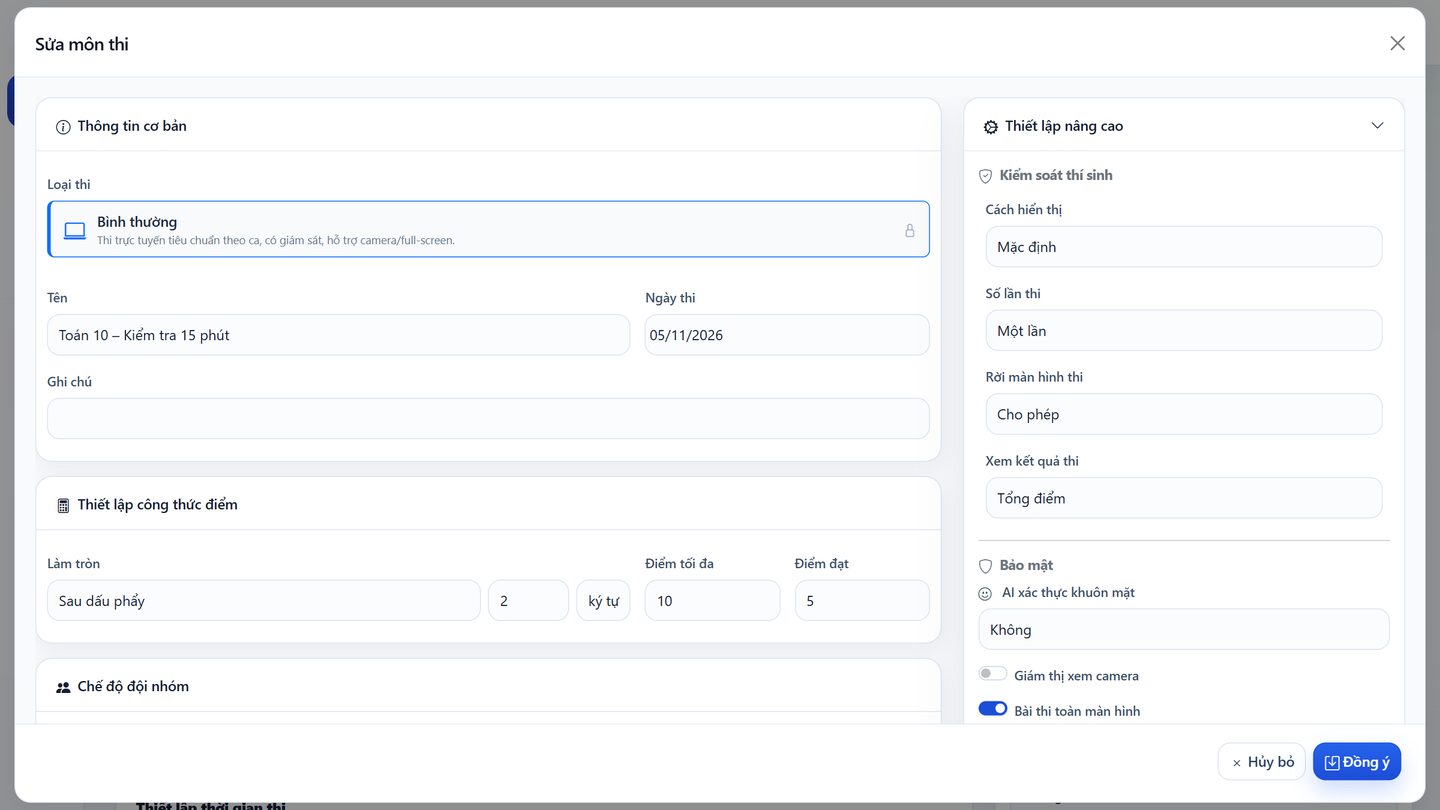
Click Edit to change the settings:
| Group | Settings |
|---|---|
| Basic information | Subject name, exam date, notes. |
| Scoring | Rounding (decimal places, round to 0.25 or 0.5, IELTS band…), Maximum score, Pass mark. |
| Exam time | Start by session time, fixed or per-candidate duration, minutes allowed for late entry. |
| Candidate control | Display mode (whole test, by part or one question at a time), Attempts, how many times a candidate may leave the exam screen (beyond that the paper is submitted), Show results (total score, per-question score, with answers). |
| Security | AI face verification, Proctor views camera, Full-screen exam, AI screen monitoring, Proctor views screen, Require Safe Exam Browser. Some features need a higher plan. |
Schedule and rooms
Tab 1. Schedule: add exam sessions (date, time) and rooms. Online exams have an Online room by default; you can add a room per class or computer lab.
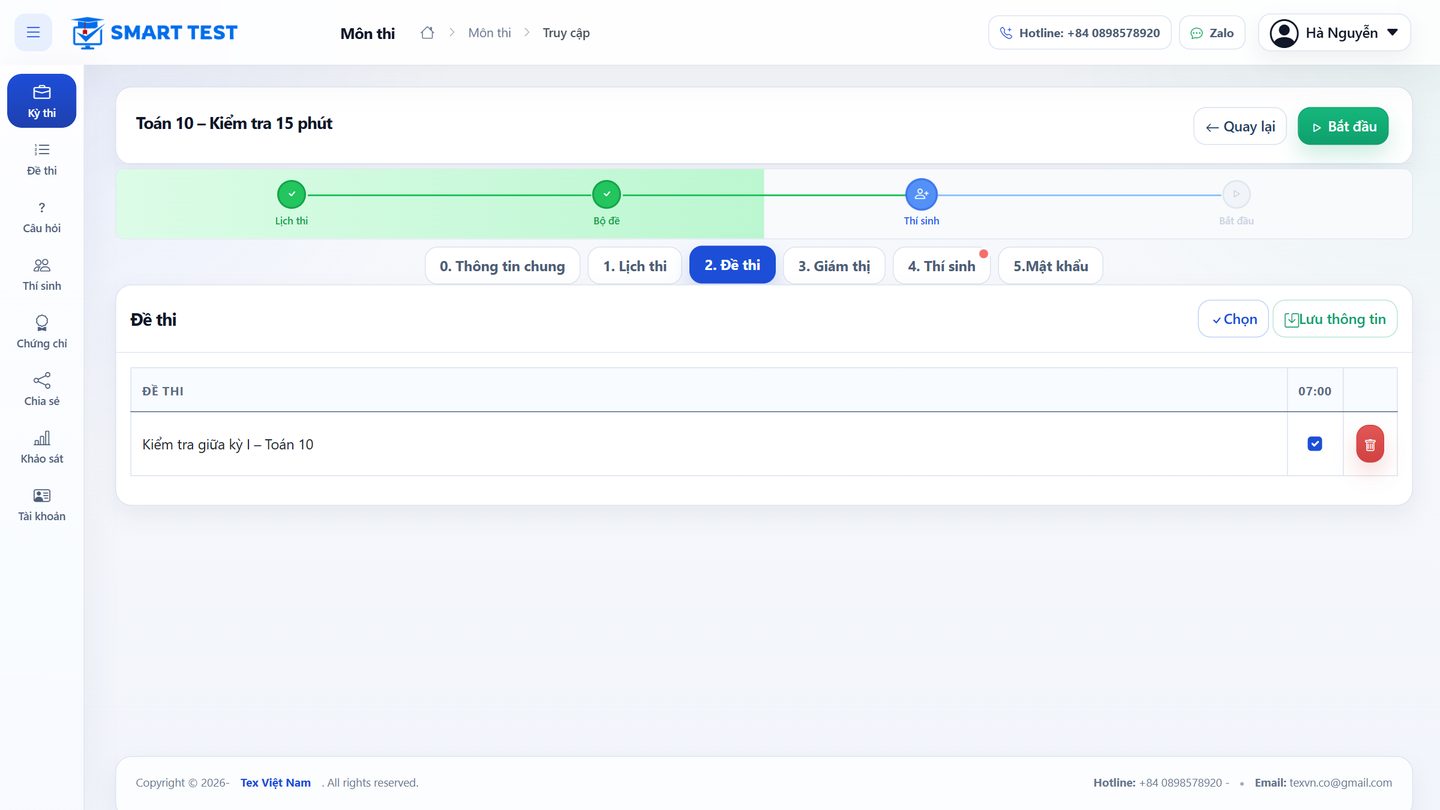
The subject's test
Tab 2. Tests shows the test attached to the subject. Click Choose to switch to another test from the Tests list.
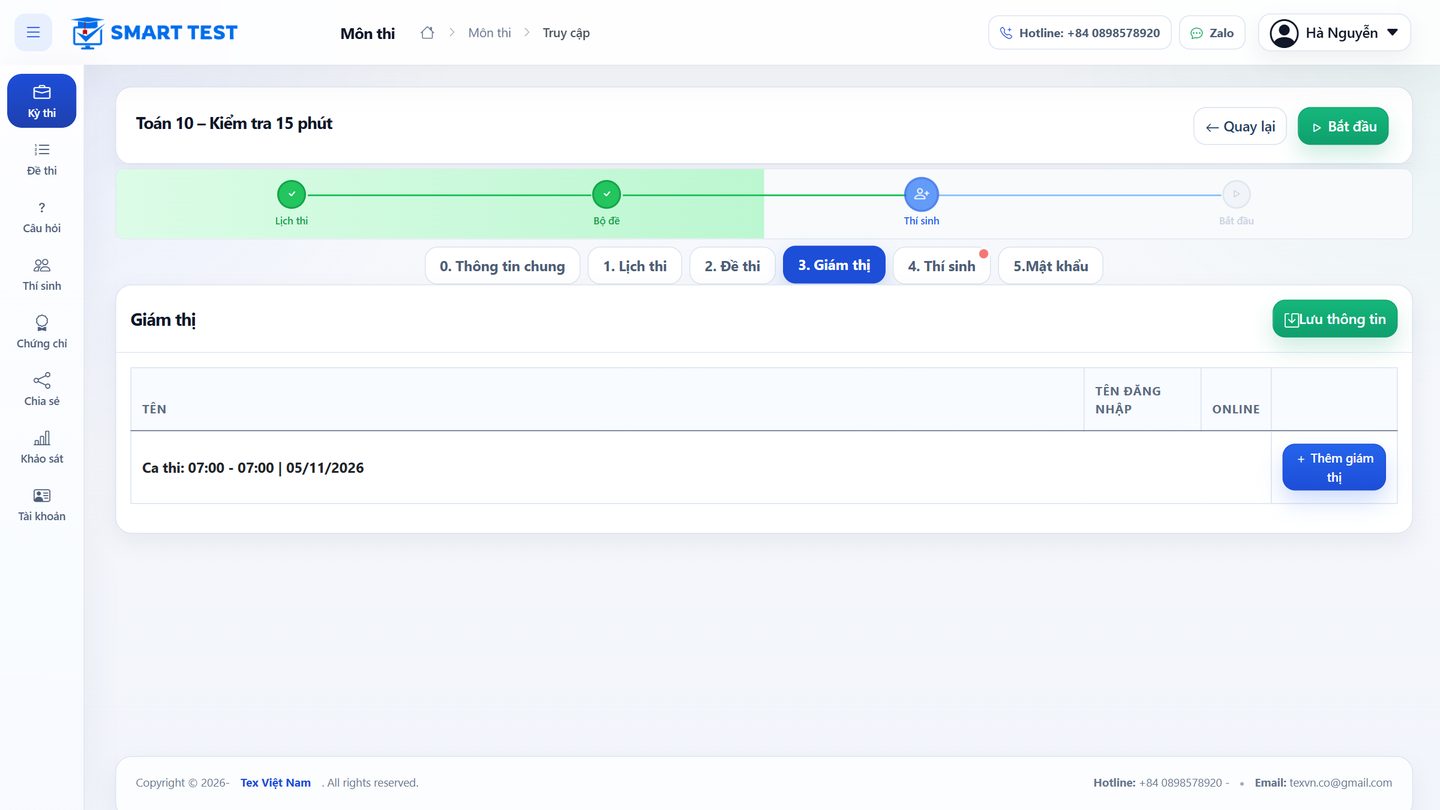
Proctors
Tab 3. Supervisors: click Add supervisor in each session, enter the proctor's email and assign a room, then Save. Proctors sign in with that email to run their room.
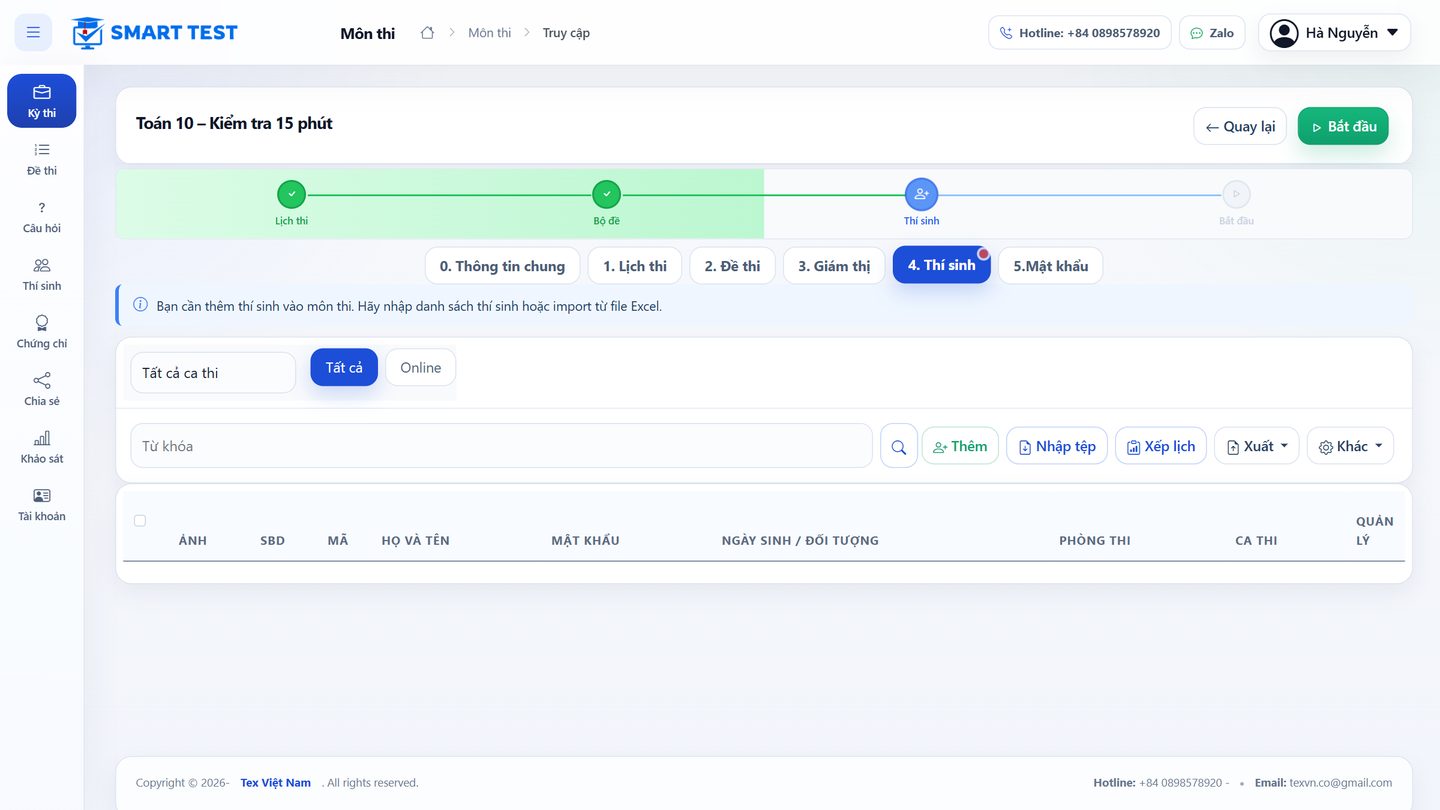
Step 4. Import candidates from Excel
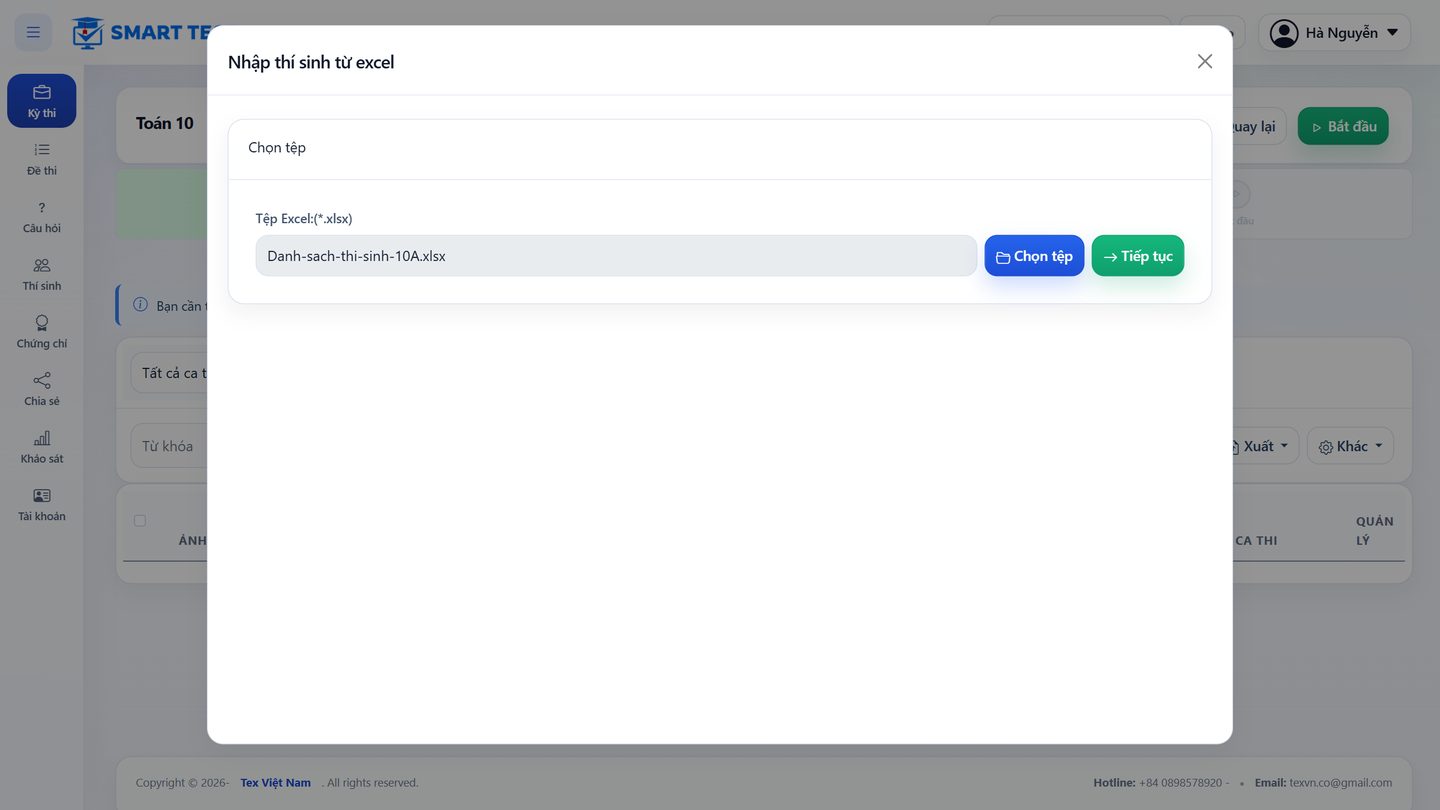
Tab 4. Candidates → Import file. Choose the class list Excel file on your computer.
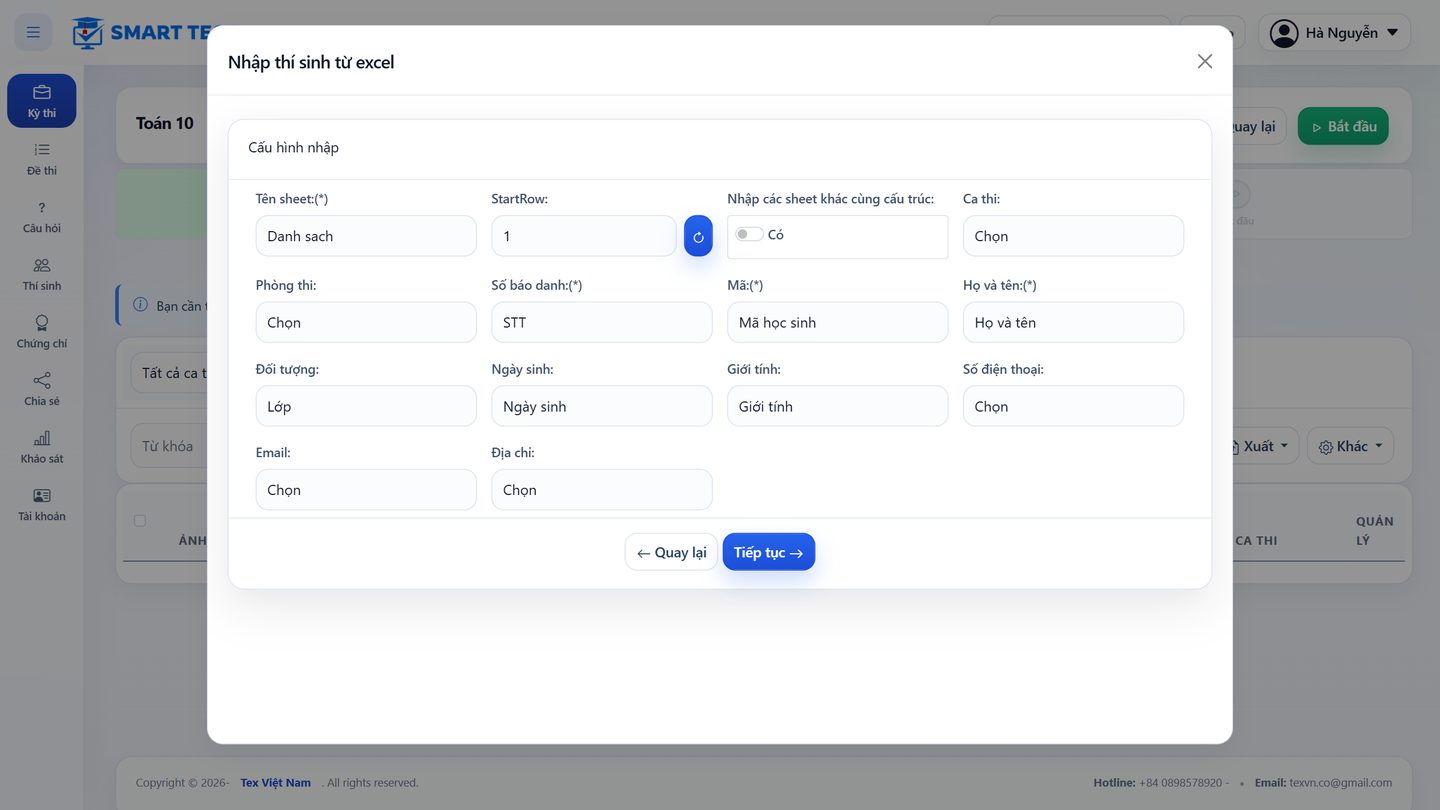
Choose the sheet, start row and matching columns: Candidate number, Code (the student code used to sign in), Full name, group (class), date of birth, gender, email… Fields marked (*) are required. You can preset the session and room for the whole list.
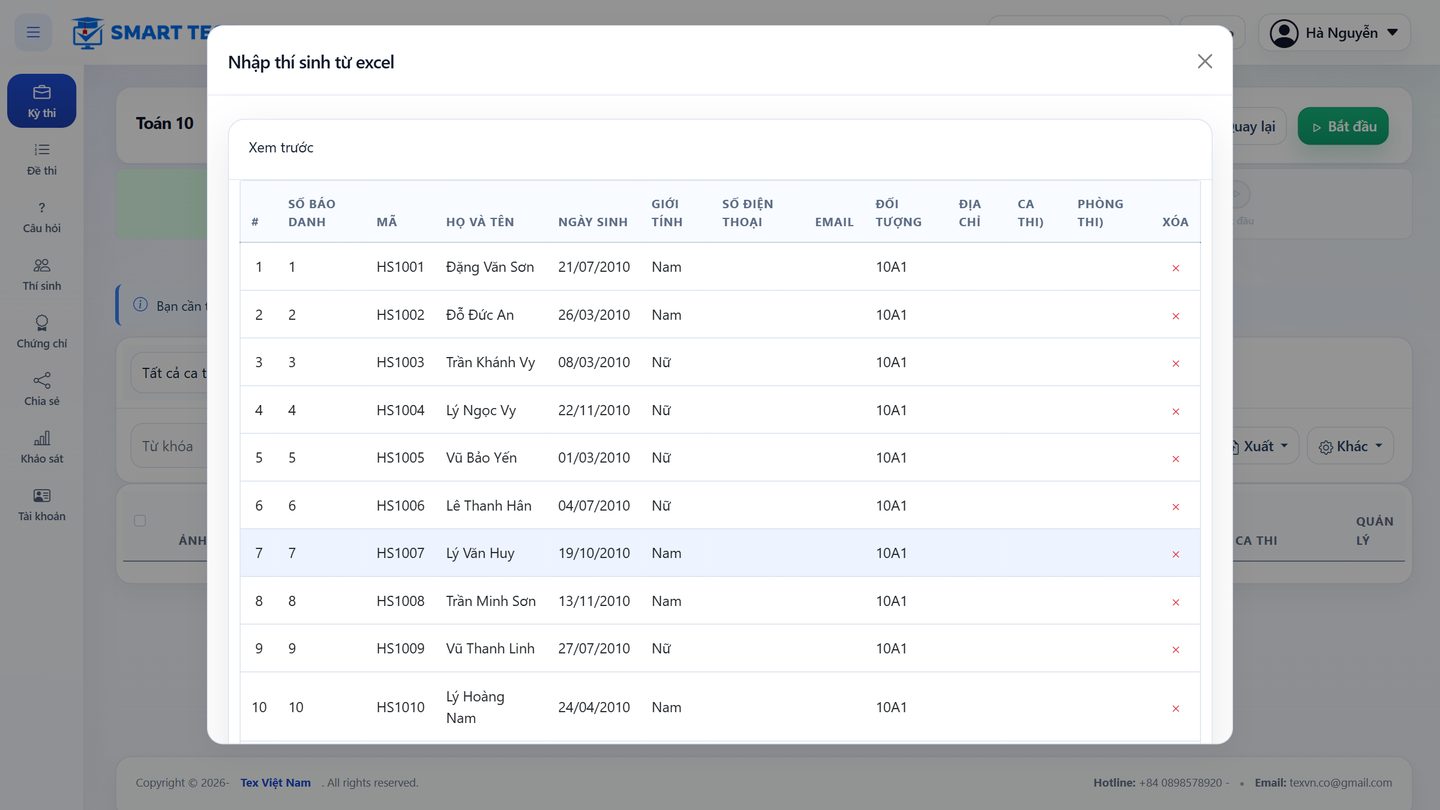
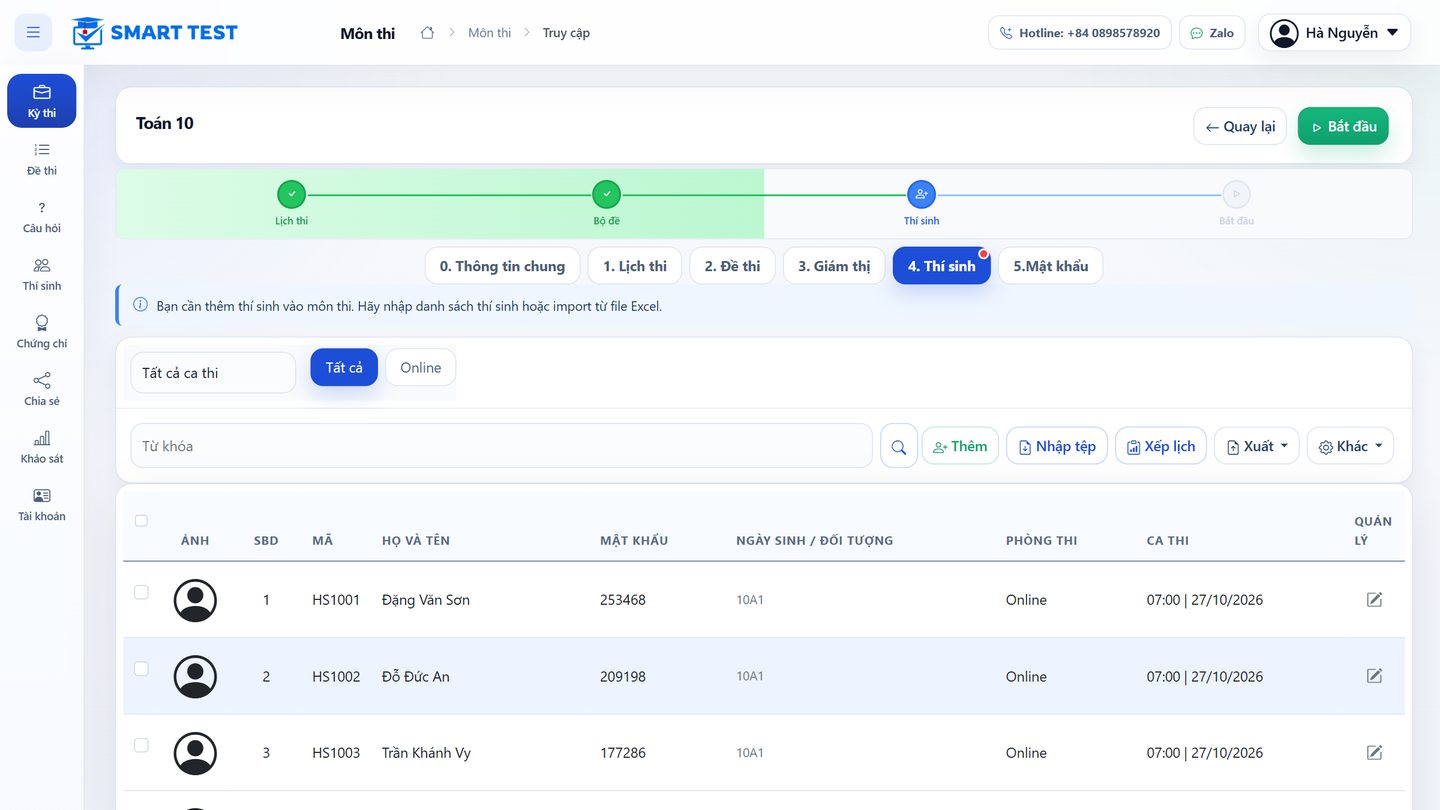
Check the preview and click Save. Each candidate gets a code and password to enter the exam; you can reset passwords to the date of birth, reassign sessions and rooms, or export the list by room.
Room password (optional)
Tab 5. Password: set a password per room and session. Candidates must also enter it to open the exam room – the proctor reads it out when the exam starts.
Step 5. Start the exam and send the link
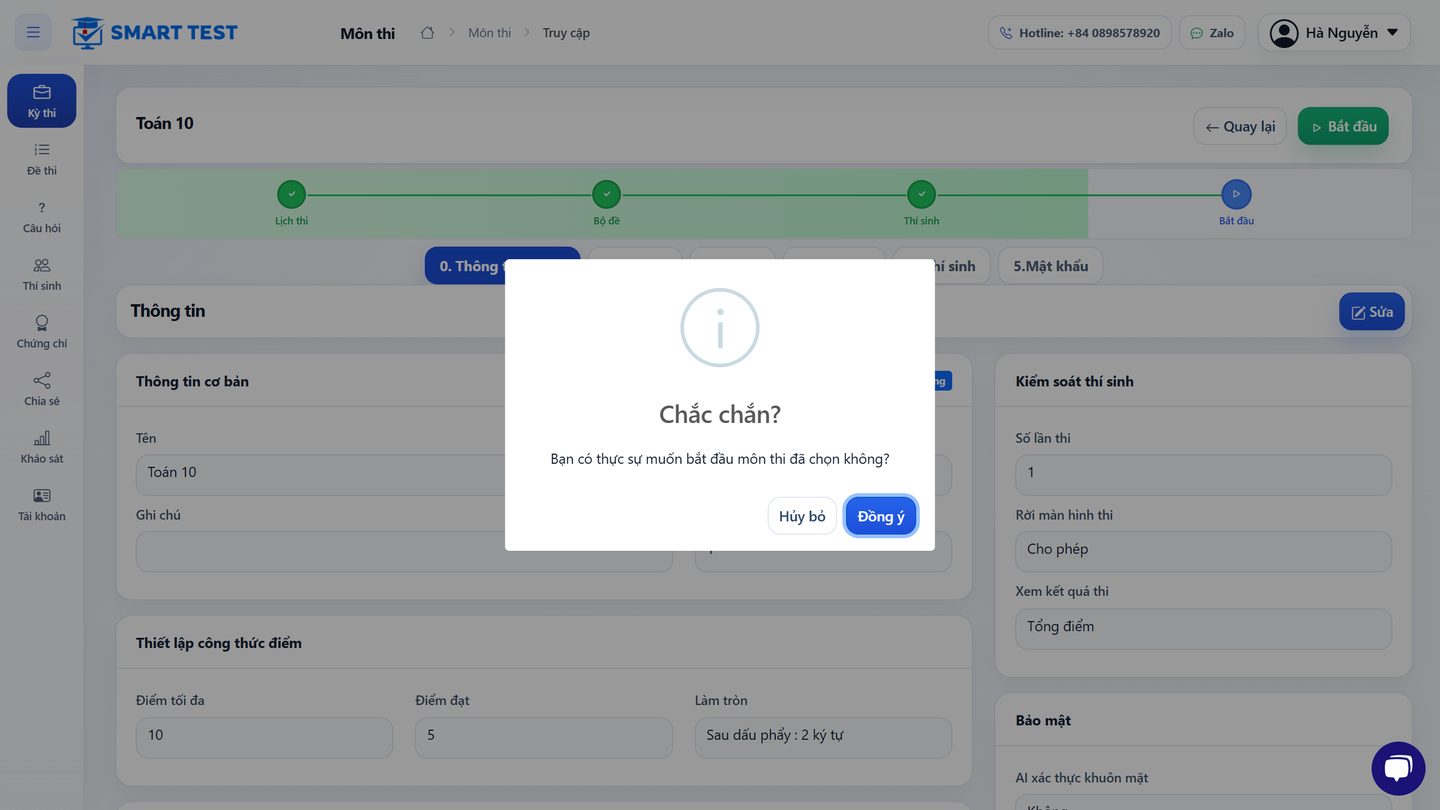
When the tabs are complete, click Start at the top of the subject and confirm. The subject is now running and candidates can enter the room.
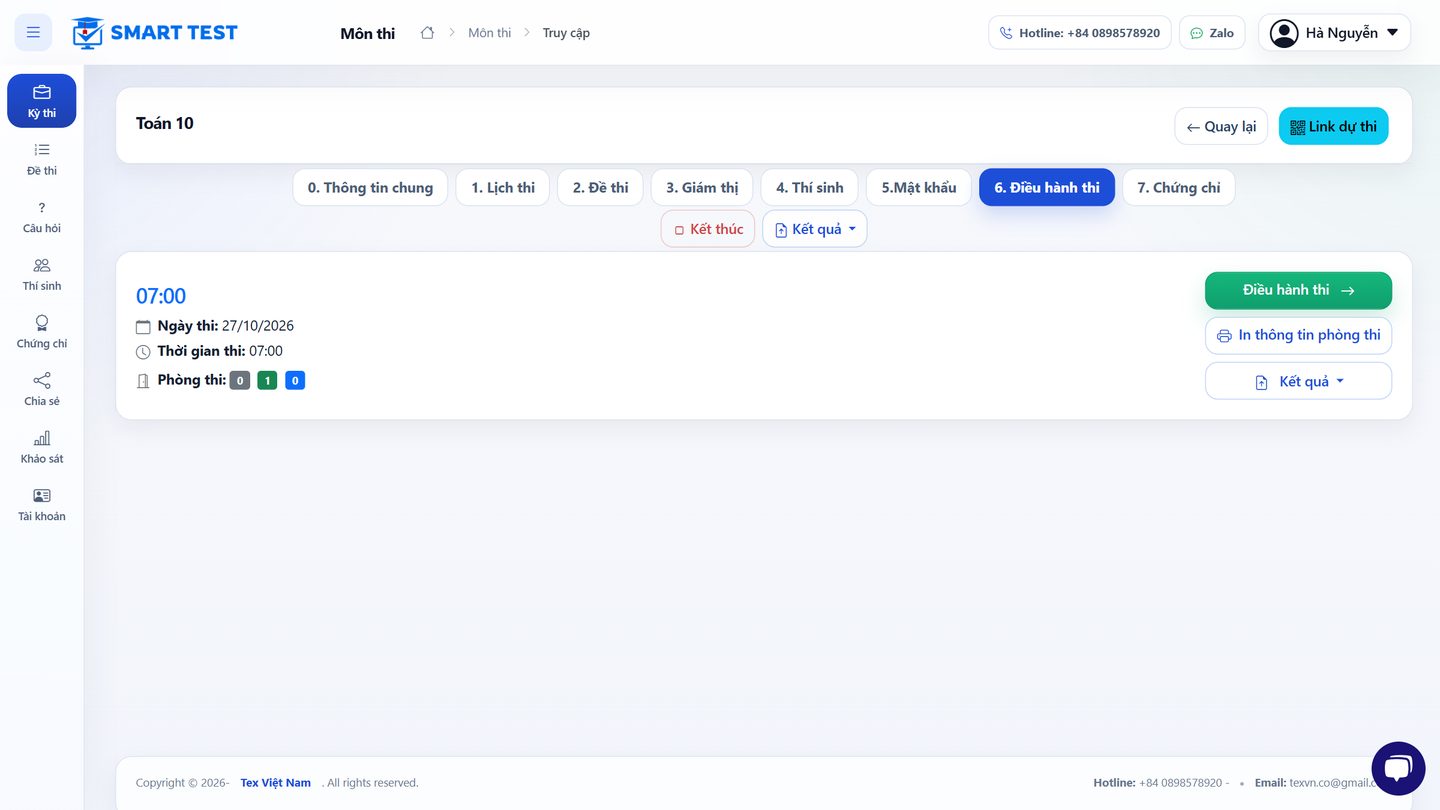
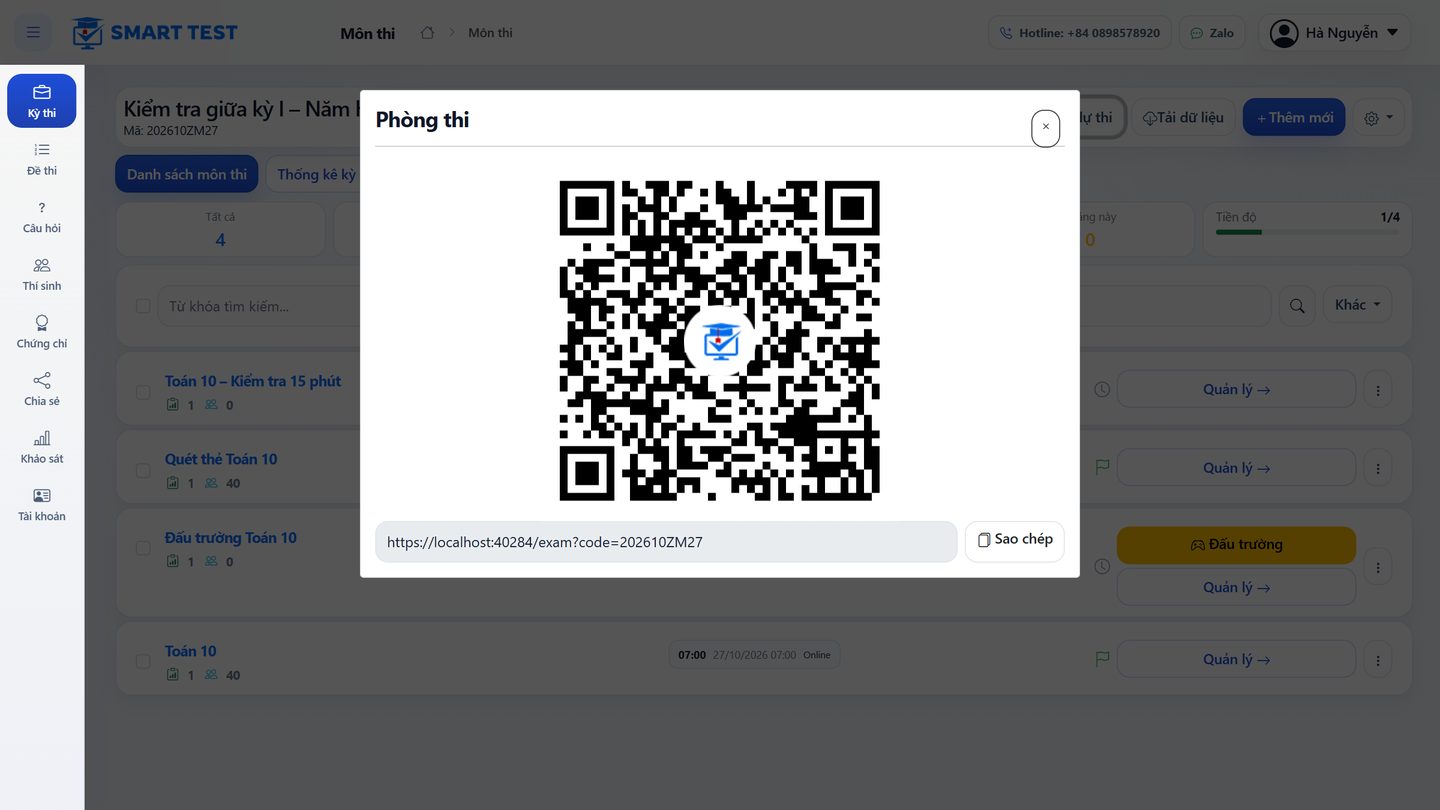
Send candidates the exam link or exam code: click Exam link on the exam page to get the QR code and link, then share it by chat or email, or project it on the screen.
Step 6. Monitor the exam
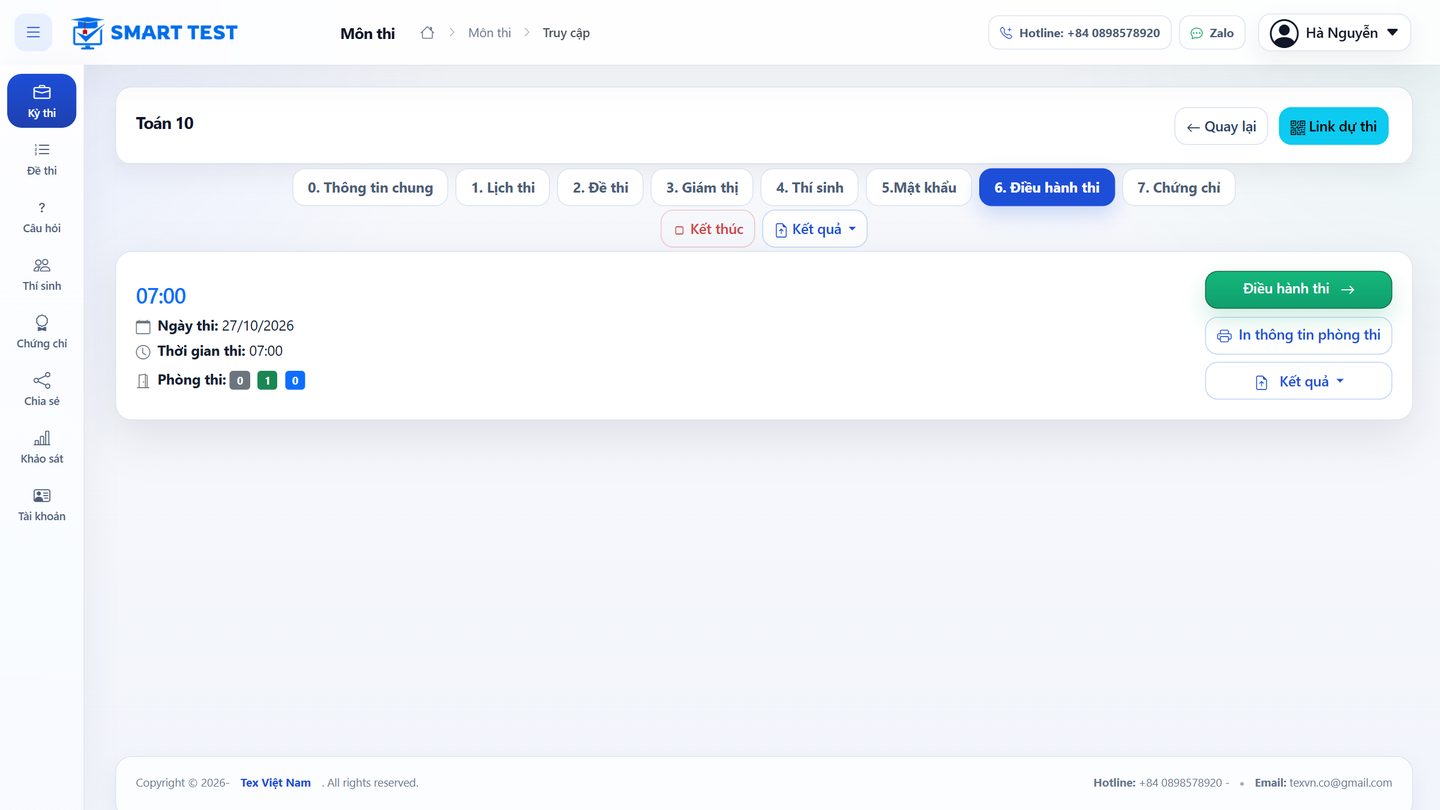
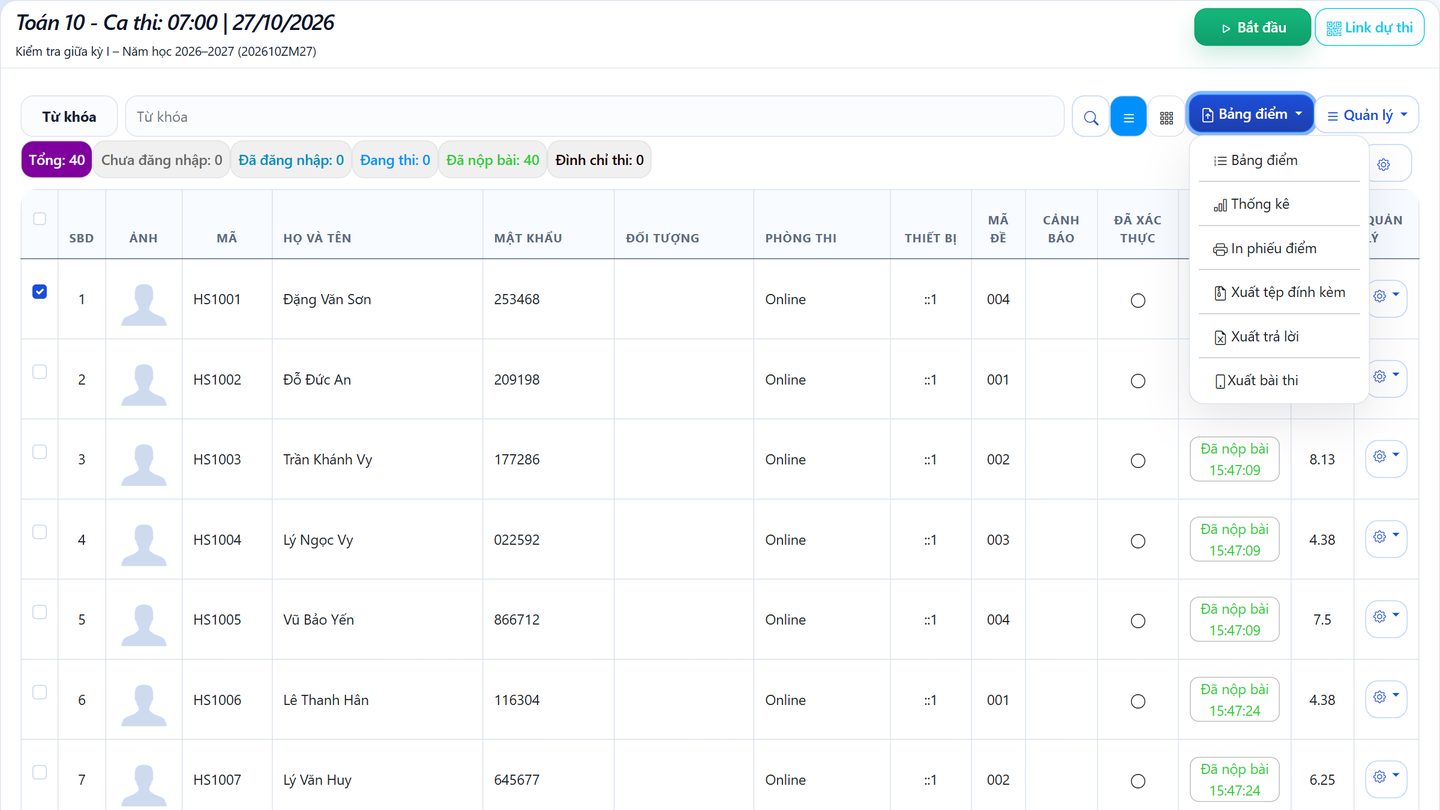
While the exam runs, the Monitor exam tab lists the sessions with the number of rooms waiting, in progress and done. Click Monitor exam on a session to open the monitoring screen (in a new tab). The Result button exports the score table even while the exam is running.
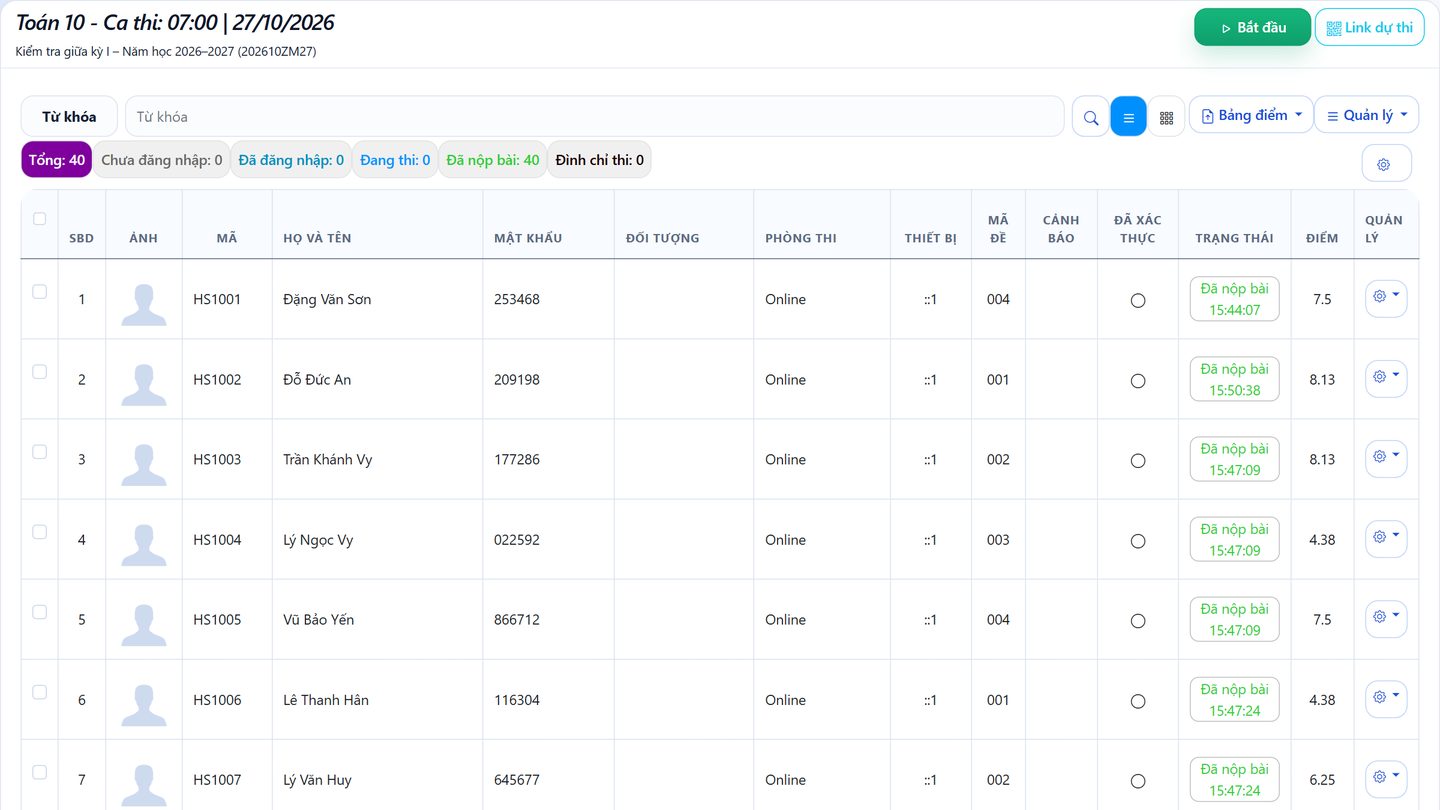
The monitoring screen shows each candidate: device, test version, violation warnings, face verification, status and score. Use the buttons at the top to filter by status: Not signed in, Signed in, Taking the exam, Submitted, Suspended.
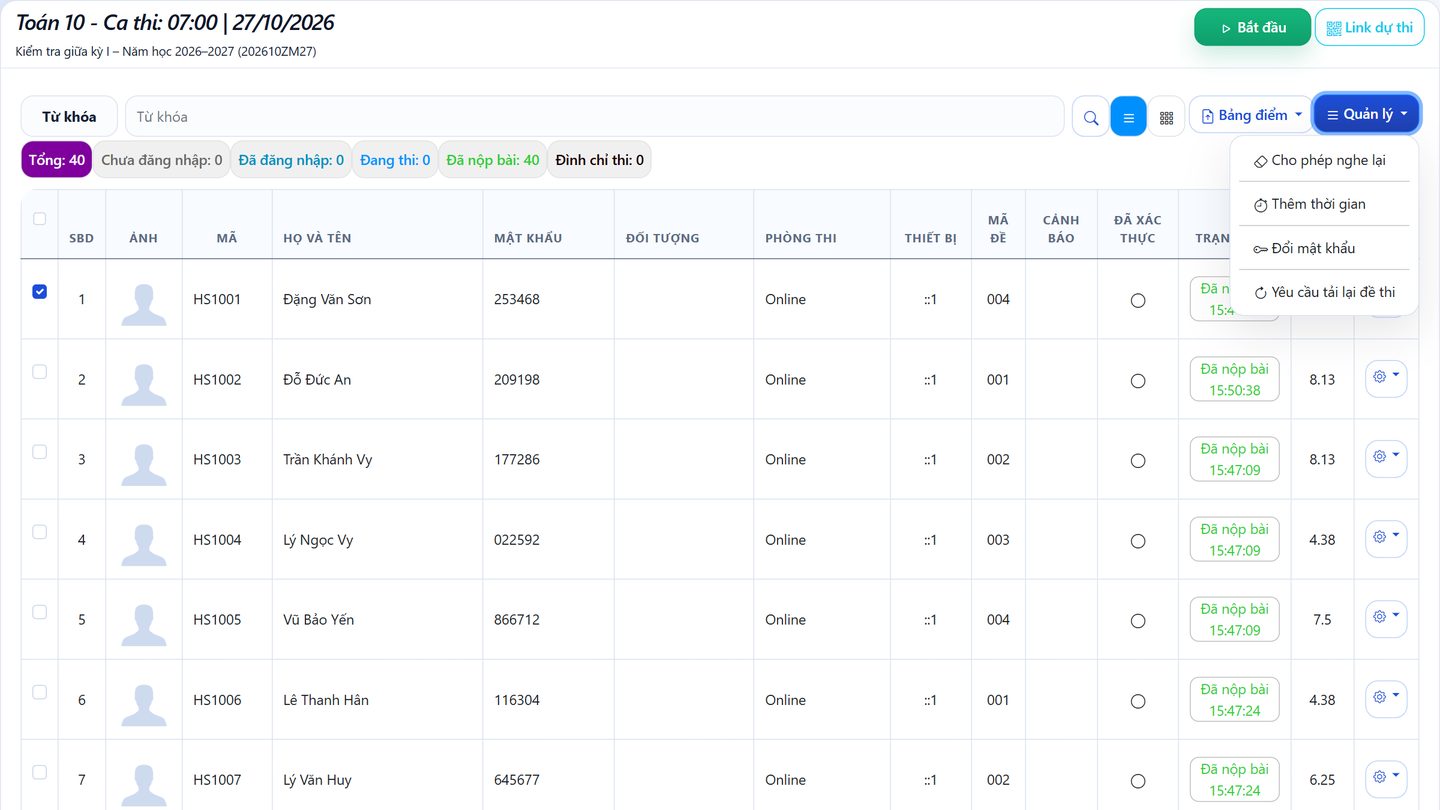
Tick candidates and click Manage to:
- Allow replay: for tests with audio, which normally plays only once.
- Add time for the selected candidates.
- Change password and give it back to the candidate.
- Ask to reload the test: after fixing a faulty question, candidates reload it without losing their work.
The three-dot button at the end of each row lets a candidate enter late, continue, or have their paper deleted, and exports the paper or shows its history.
Step 7. Finish and review results
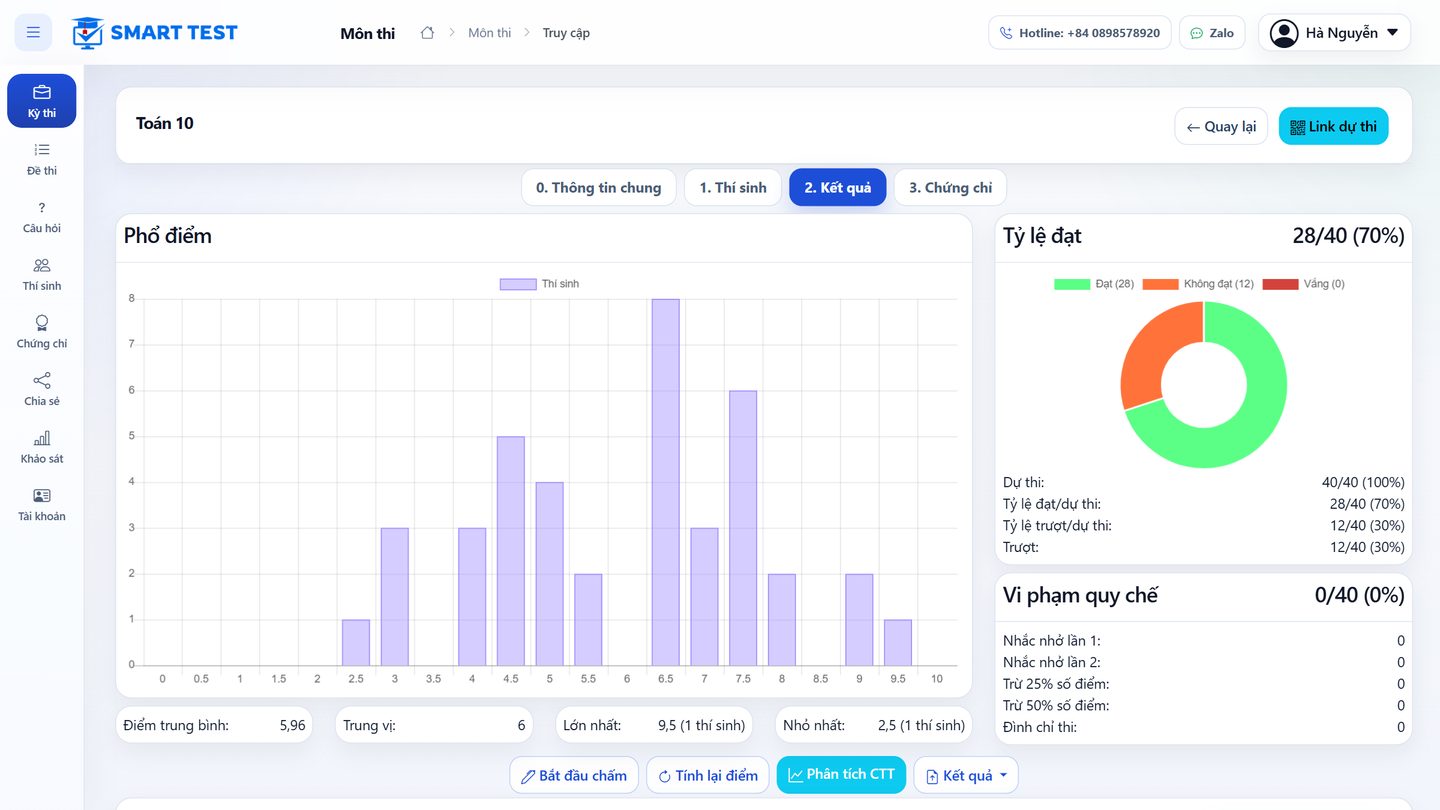
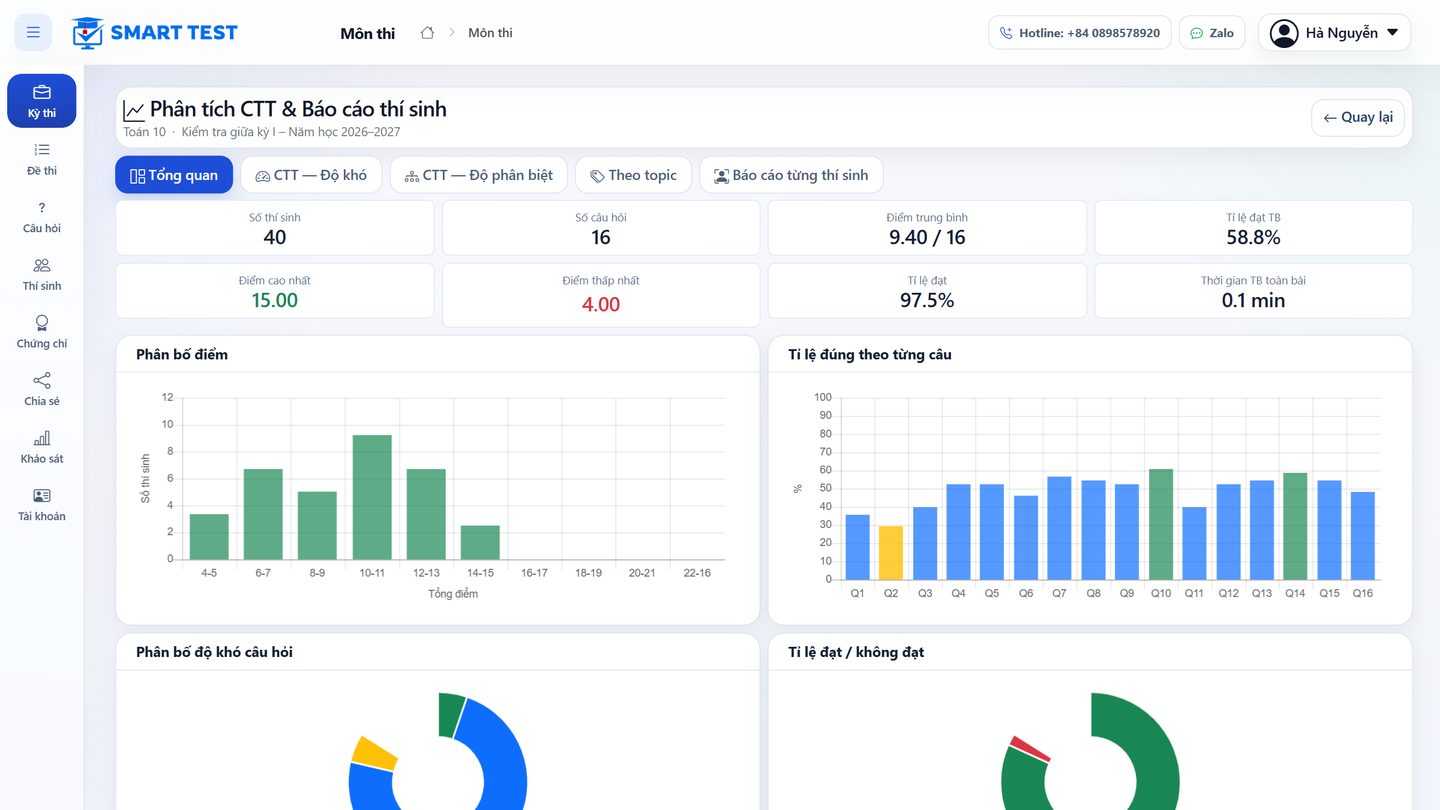
Candidates get their score as soon as they submit (for objective questions). When everyone has submitted, click Finish for each session, then finish the subject. The Result tab shows the score distribution, pass rate, average, highest and lowest scores, and the number of rule violations.
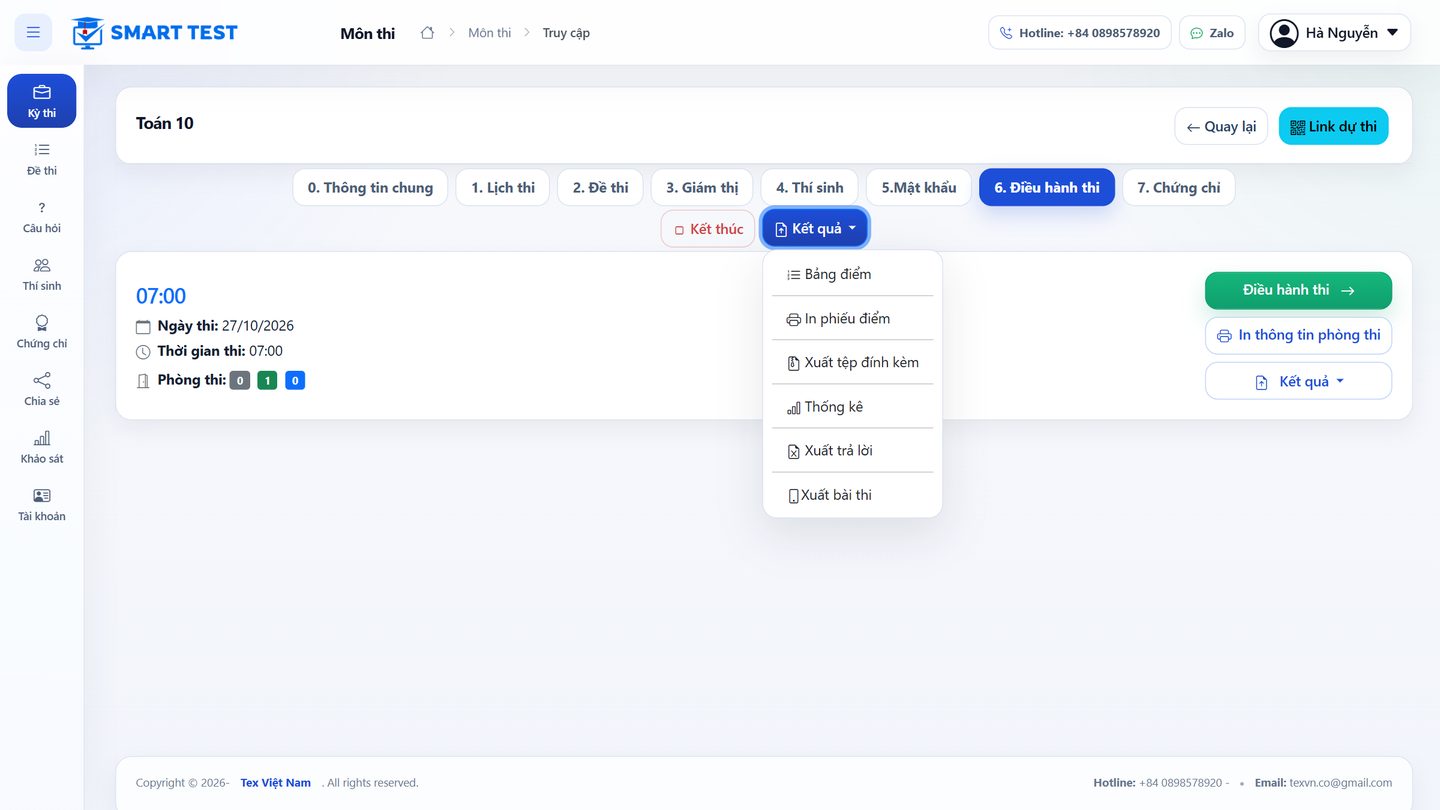
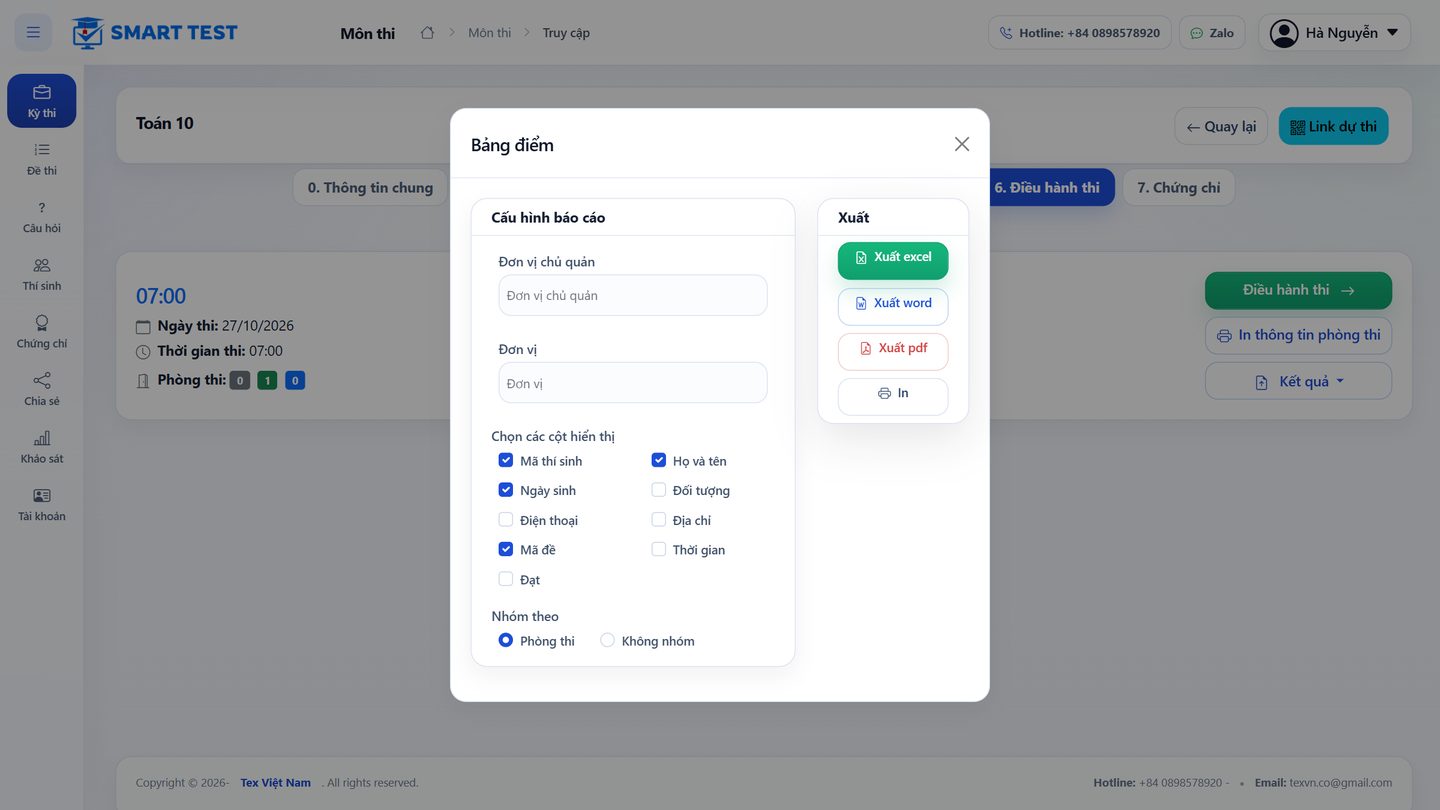
The Result menu has: Score table, Print score slips, Export attachments, Statistics, Export answers, Export papers. The score table lets you pick columns, group by room and export to Excel, Word, PDF or print.
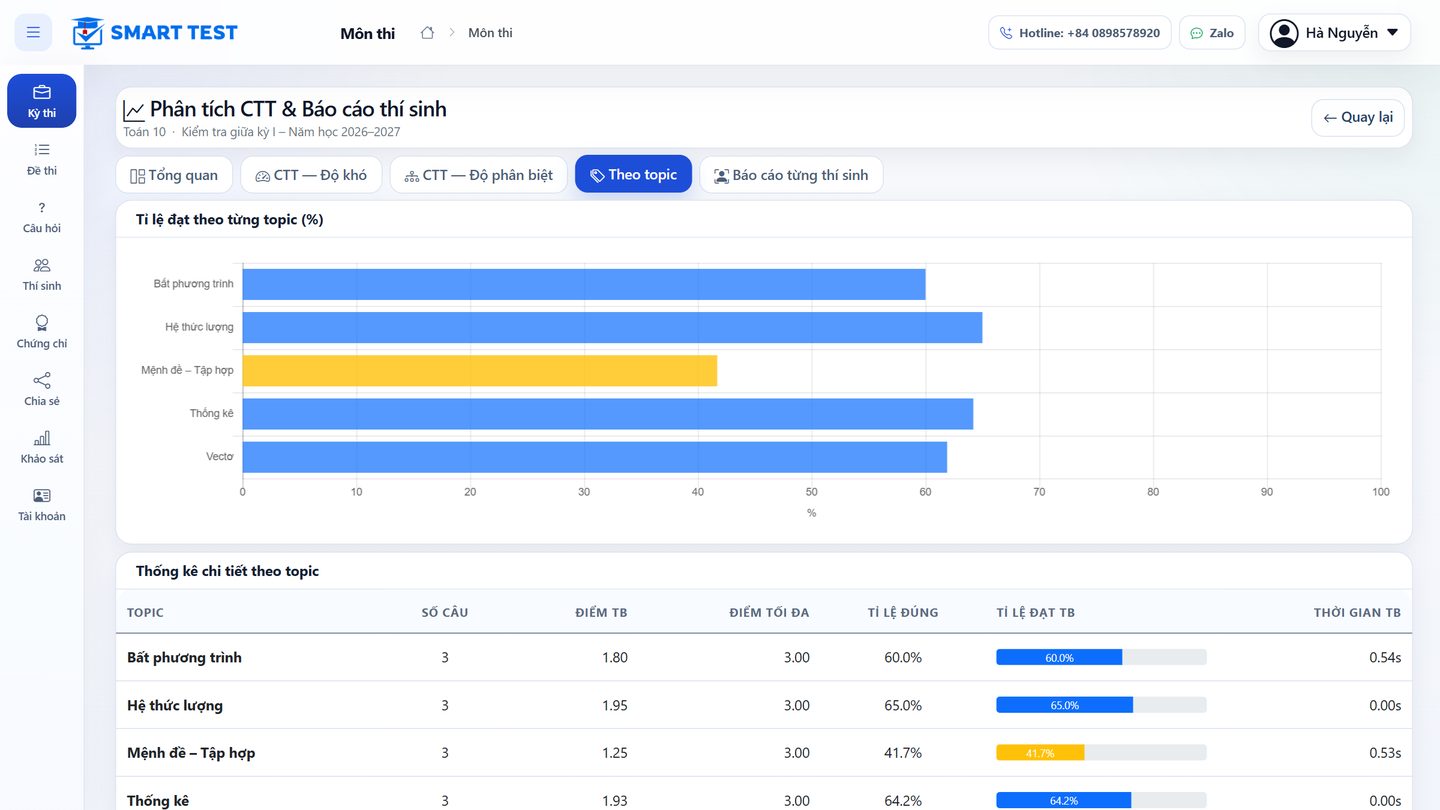
If you change an answer key after the exam, click Recalculate score to re-grade every candidate. Click CTT analysis to see the difficulty and discrimination of each question and the scores by topic.
Grading essays
Subjects with essay questions or file-upload tasks need teachers to grade them. After finishing the subject, click Start grading on the Result tab to create a grading round:
- Name of the round; turn on Re-grade for an appeal round.
- Show candidate information: by default graders see only an anonymous number.
- See other graders' scores: with double grading, whether a grader may see the other grader's score.
- Gradings per paper: once or twice.
- Manager: the email of the grading manager, who receives an invitation and assigns teachers.
- Start and end date of grading.
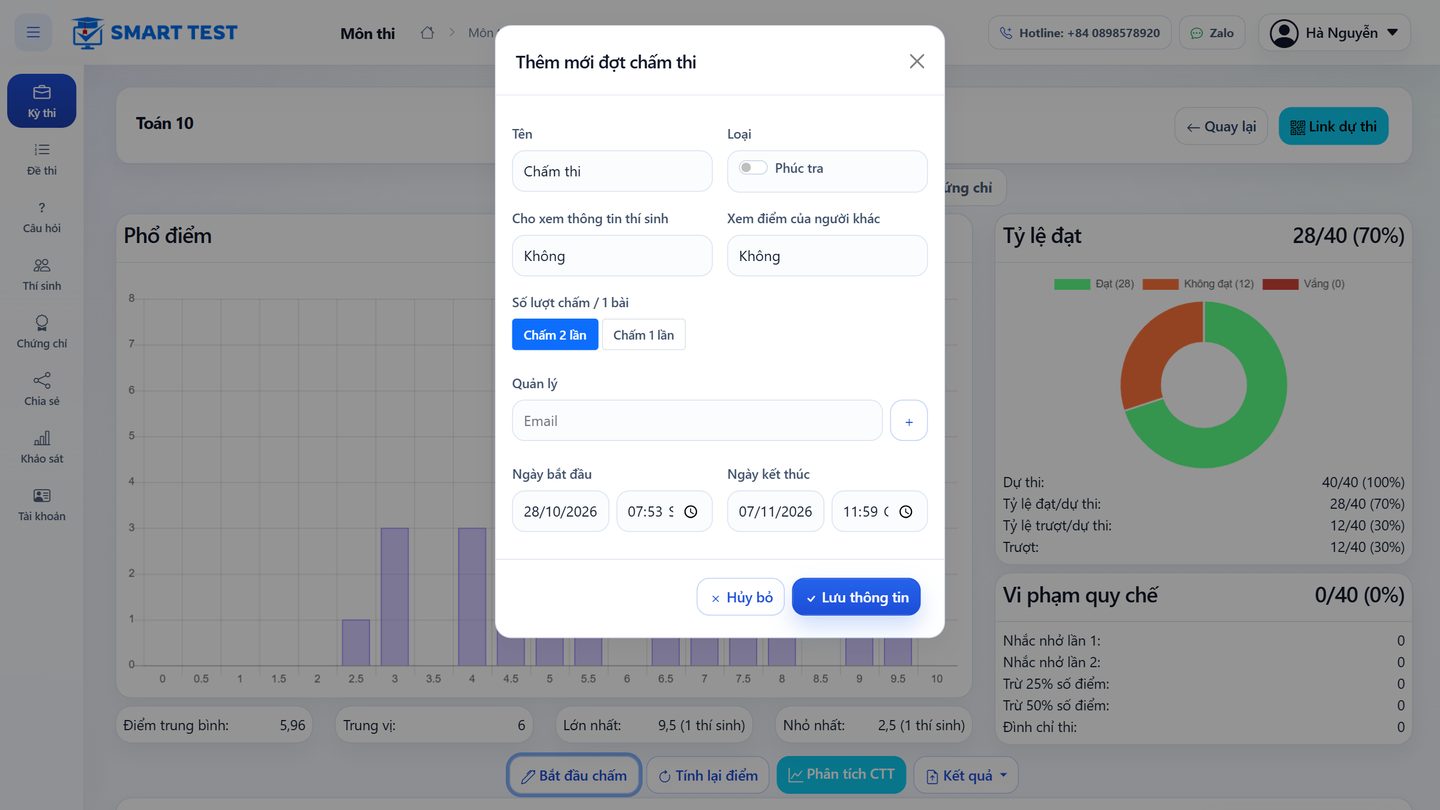
Click Save, then Manage grading to open the grading board: papers are numbered anonymously. Enter teachers' emails and how many papers each grades; SmartTest assigns the papers and sends invitations. Teachers accept the email, sign in, open Exams → the subject being graded → an anonymous number, read the answer and attachments, enter the score and save. The grading manager can also grade papers directly.
The board shows the 1st and 2nd scores, the approved score (the manager's final decision), the agreed score (average of two gradings or the approved score), the objective score (available on submission), deductions and the total scaled to the subject's maximum score.
Managing exams
The Exams menu lists exams by status: Preparing, Active, Finished. Each exam has its own exam code and link. Click Create to create an exam first and add subjects later, or let the Organize wizard create it in step 2.
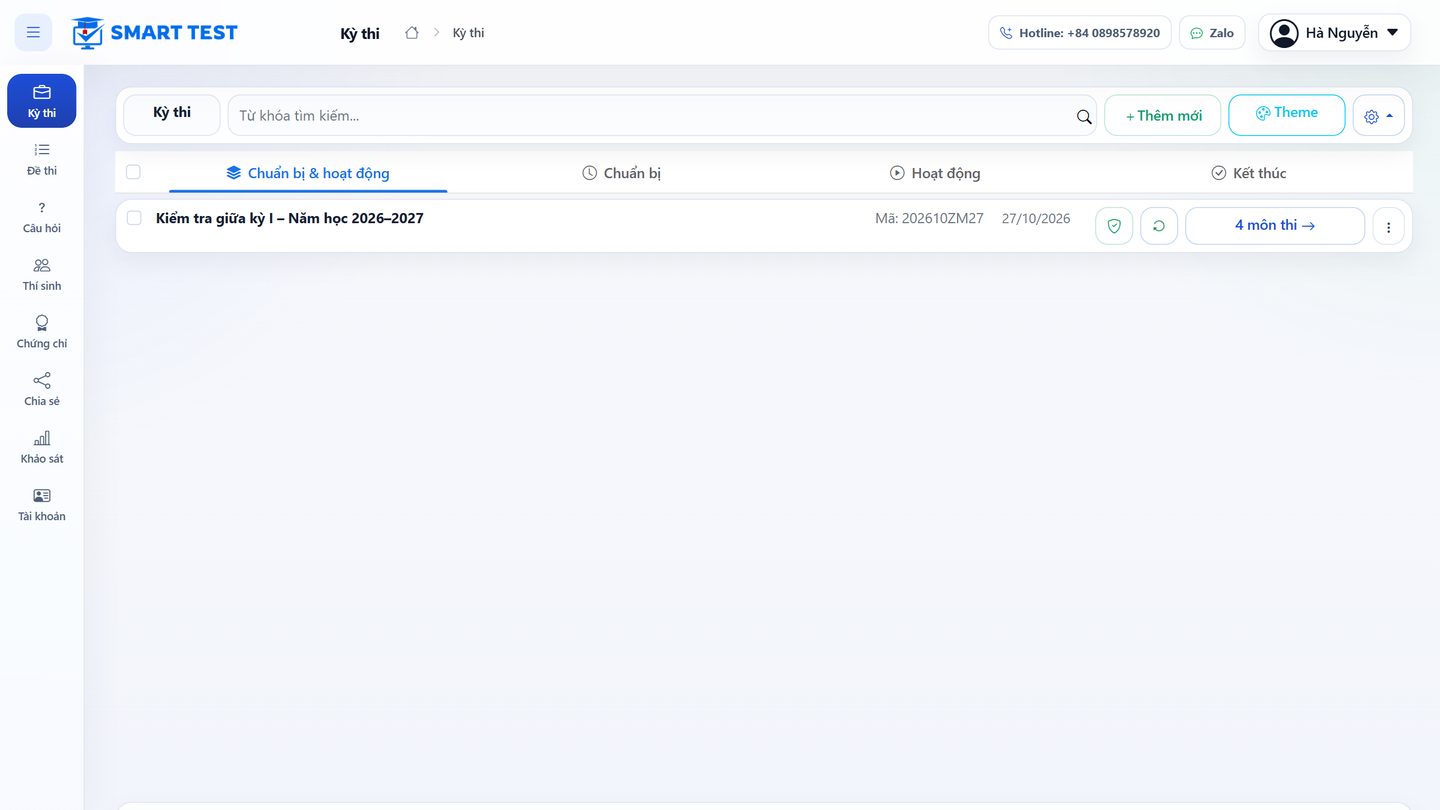
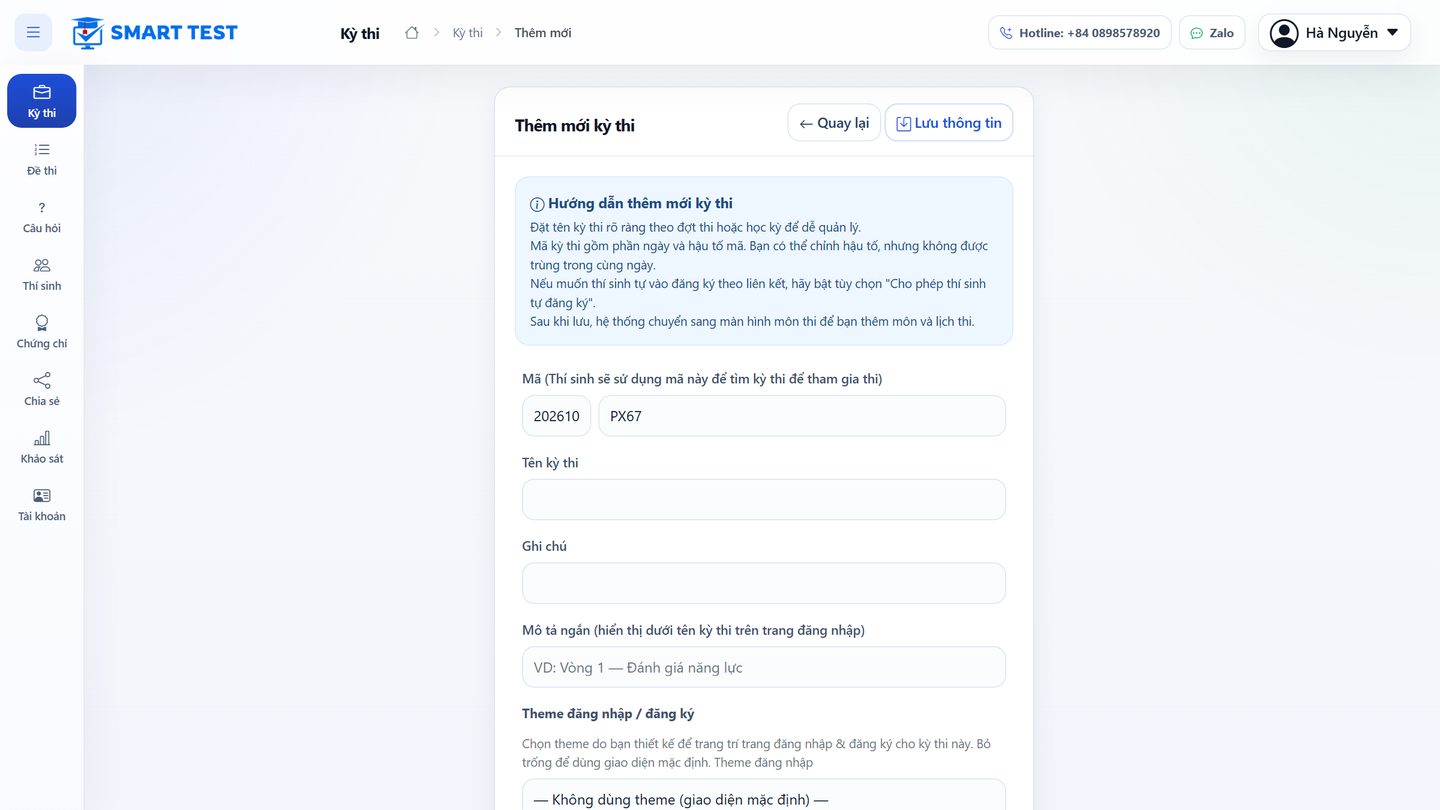
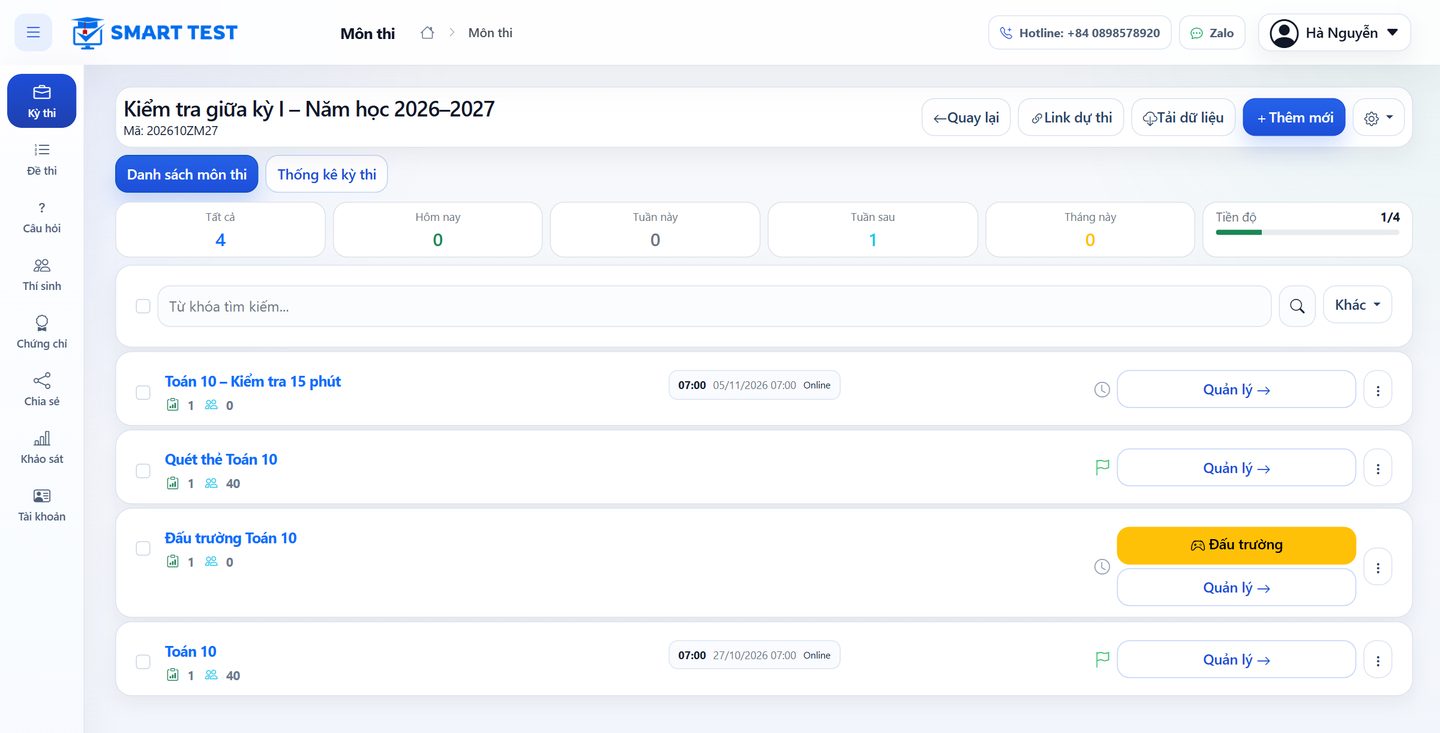
Click the number of subjects of an exam to see them: each subject shows its mode (online exam, live arena, card scan), exam time, number of candidates and a Manage button.
For candidates
- Open the exam link from your teacher, or go to the Online exams page, enter the exam code and click Enter.
- Sign in with the student code and password you were given. If the exam allows self-registration, you can sign in with email.
- Choose the subject and click Take exam. For objective tests, click Continue to switch to full screen.
- Answer the questions. Click the bell on a question you are unsure about to mark it yellow and come back later. For practical tasks, attach your work file.
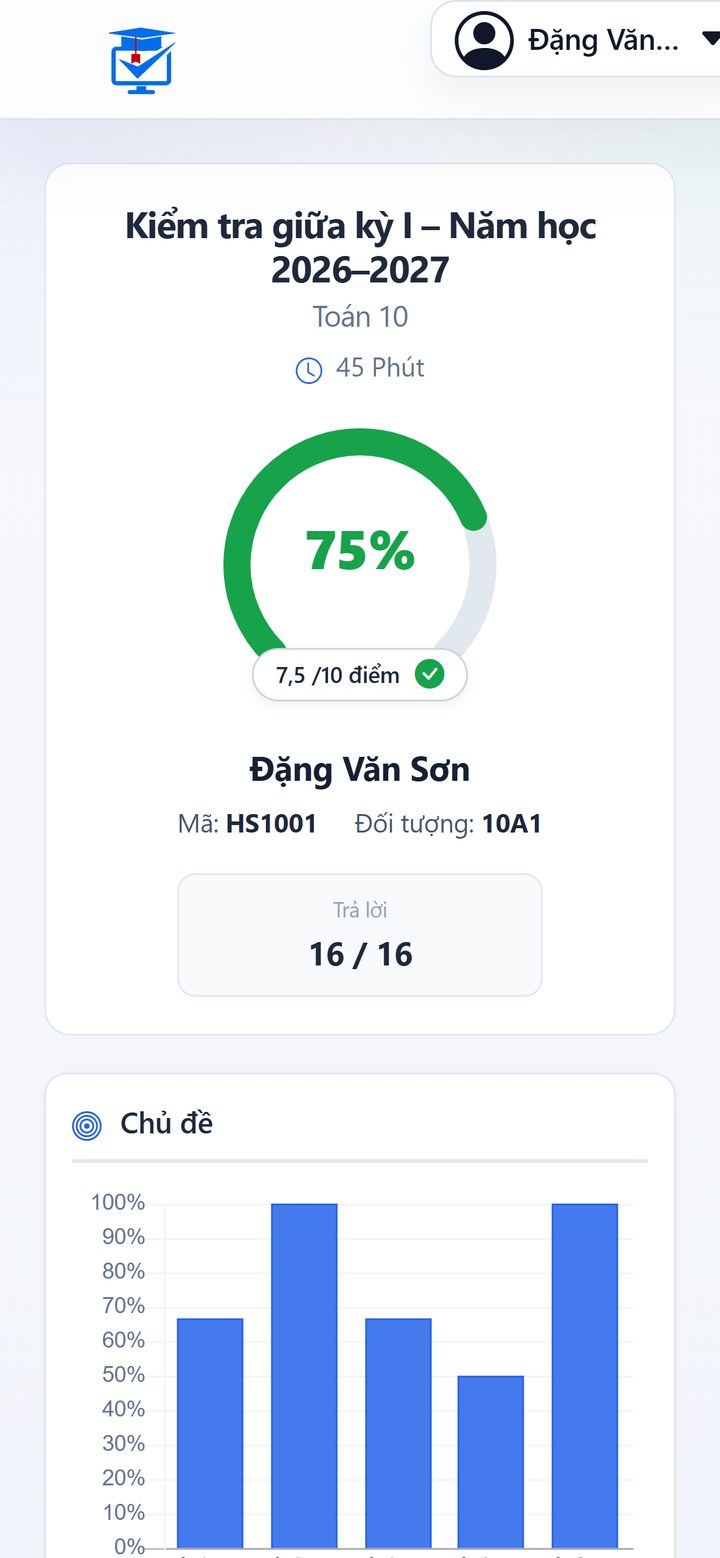
- Click Submit and confirm. If your teacher allows it, your score and per-topic chart appear right away.
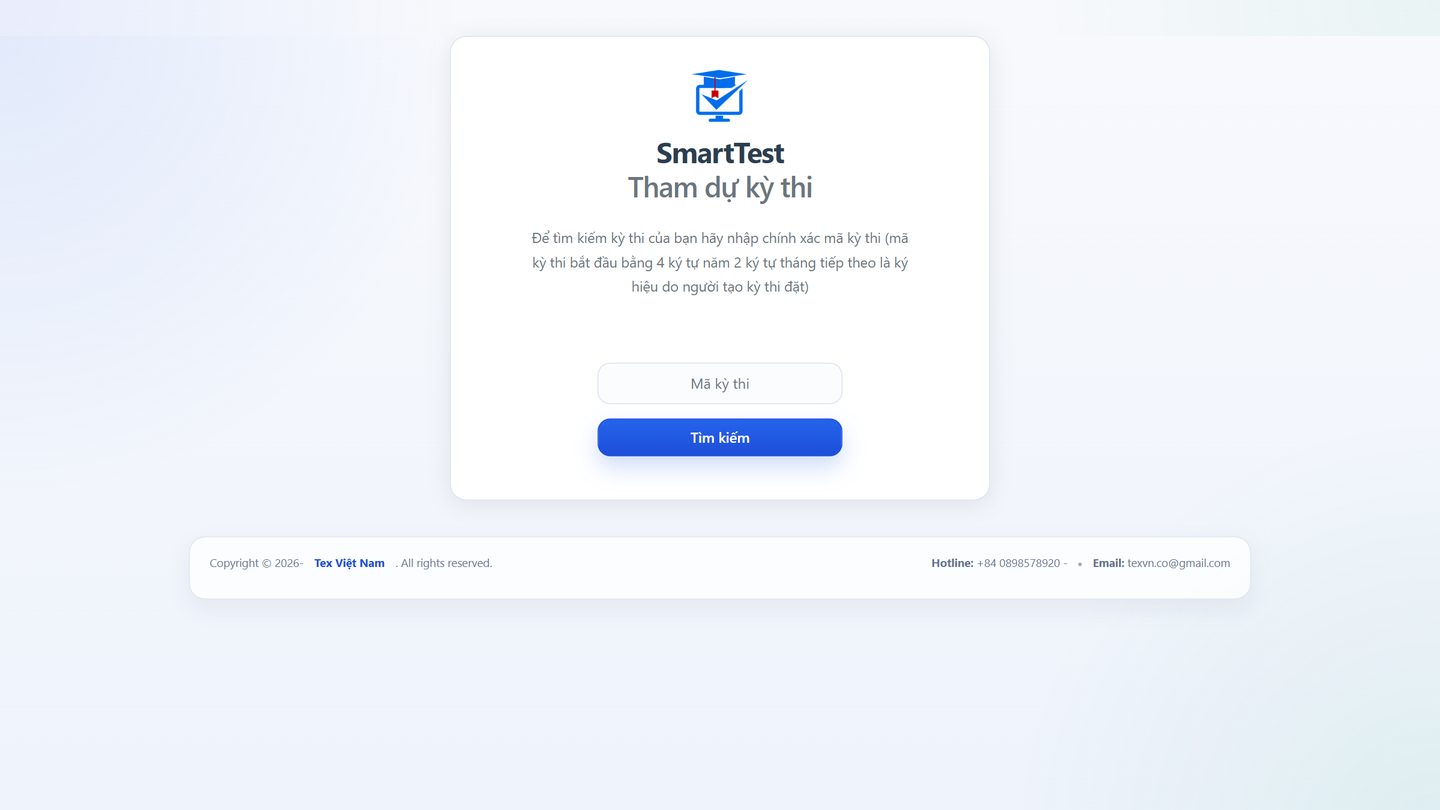
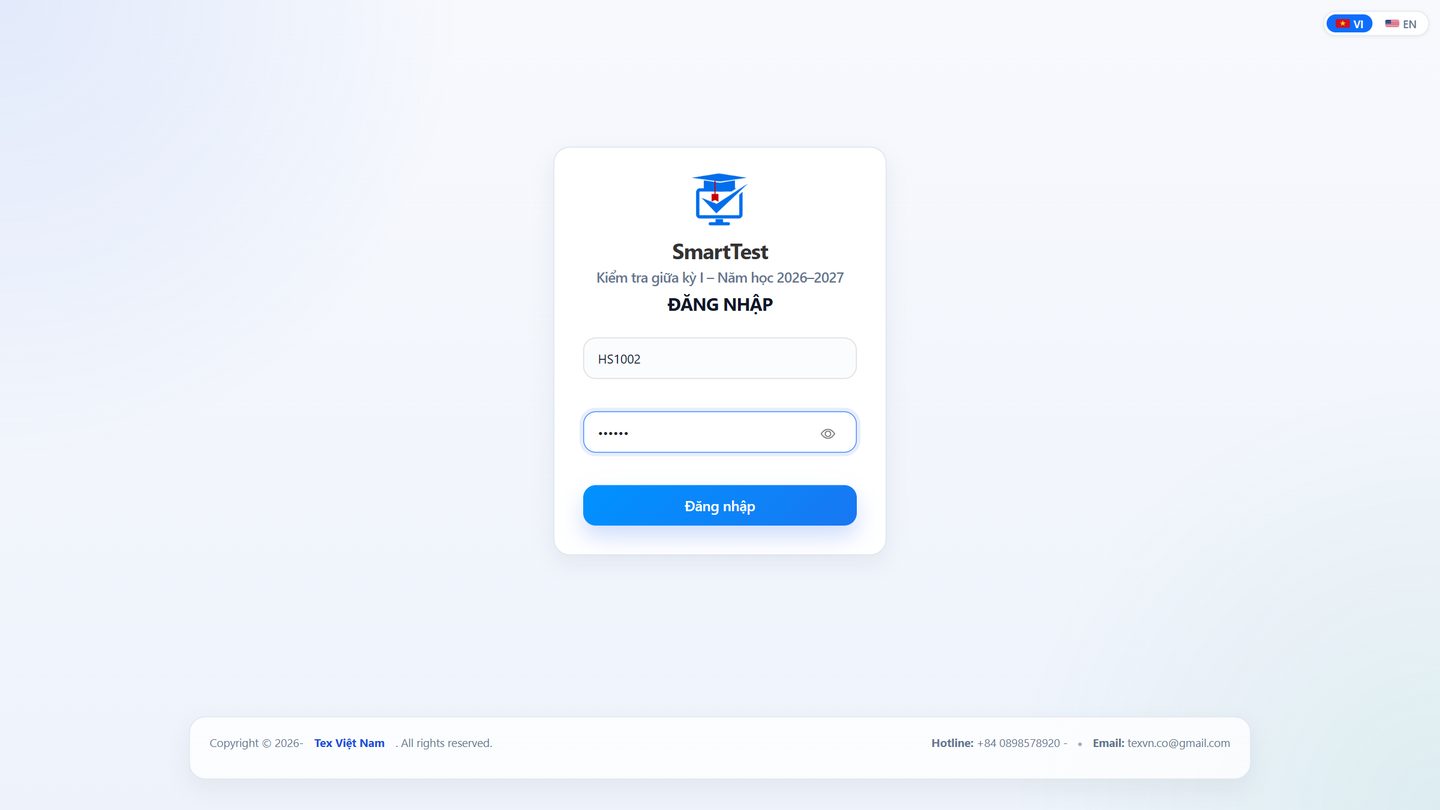
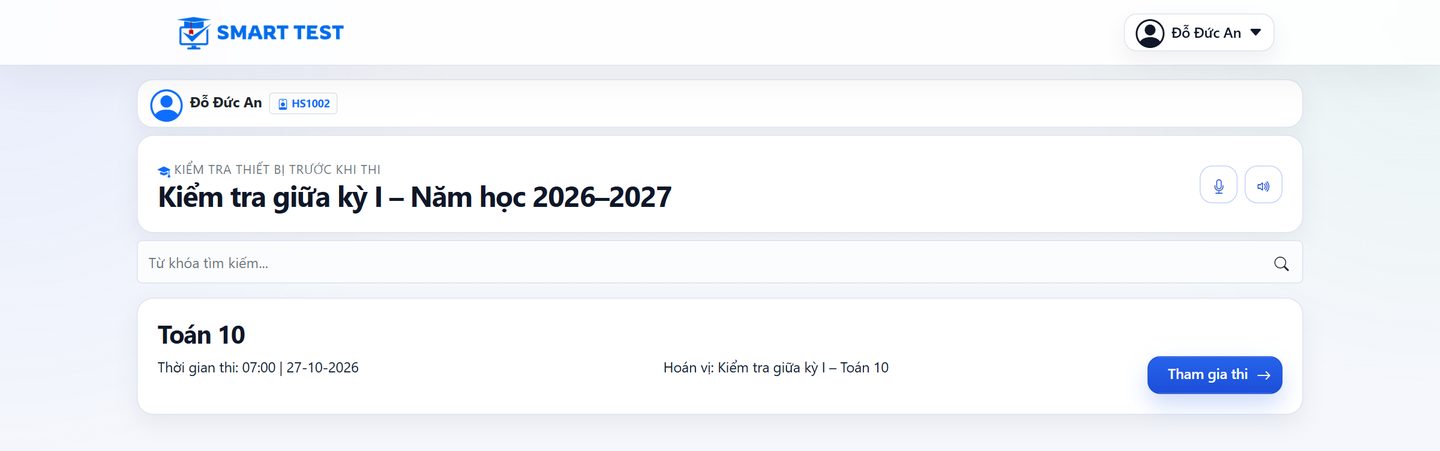
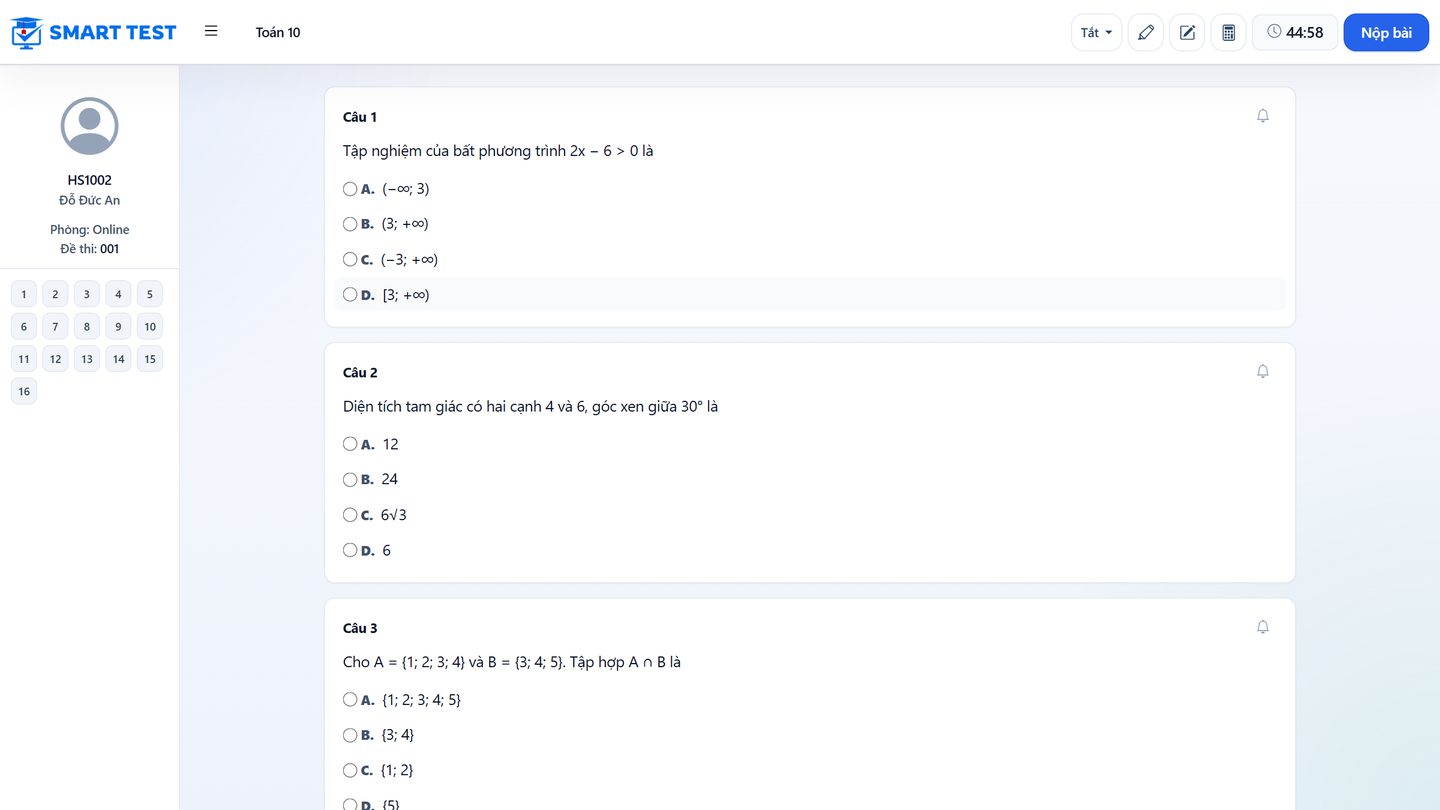
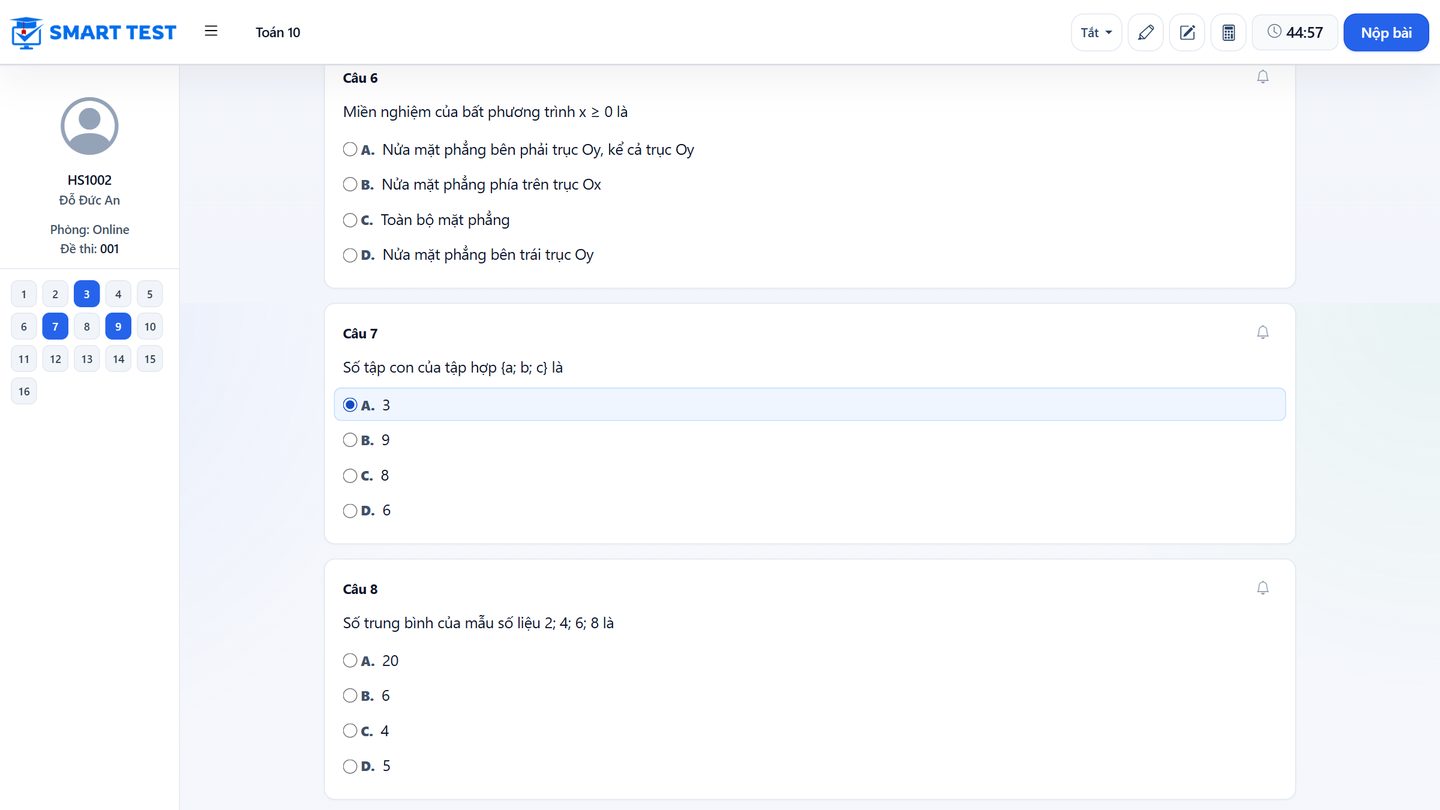
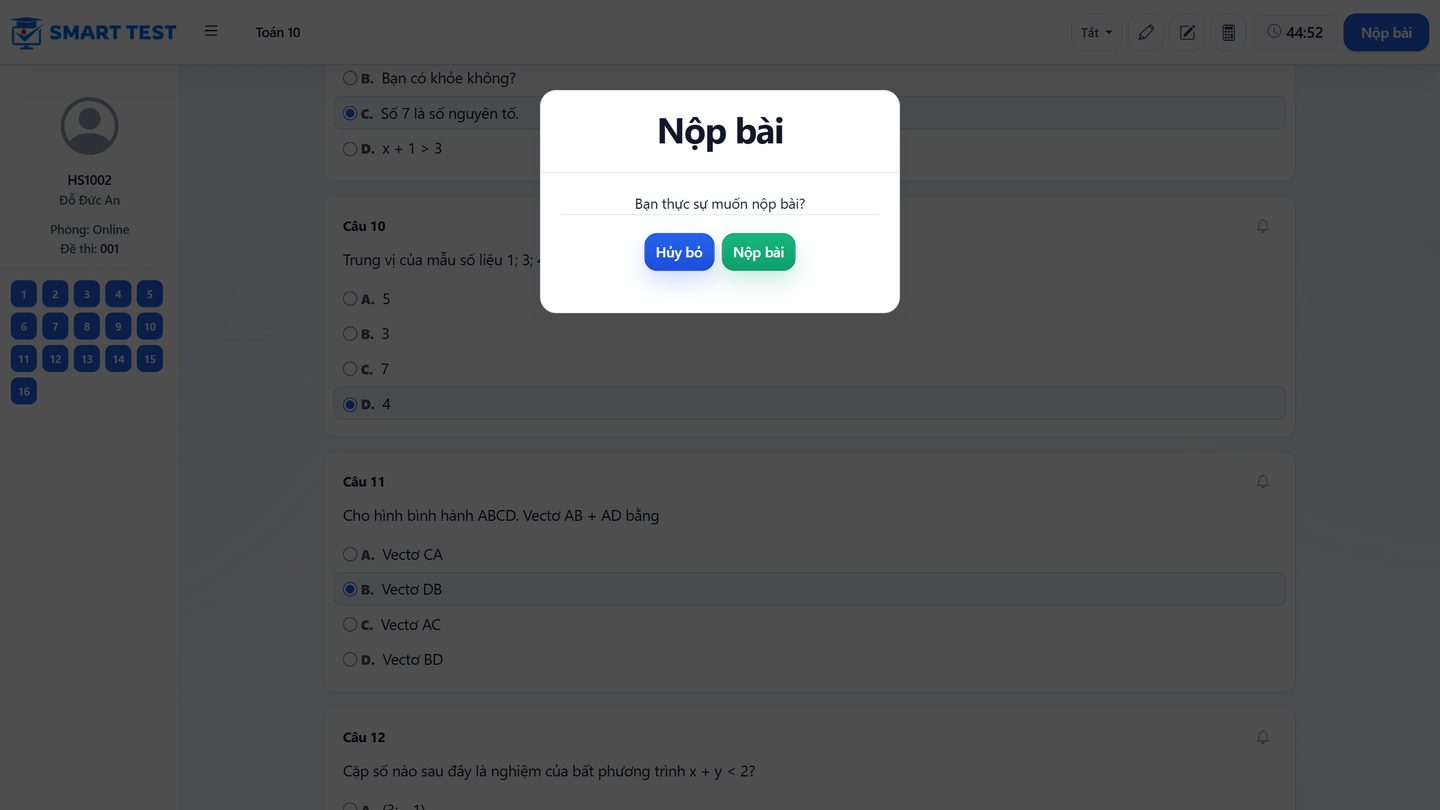
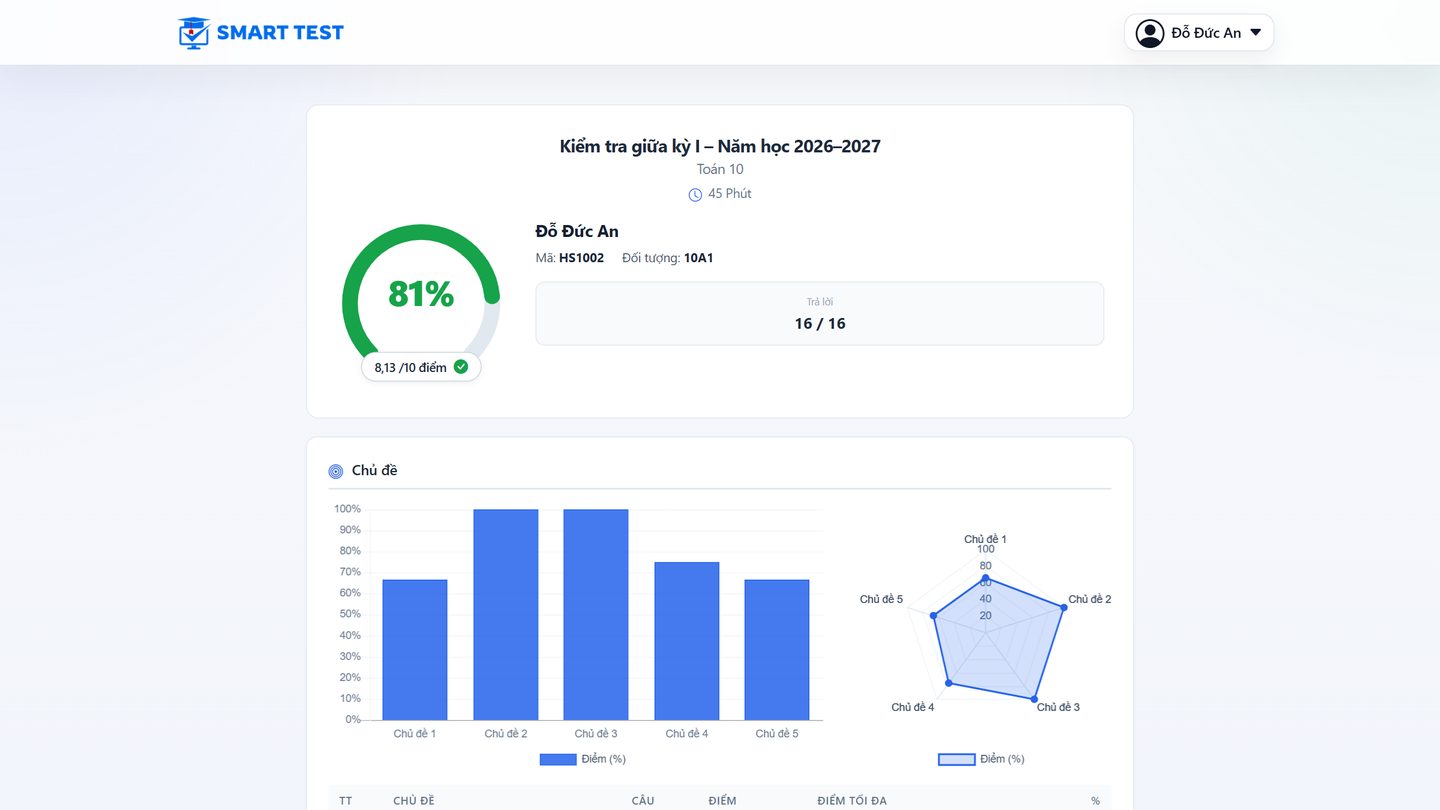
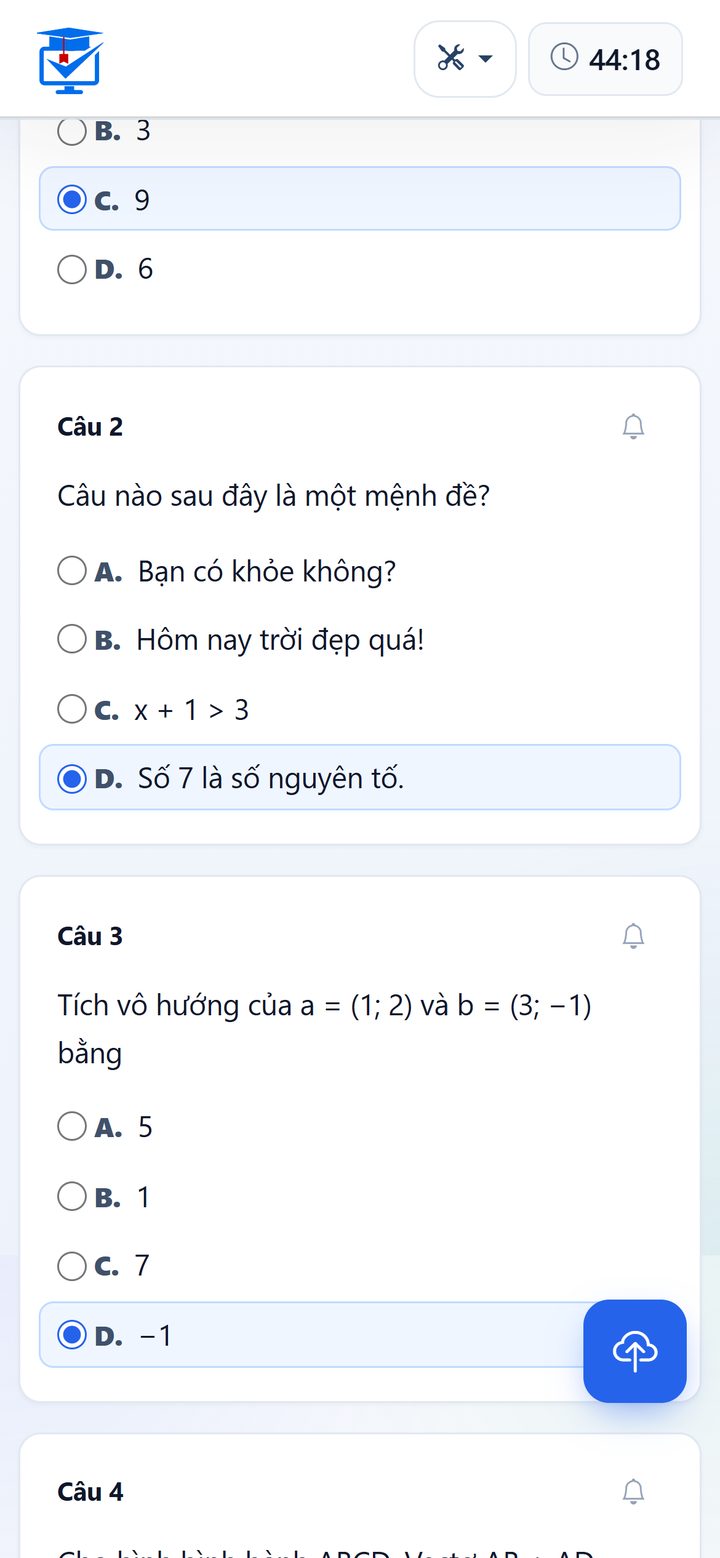
On a phone, the exam and the results adapt to the screen:
For proctors
- Sign in on the management page with the email added as a proctor.
- Open Exams, choose the subject and, on the Monitor exam tab, click Monitor exam on your session.
- Watch who has signed in, is taking the exam or has submitted; handle warnings; allow late entry or add time when needed (see Step 6).
- At the end, print the objective score slips, export practical work files, then click Finish for the session.
Live arena
The live arena turns review time into a game: questions appear on the big screen, students answer on phones or computers, correct and fast answers earn more points, and the leaderboard updates after every question.
- In the Organize step, choose Live arena, pick the exam and name the subject.
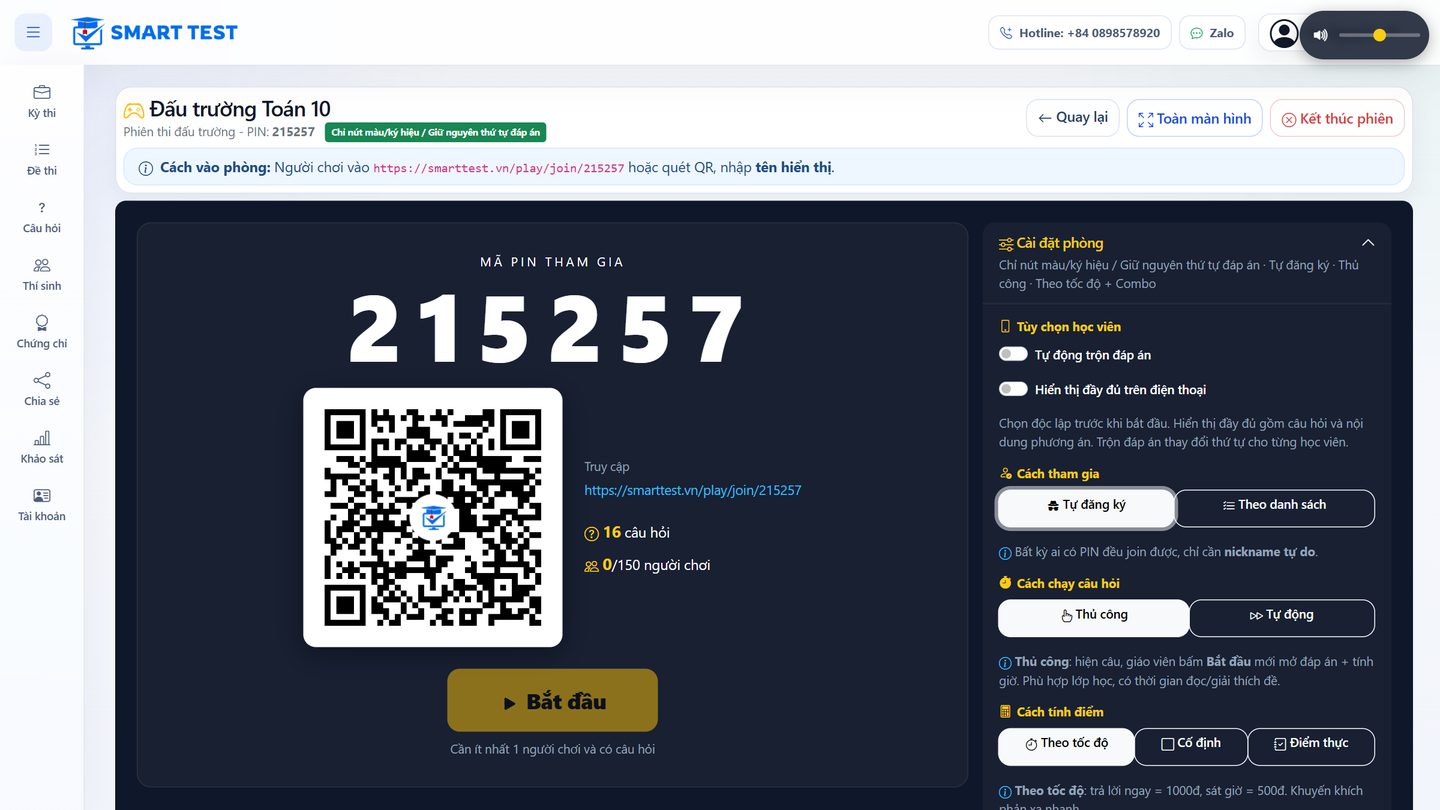
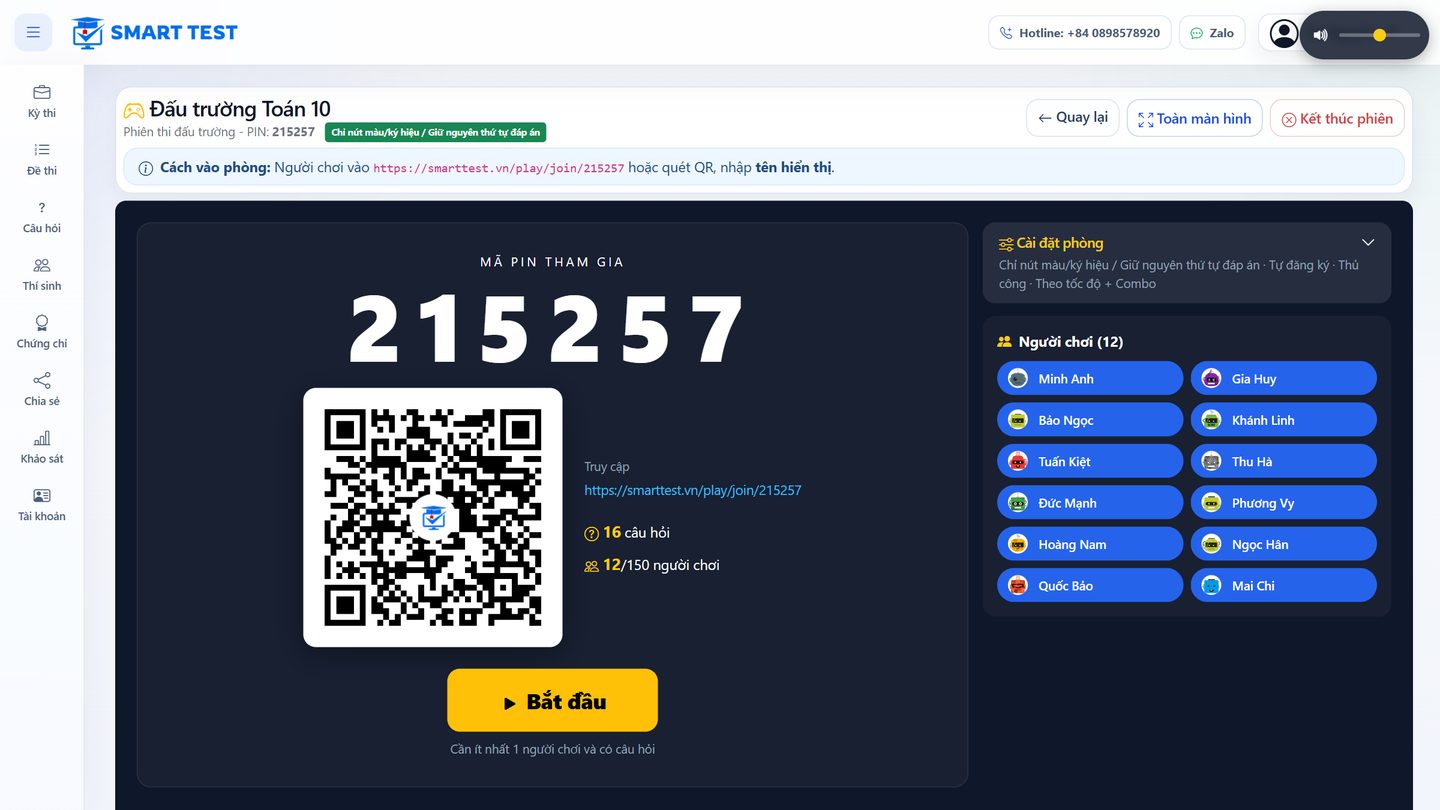
- Open the arena subject and click Arena to open the lobby. Project this screen.
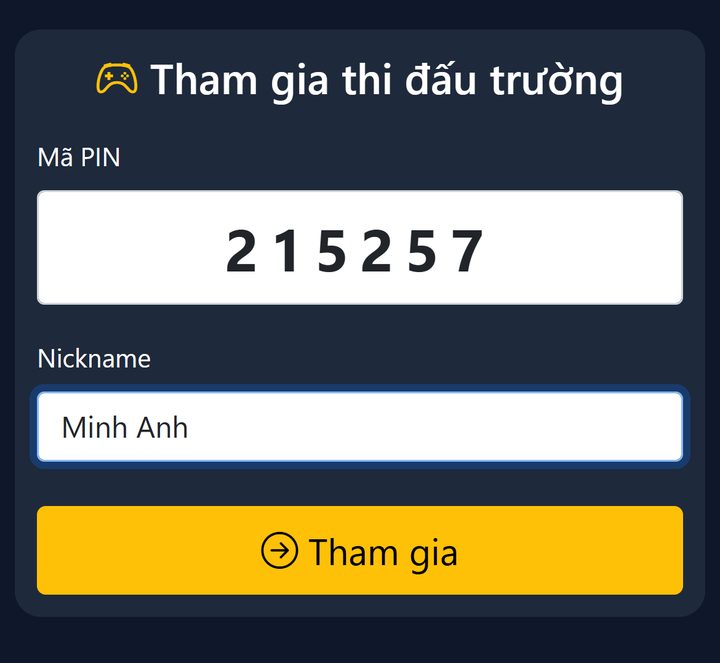
- Students scan the QR code or go to
/play/join, enter the PIN and a display name. - When everyone is in, click Start.
In the Room settings panel on the right of the lobby you can choose:
- Player options: shuffle answers automatically; show the full question on phones.
- How to join: Self-register (anyone with the PIN, just a name) or From list (sign in with the student code).
- Question flow: Manual (the teacher moves on, leaving time to explain) or Automatic.
- Scoring: By speed, Fixed or the test's real score.
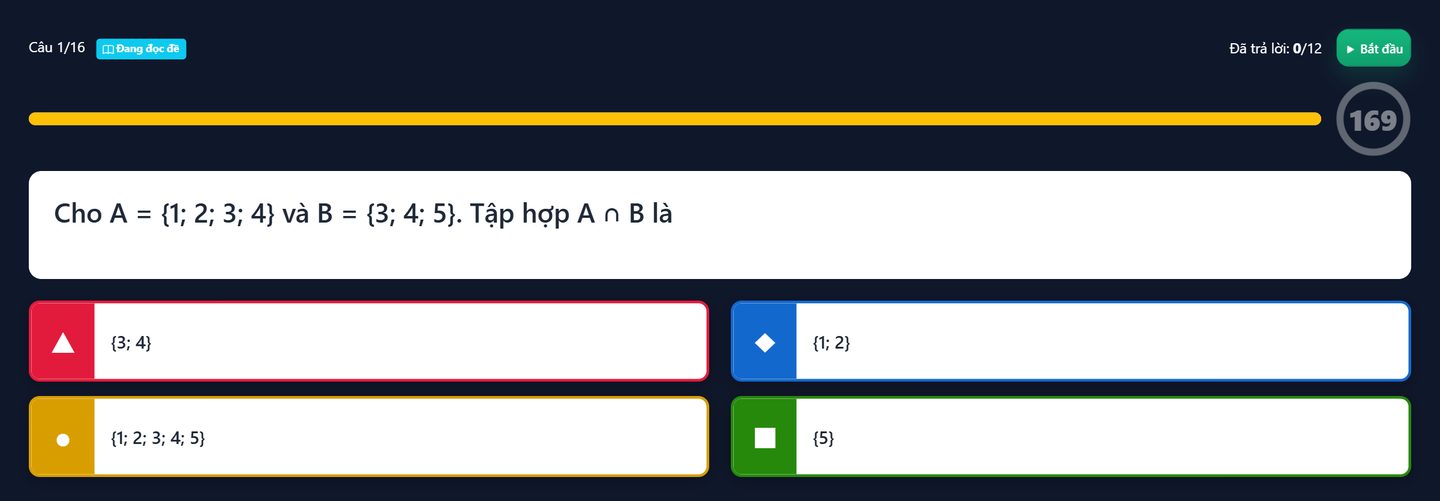
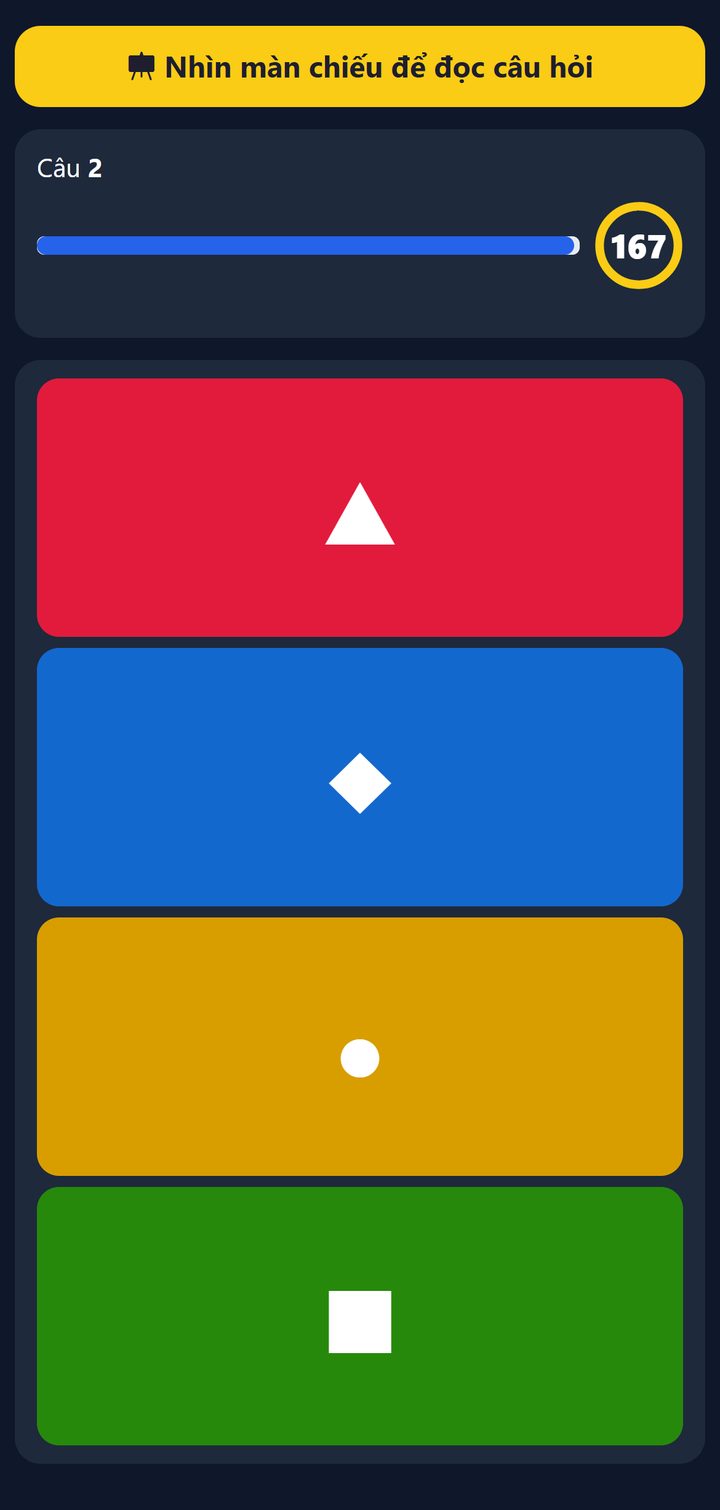
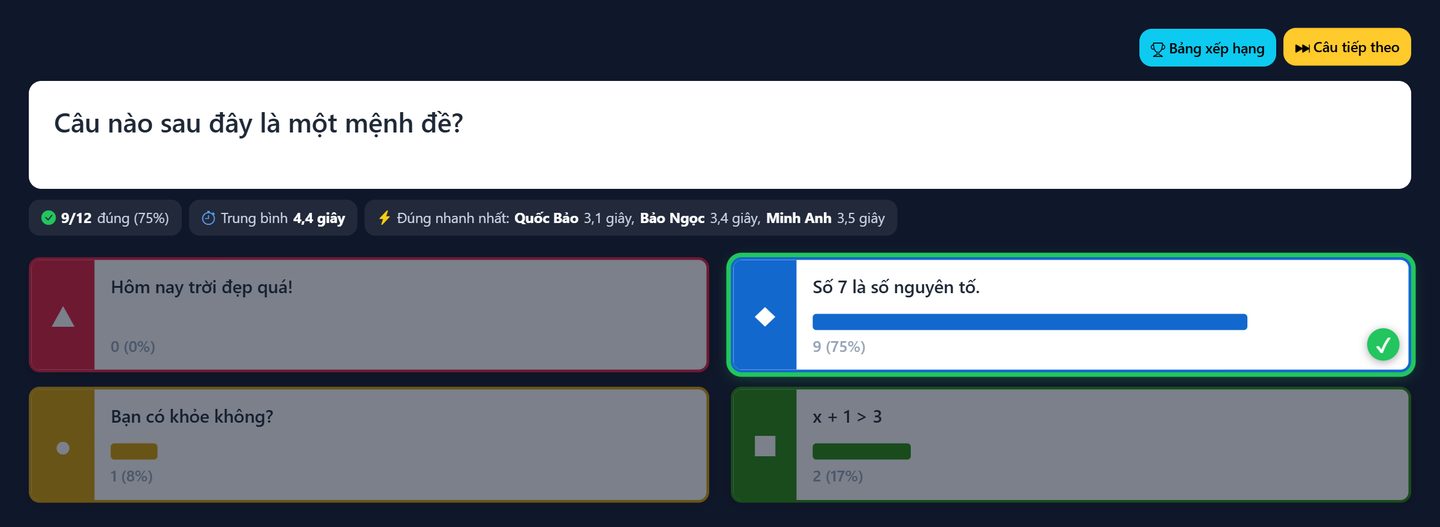
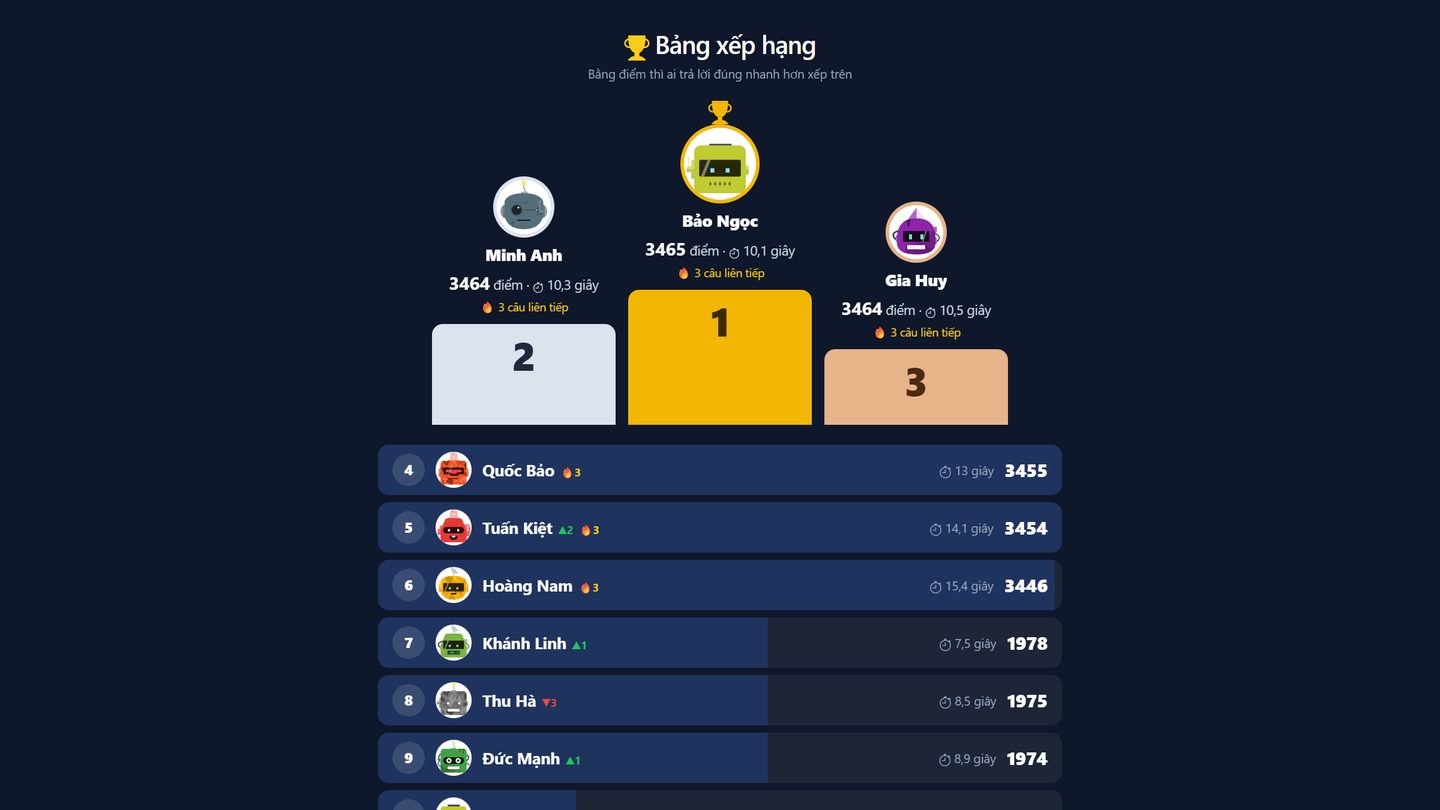
For each question the big screen shows the question and four colored tiles; students tap a color on their phone. When time is up the screen shows the correct answer, how many chose each tile, then the leaderboard. The game ends with a Top 3 podium.

Answer-card scan
Use card scan when students have no devices: each student has a printed card and turns it to choose A, B, C or D; the teacher scans the class with one phone and scores appear on the screen right away.
- In the Organize step, choose Scan card, pick the exam, name the subject, then import the student list. Each student gets a card number by candidate number.
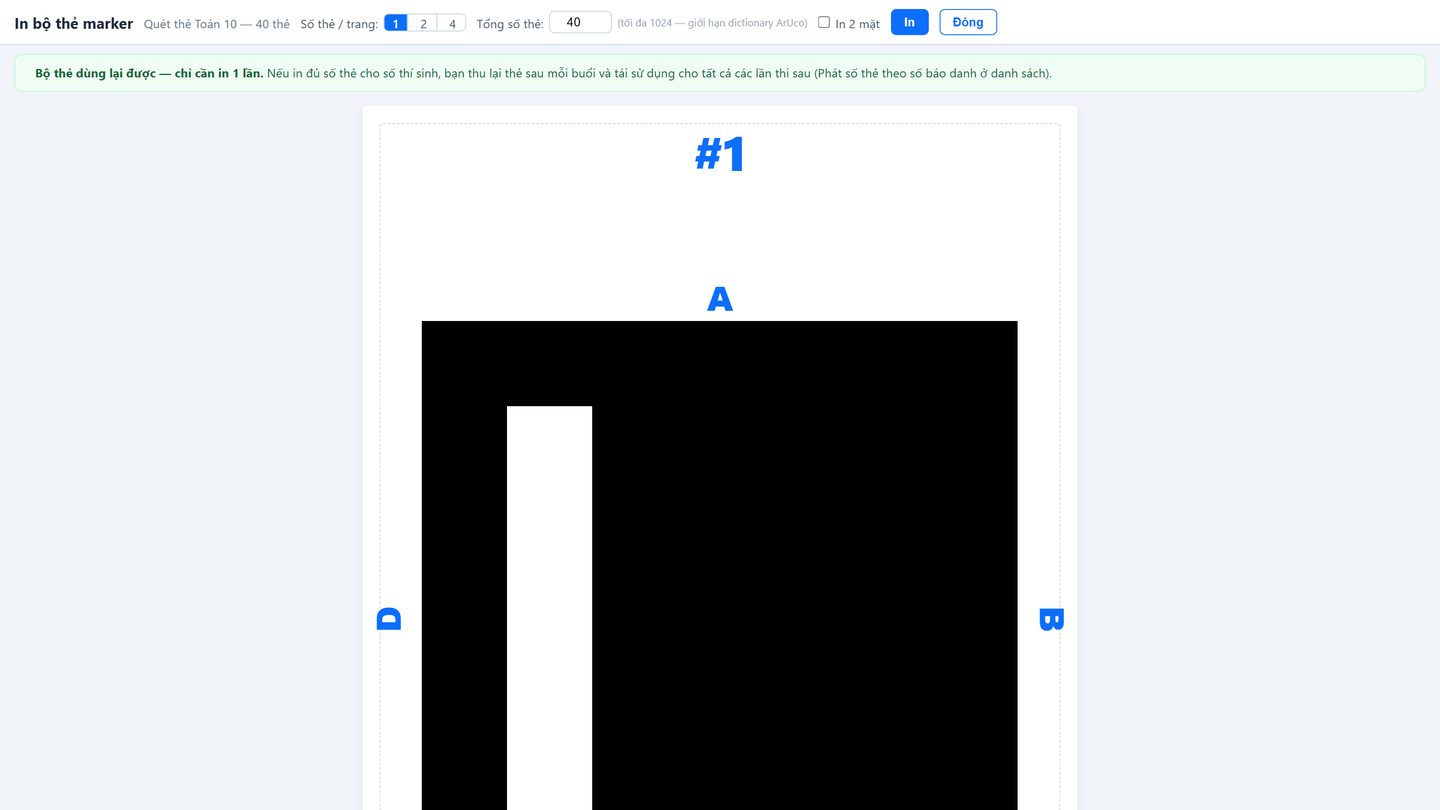
- Click Print marker cards, choose the cards per page and print. The cards are reusable – print them once and hand them out by candidate number each session.
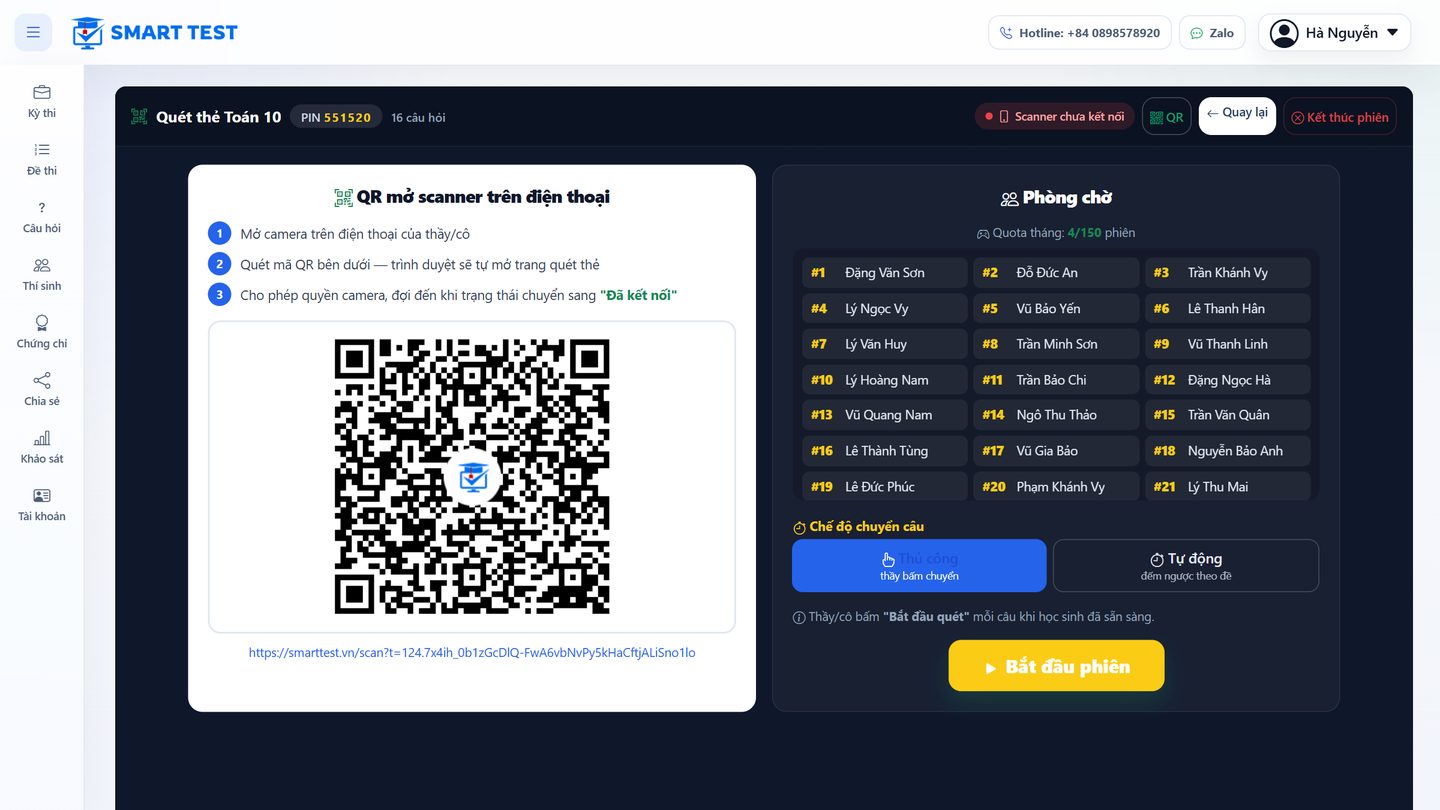
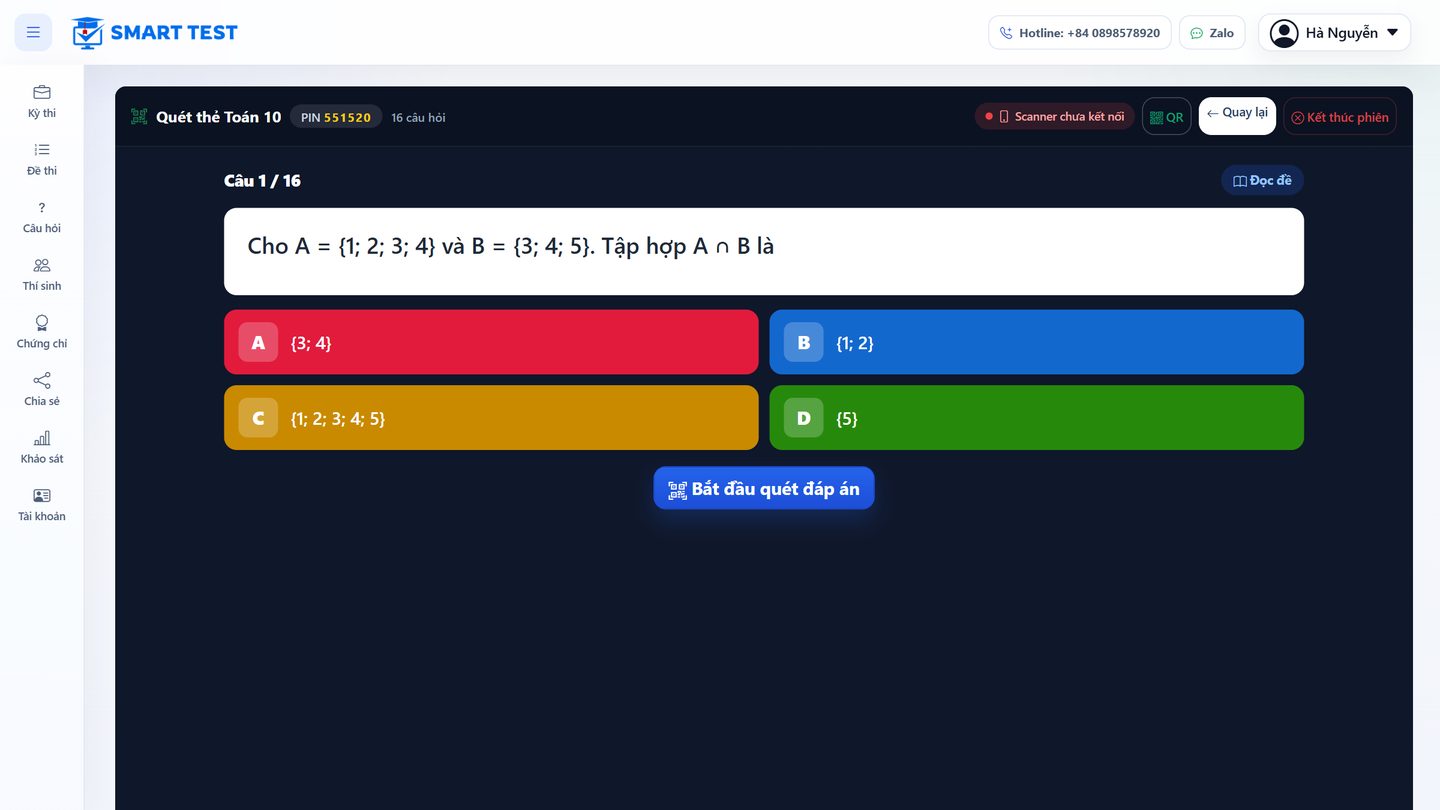
- Click Start card-scan session and project the question. Scan the QR to open scanner on phone with your own phone to open the scanner.
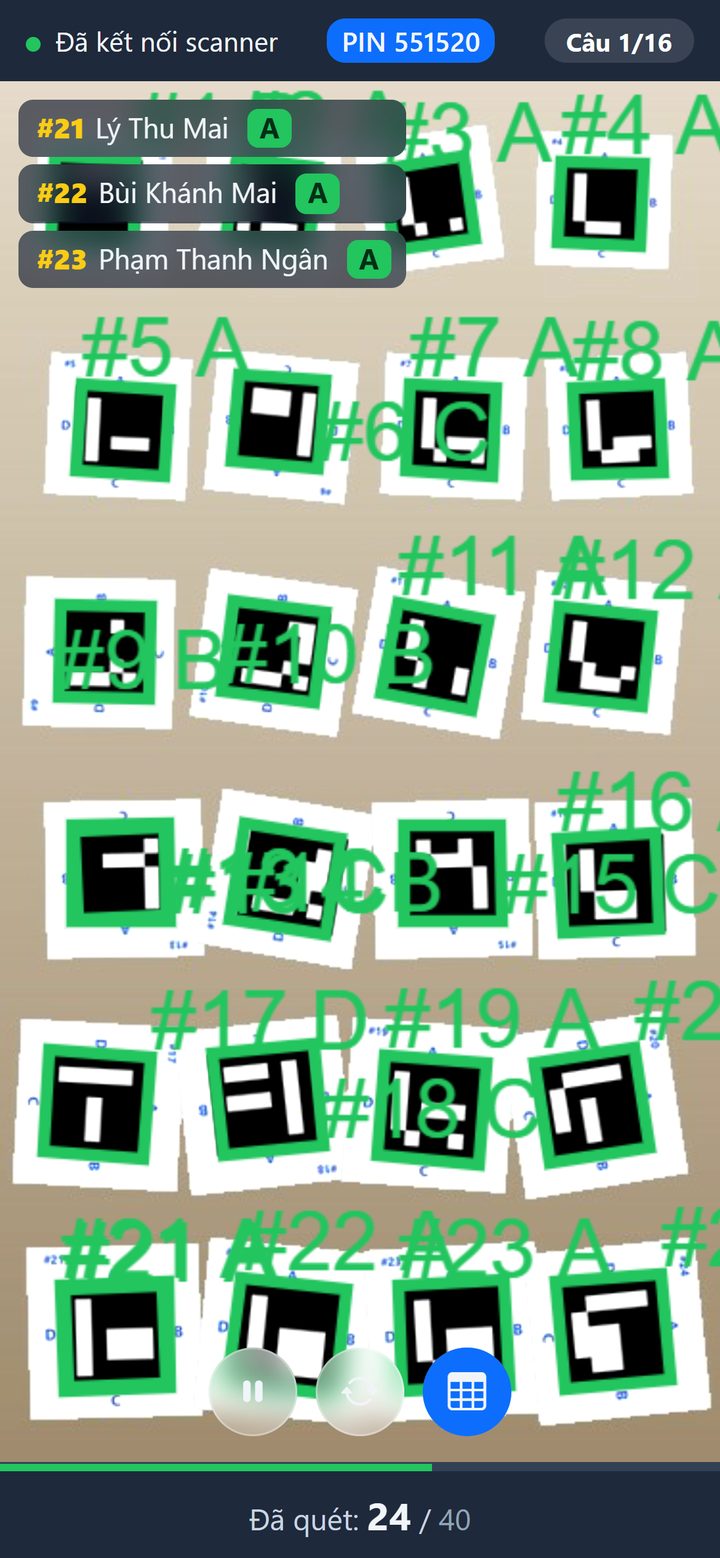
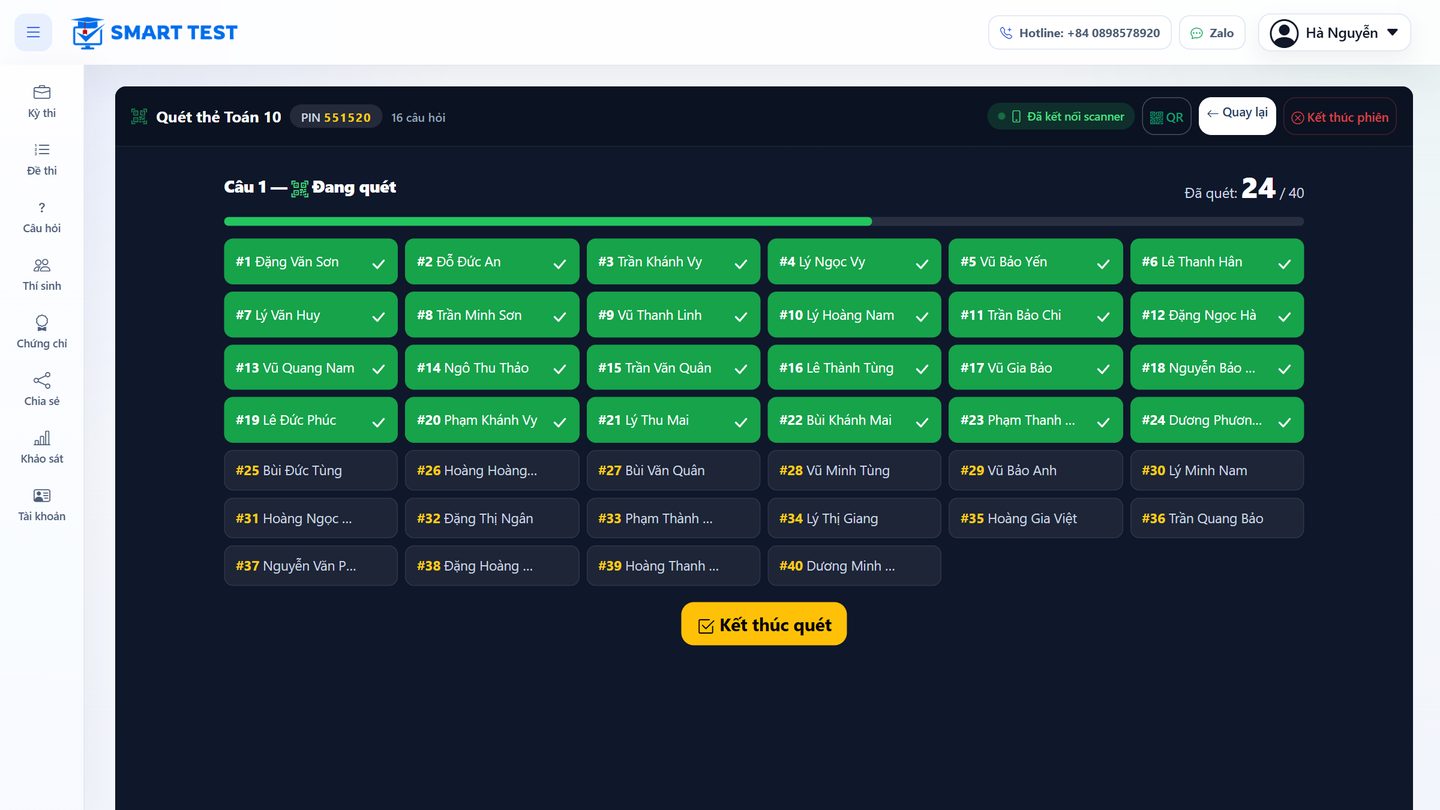
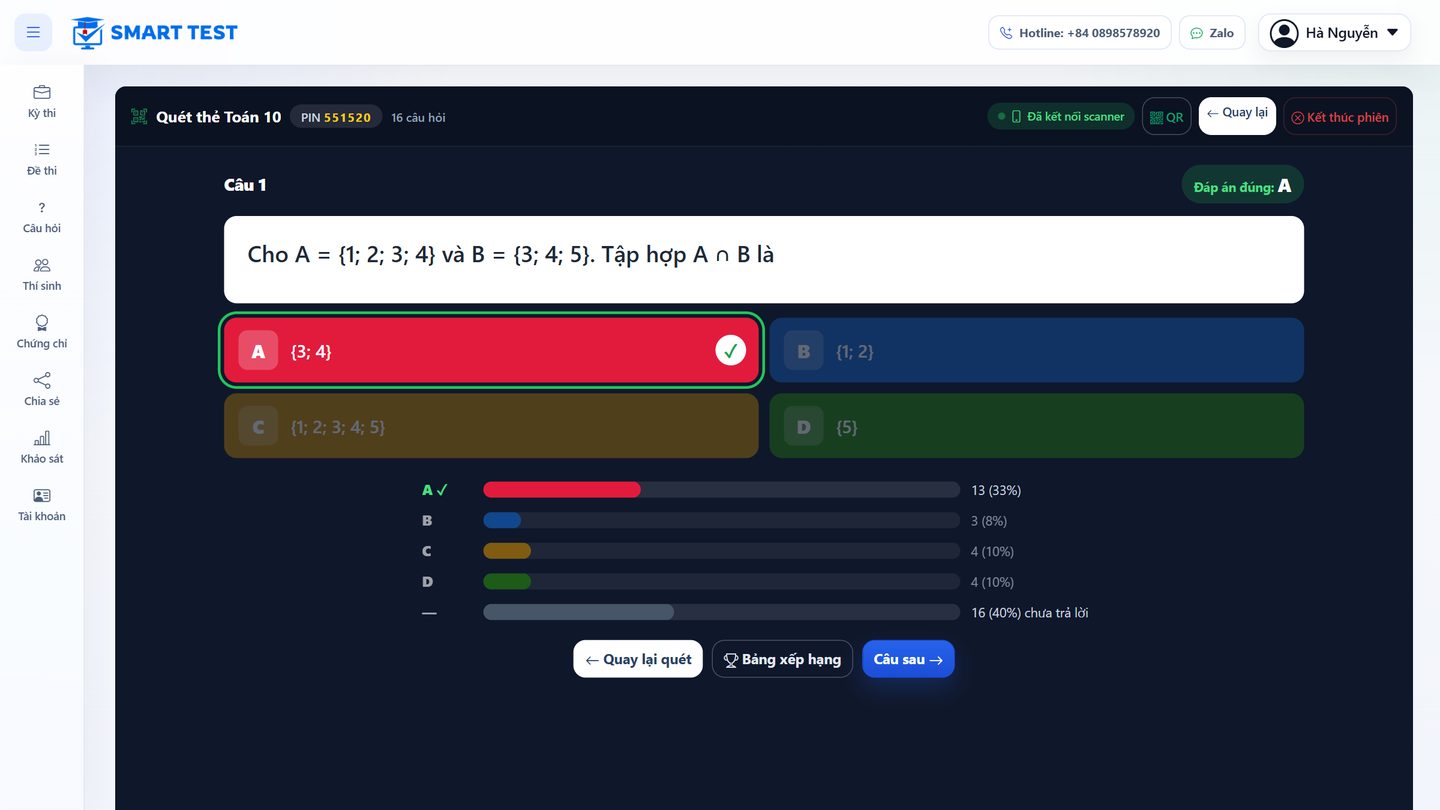
- Students hold up their cards; the letter on the top edge is their answer. Sweep the phone across the class; each card read is marked on the screen at once.
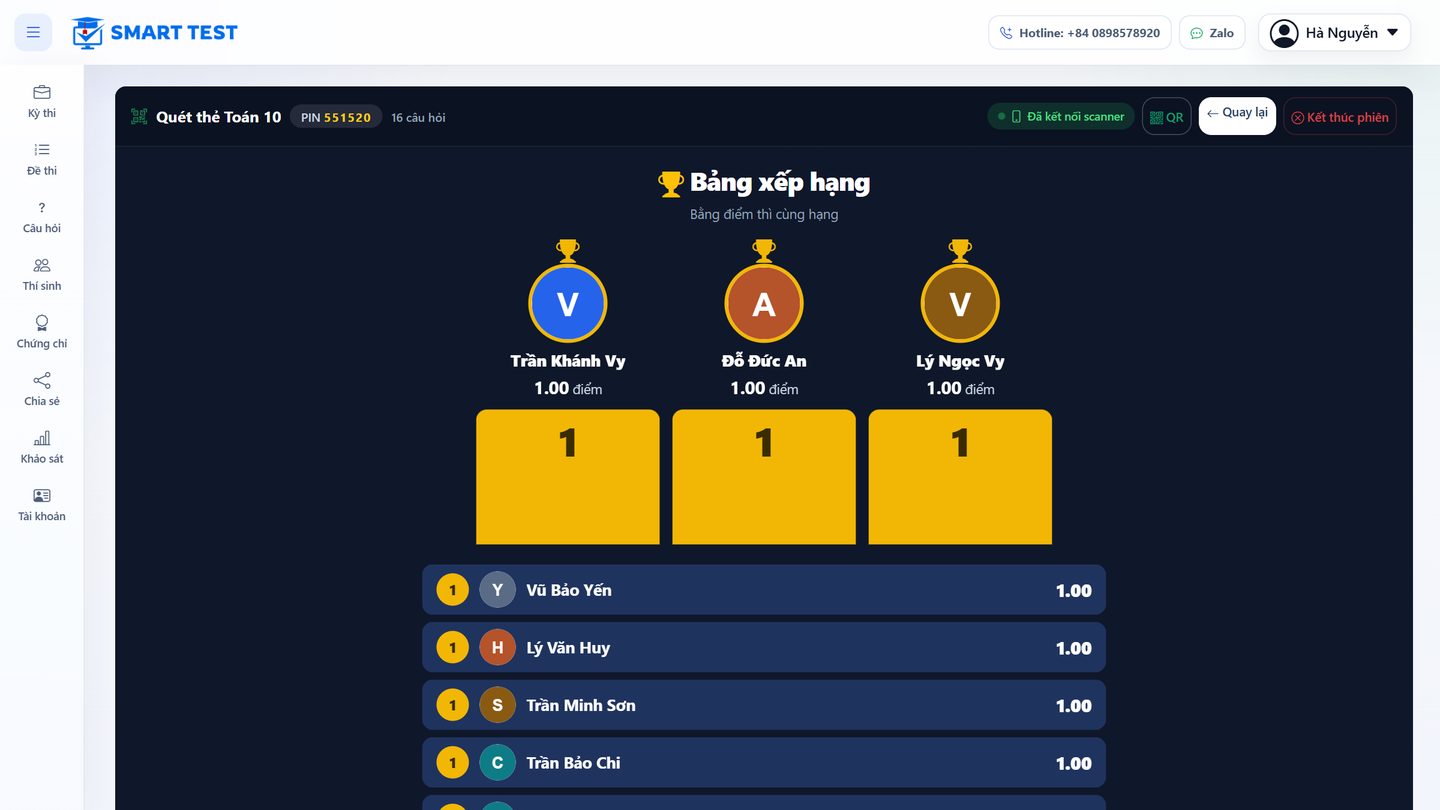
- Click Finish scanning to see the question result: percent correct, how many chose each answer, then the leaderboard.
Question banks
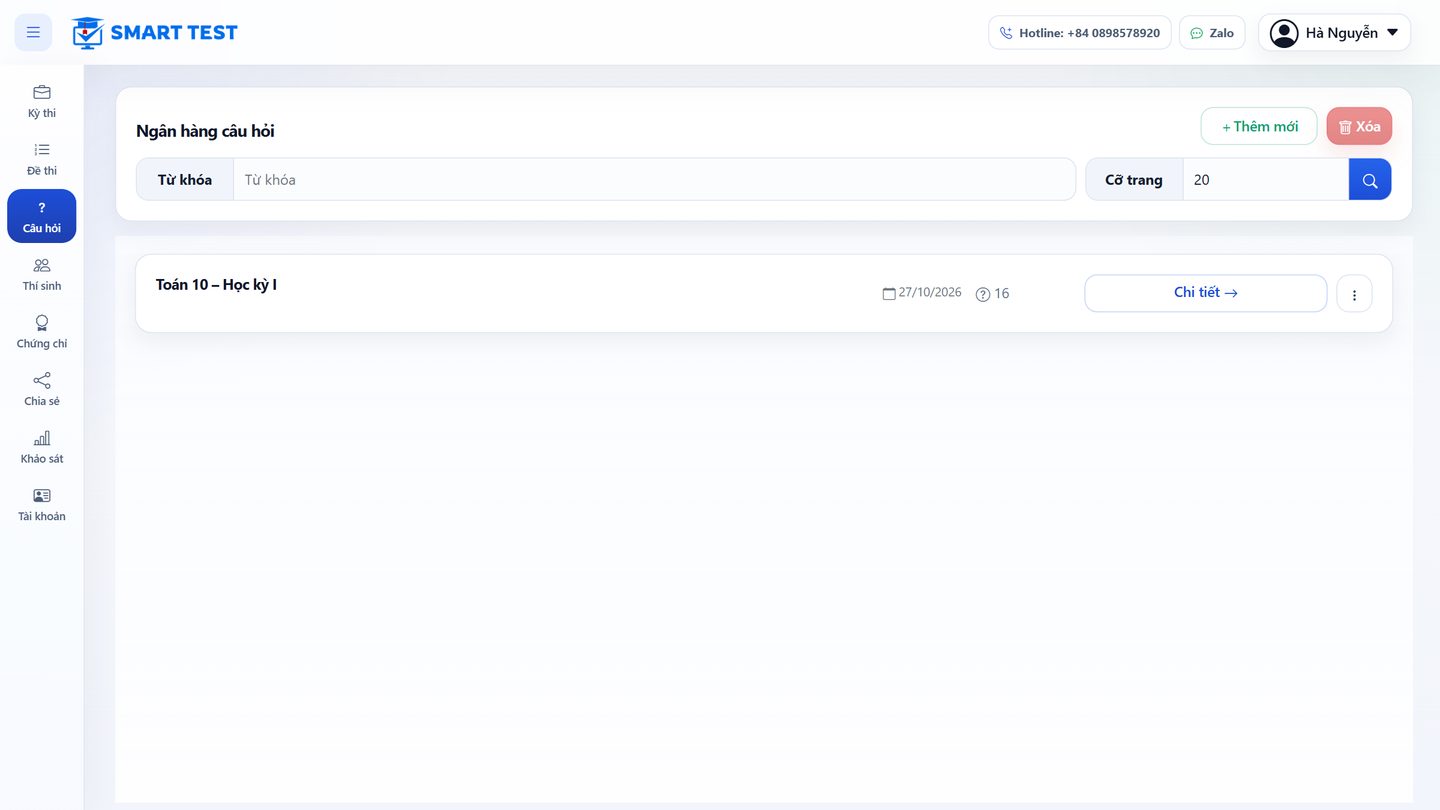
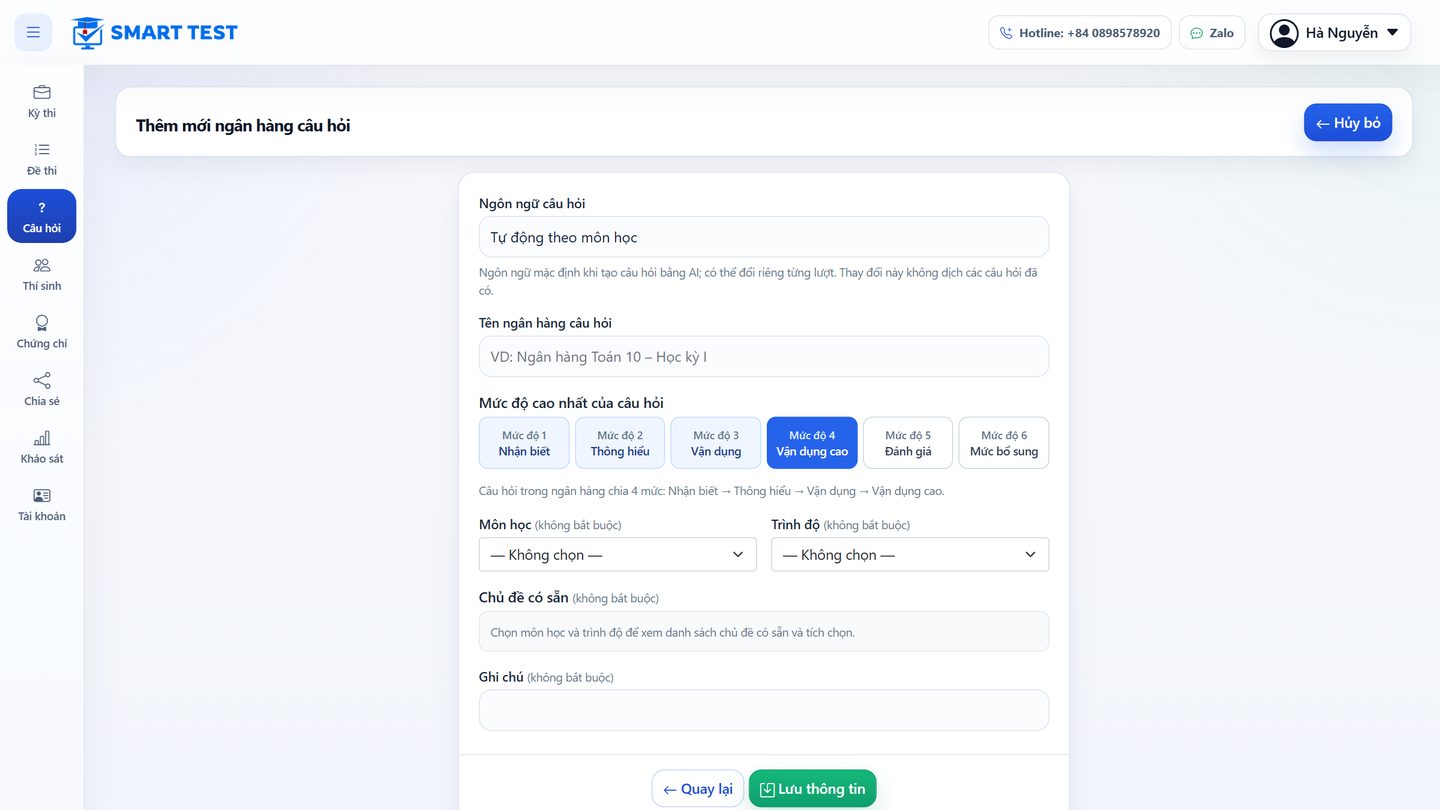
A question bank stores questions by topic and level (Remember, Understand, Apply, Advanced apply) so you can build tests from it again and again. Open Questions, click Create and name the bank and its subject.
Click Details to see the topics and the number of questions per level. Click Add at the bottom of the table to add a topic.
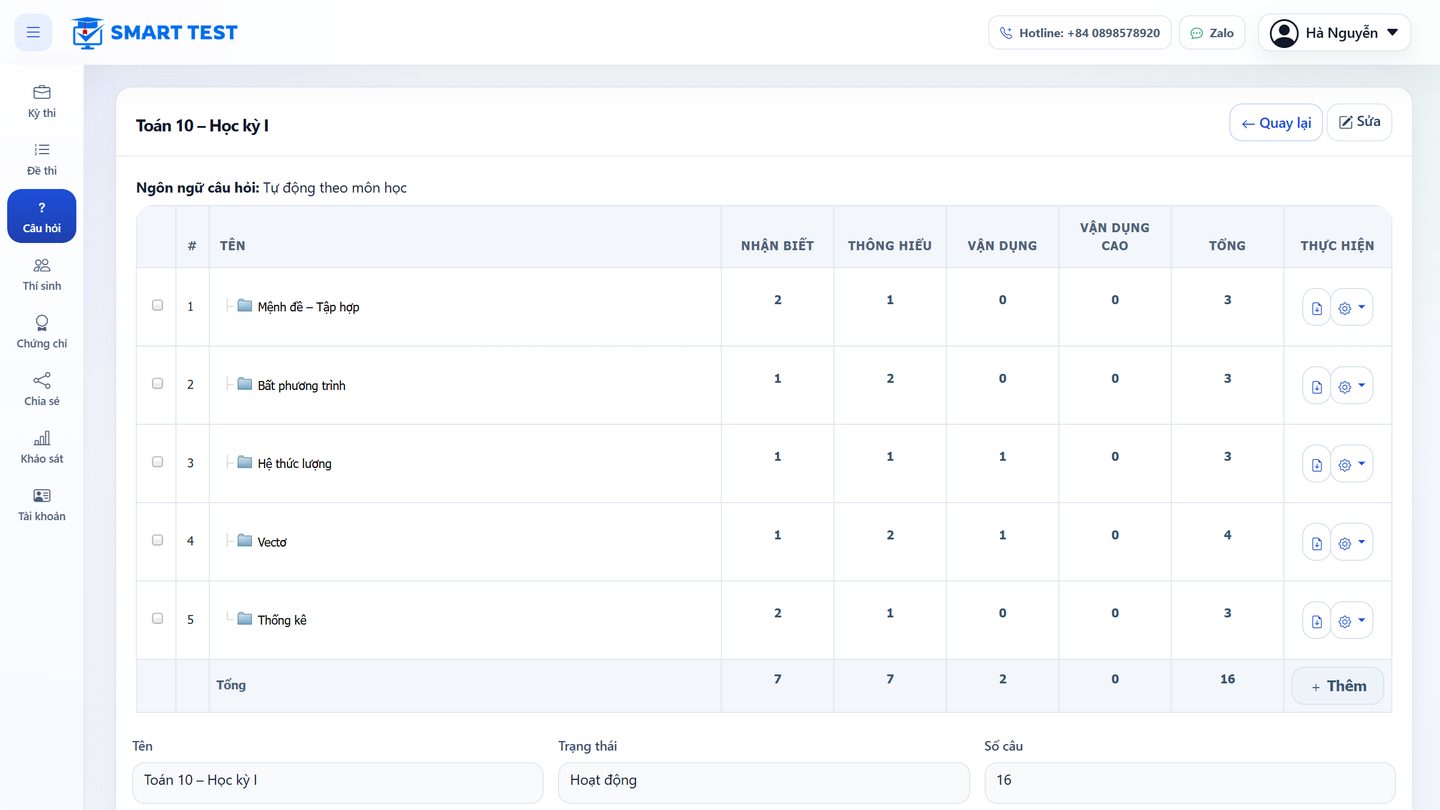
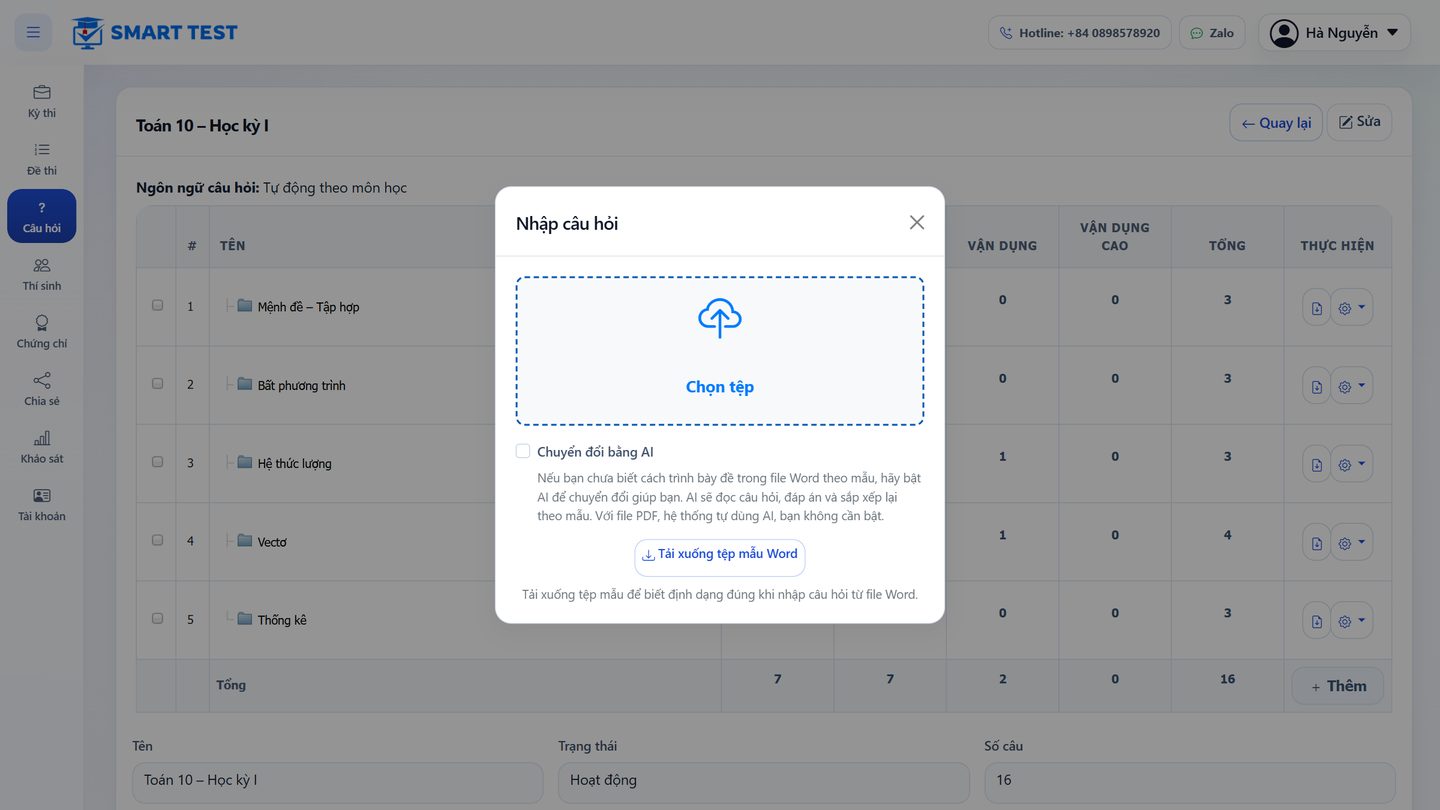
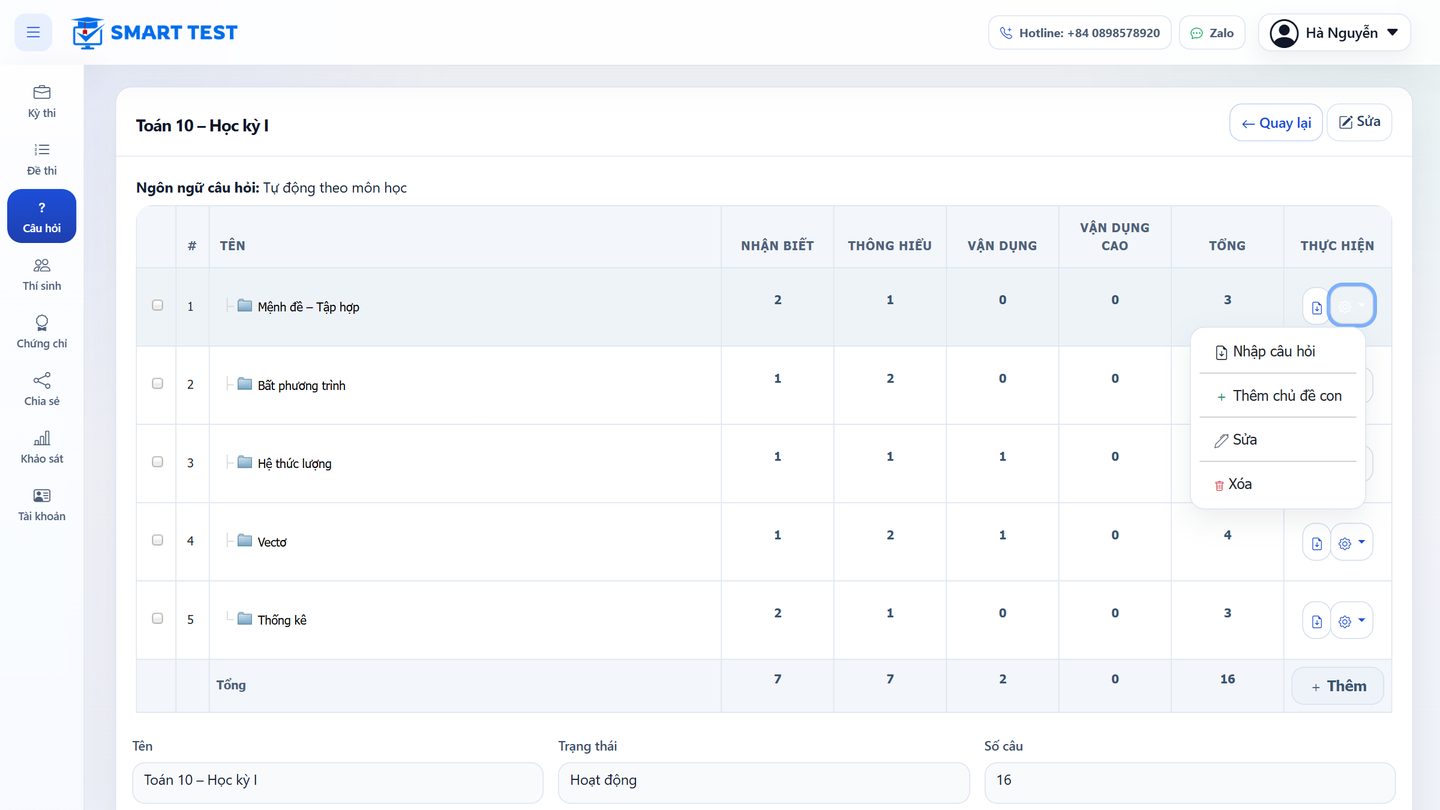
In the Actions column of each topic, the Word icon opens the Import questions window for a Word file (laid out as the table template, or with AI conversion on). The gear button adds a sub-topic, edits or deletes the topic.
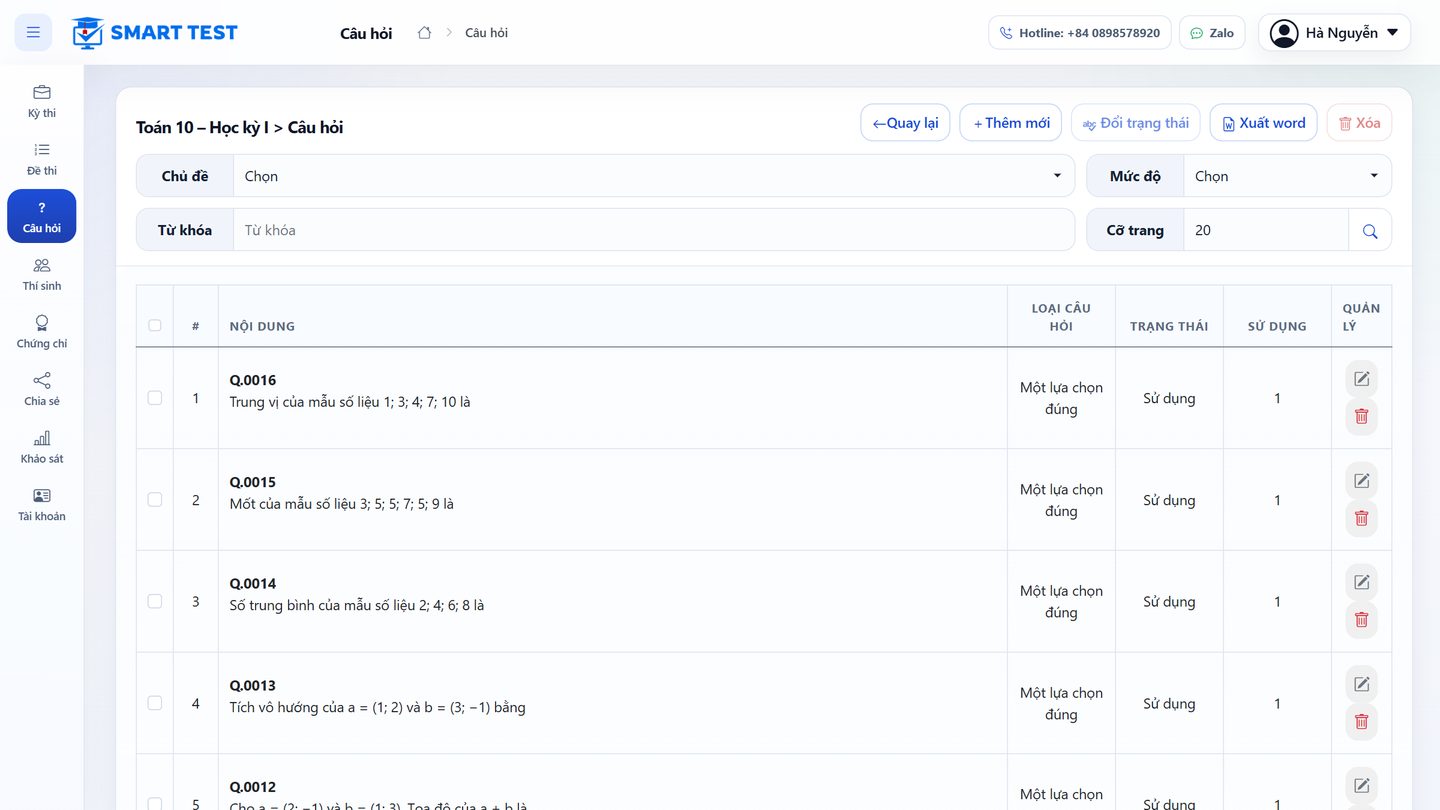
Click a question count to see the questions: filter by topic and level; edit, add questions or export to Word.
Create a test from a question bank
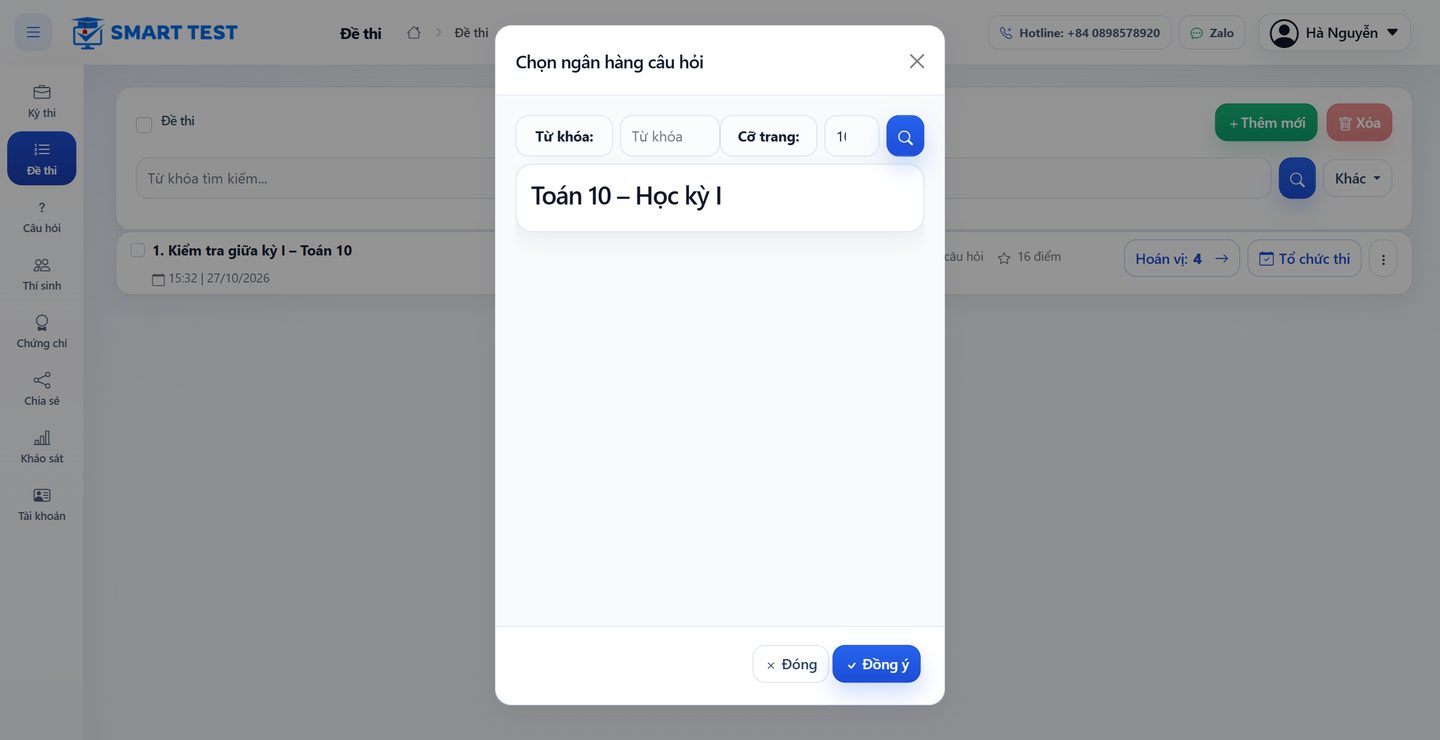
- Tests → Create → Create test from question bank.
- Pick the question bank and click OK.
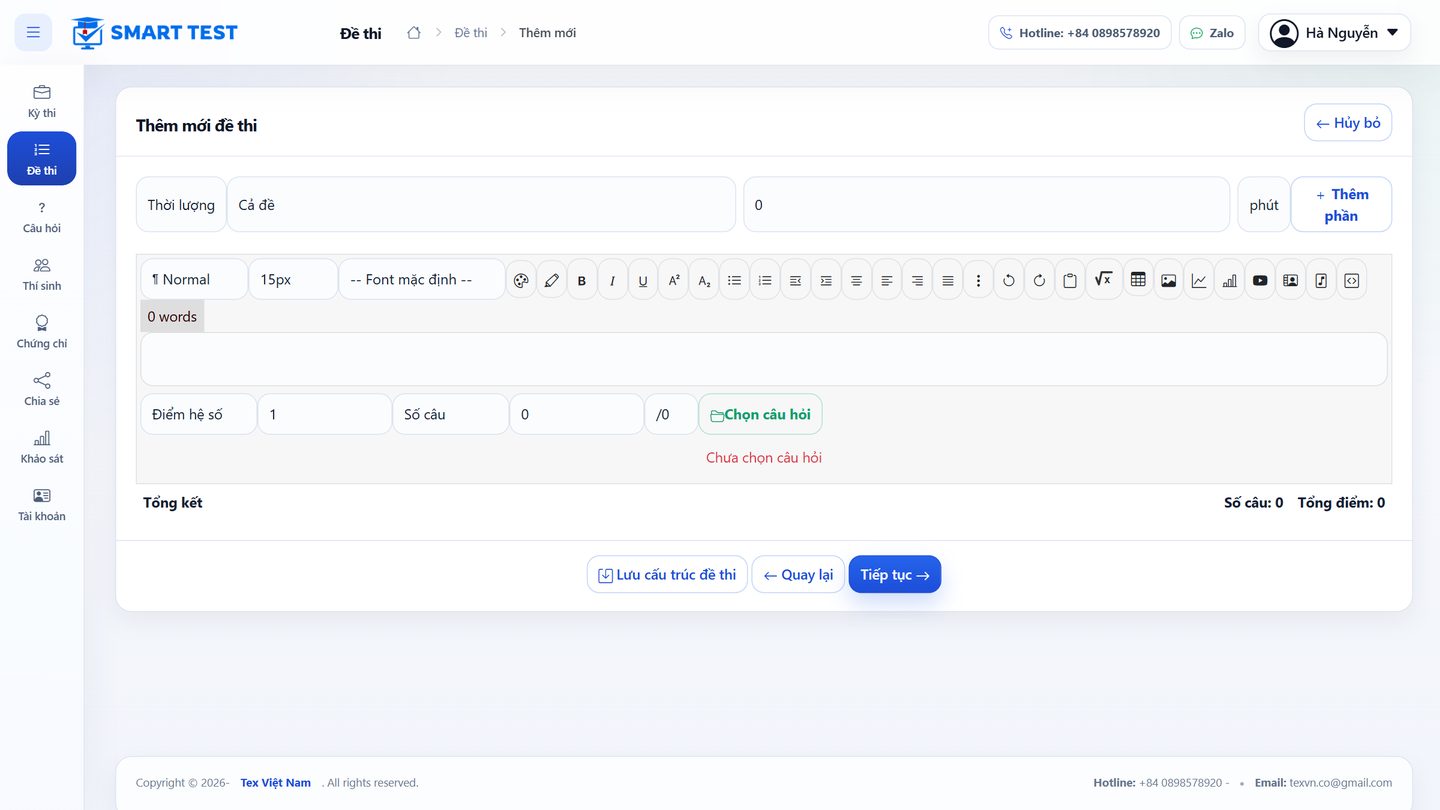
- Enter the duration and split the test into parts; in each part click Choose questions by topic and level and set the weight.
- Click Save test structure to reuse it, or Continue to generate the test and its shuffled versions.
Create a test with AI
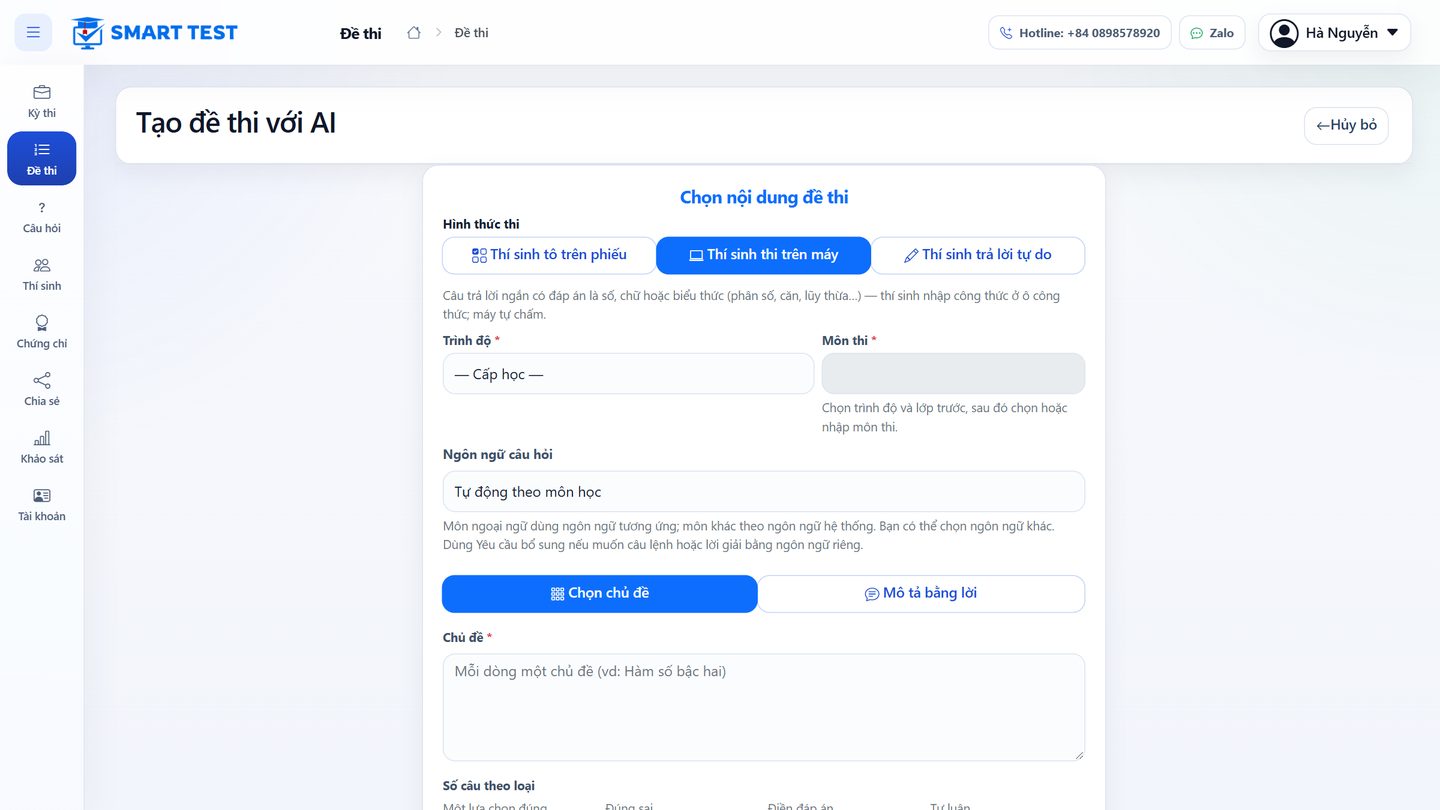
Tests → Create → Create test with AI. Choose the exam format, school level and subject; pick topics or describe the content in words; set the number of questions per type and level. AI writes the questions with answers for you to check before saving.
Student list
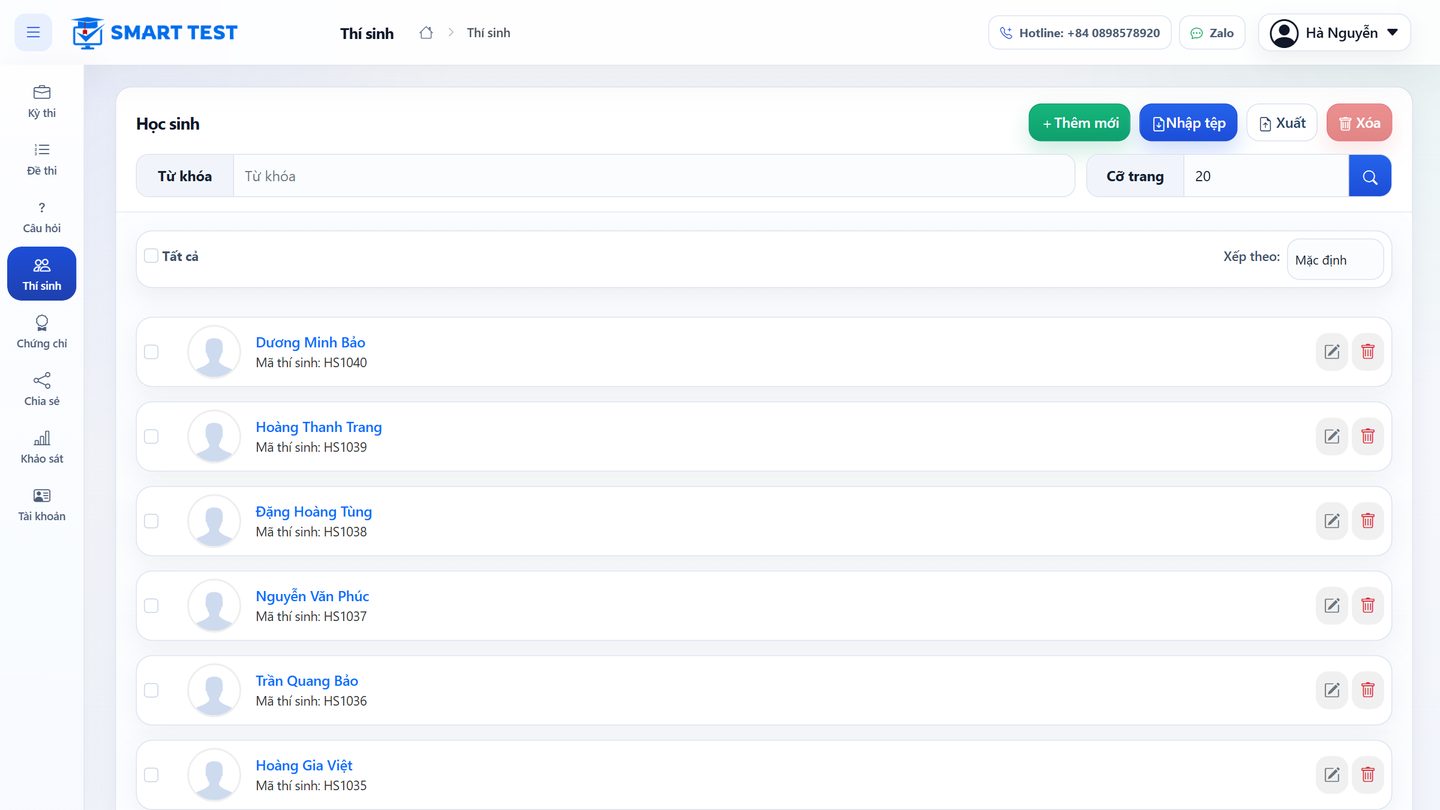
The Candidates menu keeps the students shared by all exams: add them one by one, Import file from Excel, Export the list or edit details. Candidates imported into a subject are saved here too.
Preparing the Word file for import
Write the test as a table in Word. If you would rather not use the table, turn on Convert with AI when importing. The sample test (.docx) can be downloaded from the import screen.
Multiple-choice and passage-based questions
The table has 6 columns:
- No.
- Question code: required.
- Question content: the question and its options.
- Answer: the correct answer.
- Question type: leave blank for A, B, C, D multiple choice.
GRmarks a question group (reading passage);PRkeeps the order of the questions in the passage and only shuffles their options when mixing versions. - Level: the difficulty code of the question.


True/false questions
The same 6 columns; the Answer column gives true/false for each statement, for example ĐSĐS (Đ = true, S = false), and Question type is ĐS.

Essay questions and file-upload tasks
Columns: No., Question code (required), Question content, Score (for example A:1 or A:1.5), Type TL. Under each question add a row for the grading guide, and merge the first two columns of that question.

For practical tasks, choose type Essay when saving the test and tick Attachment only in the Properties tab: candidates do the work on their computer and attach the file.
Matching: drag into place
Leave Answer blank, set Type to MC2 and leave the Fixed column blank.

Matching: connect two columns
Leave Answer blank, set Type to MC and leave the Fixed column blank.

Sentence ordering
Arrange words and phrases into a complete sentence. Leave Answer blank, set Type to RW and leave the Fixed column blank.

Certificates
SmartTest issues certificates with a verification QR code to candidates who pass. See the certificate guide (Vietnamese).
Support
Need help? Contact the SmartTest hotline, email or Zalo support group at the bottom of the page.